Free 186 More Best Homemade Tools eBook:  
Get 2,500+ tool plans, full site access, and more.

User Tag List

Page 2 of 3 FirstFirst 1 2 3 LastLast
Results 11 to 20 of 28

Thread: Help!!!

  1. #11
    Supporting Member
    Join Date
    Oct 2015
    Posts
    28
    Thanks
    4
    Thanked 6 Times in 4 Posts
    Frank:
    Now the quality assurance side of me is kicking in. If your idea is to do a weld repair and insitu machining - this can only be a stop gap measure until you get it back to the shop. Any welding in a highly stressed area needs to be heated up to a pretty high temperature before, during and after welding. Then you need to stress relieve that welded area, or it will just crack again and again. You might also consider MIG welding a 60 series wire in the root and then stick weld the filler and cap using 7018 rods. This way you can control the warping a bit better. After your all done, use magnetic particle inspection to check for surface cracks you might have induced during your welding and or grinding process.
    Hope this helps.
    Nixrox

    186 More Best Homemade Tools eBook

  2. #12
    Supporting Member Frank S's Avatar
    Join Date
    Aug 2015
    Location
    Peacock TX
    Posts
    11,716
    Thanks
    2,228
    Thanked 9,207 Times in 4,399 Posts

    Frank S's Tools
    now that you brought that up we might help out the op with a few tips on WPQR. I don't know about the OP but I passed my first 6G back in 1967. and most recently before I retired in 2013 I spent 10 years in the middle east as the senior engineer for a company among my many duties I was over the QAQC,
    For my elevators and freight lifts that I designed i was probably a little strict when it came to fabrication procedures but some of them had to lift 30 to 40 tons as high as 60 feet others were just human meat boxes with no more requirement than to carry 10 to 15 passengers up 15 to 30 floors. No real challenge there after all OTIS had been doing it for over 100 years.
    7018 has its place and has been the gold standard in the industry for years but it is hardly the only filler for all applications.
    about everything I've spec to be welded out structurally for the past 30 years has been FCGMAW for those who are not aware of the acrnym that is fluxcored gas-shielded metal arc welding. OR AWS D1-1 FCAW for short.
    My filler of choice (mostly just a personal preference) because I can use it in a very wide variety of applications, has been Hobart Excell 550 E71T1-1 with either 100% Co2 or 75/25 Argon Co2.
    Here again this is not the absolute last in fillers particularly when dealing with building up the bearing race of a small er truck spindle, larger ones OK' anything thicker than 3/8" wall, unless the welder is well versed in being able to use very low amperages and voltages. ER 70S6 with 75/25 set just high enough to have a stable arc will do just fine even beter than a much stronger filler due to not wanting to induce more heat than needed.
    Prior to welding on a truck spindle it needs to be cleaned any work hardened bilby layer needs to be ground off using iether a small belt sander or a rt angle grinder whit a soft 36 grit floppy disc. then the spindle should be slowly and evenly heated to not more than 300°f a few inches to both sides of the proposed weld area.
    if using a mig as I said try to obtain the smallest possible stable arc. weld in a cross stringer pattern never starting or stopping at either end if using stick electrode NEVER EVER EVER USE 6011 filler material. the arc pattern is too random and deep penetrating. the same goes for the all favorite pipe welders root rod 6010 or 5P as we know it.
    7018 as stated will work just fine but use the smallest diameter filler you can buy. the idea here is to build up not to fill a crack.
    years ago before the filler material manufacturs gobble up Murex (spelling) products made a 1/16" diameter rod that welded like 7018 will overhead but had the buttering flow characteristic of an iron powder 7024 in the flat position.
    make only a few side to side stringers at a time then wait until the temp. is below 250°f in the weld area before makeing a few more passes. start the process at 6o'clock weld to 7oclock then start at 1 o'clock and weld to 12o'clock then 6 o'clock to 5 o'clock then 11 o'clock to 12 o'clock then 7 to then 8 to 11 then 2 to 1 then 5 to 4 then 10 to 11 then 4 to 3 then 8 to 9 then 3 to 2 then 9 to 10. the pattern is not absolute but maintains a reasonably even flow of heat . after welding is complete a low post heat of around 300°f gradually reducing over 10 minutes or so. you will be ready to start dressing the weld to round. and the finished size but the final grinding should not be done until the spindle has returned to ambient temp. for a 3to 4" diameter bearing surface you will want +0000'-.0005" max.
    Another way to weld up the spindle would be with an Exothermic metalizing spray like that of Ram Airco or Study they use ox/act flame and powdered metal dust. the torch is held several inches away for the preheated part and the powder is sprayed through the flame. the part never receives the electrical shock treatment that mig or wire can do and stays at around 300 to 400°f throughout the whole build up process. I've used them to weld up everything from crankshafts to the leading edges of gas turbine blades in the past.

    2,500+ Tool Plans
    Never try to tell me it can't be done
    When I have to paint I use KBS products

  3. #13
    Supporting Member Frank S's Avatar
    Join Date
    Aug 2015
    Location
    Peacock TX
    Posts
    11,716
    Thanks
    2,228
    Thanked 9,207 Times in 4,399 Posts

    Frank S's Tools
    Nixrox the repairs need not always be a stop gap measure your are correct though in most cases about the recovery of highly stressed parts. sometimes things absolutely must be stress relieved prior to any repair procedure such a broken crankshaft we repaired once it would have been impossible to rejoin the 2 pieces with any success had we not placed in in an oven for 24 hours to soften and normalize it then it had to be returned to its hardened condition prior to regrinding it back to origonal like new condition.There was also a pretty heavy duty fixture that had to be made then normalized then machined to hold the shaft before the shaft could even be put in the oven as well
    but in the case of spindles housings like the OP has the practicality of doing this and the necessity is not warranted.
    Some guys I know who have an Axle Doc. Franchise can repair on location as many as 4 spindles or replace all 4 in a day . and never remove an axle from under a truck or trailer.
    Never try to tell me it can't be done
    When I have to paint I use KBS products

  4. #14
    Supporting Member
    Join Date
    Oct 2015
    Posts
    28
    Thanks
    4
    Thanked 6 Times in 4 Posts
    Frank:

    I really did not want to get into the finer details of the welding procedure - we use welding engineers to do that here in Alberta. You would need to be either a CWB certified level 3 weld inspector, or a welding engineer to make any welding recommendations - especially on a motor vehicle.

    However, I have been a certified non-destructive technologist and teacher for the last 30 years. I have worked with many engineers on hundreds of failures. I can tell at a glance whether a weld will pass a visual inspection. But if I really want to thoroughly check out a weld, I use either ultrasonics or x-ray to inspect it. I always follow up with either magnetic particle, or die penetrant to check for surface defects.

    In the aircraft industry - no defects are allowed. It was real easy to inspect anything.

    On the industrial side, I have had to deal with ASME and CSA specs and codes. Trust me - they allow a significant amount of defects to pass, as long as they are round with no sharp edges that can initiate a stress riser crack.

    So having said all this - getting back to my original point - field repairs are just that - they probably need to be thoroughly checked out once the vehicle gets back to the shop. In addition, this is also a good time to use the services of a structural and/or welding engineer to put a plan and procedure in place to mitigate this ever having to be done again.
    Just my two cents worth.
    nixrox

  5. #15
    Supporting Member
    Join Date
    Oct 2015
    Posts
    28
    Thanks
    4
    Thanked 6 Times in 4 Posts
    Frank:
    You are right about that. The most absolutely rediculous field repair I ever saw, was that guy up in Alaska who flew his piper cub into a remote location for some prime fishing. They caught a bunch of fish and then put those inside the aircraft and proceeded to go out and catch some more. When they got back a really big bear had feasted on the fish they left in the aircraft. However in doing so he literally wrecked the aircraft - remember it is only fabric covered. He came up with an ingenious idea to do a field repair - use duct tape. They had a mobile phone and were able to call their base to deliver a case of duct tape and a new tire because the bear had even flattened one of those. A few hours later he flew the aircraft back to base. It looked awful but it flew. It never ceases to amaze me what some people are willing to fly.

  6. #16

    Join Date
    Oct 2015
    Posts
    8
    Thanks
    0
    Thanked 0 Times in 0 Posts
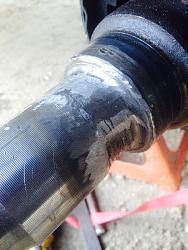
    I'm trying to upload a photo.. But it's a bit tricky from this phone. Help!!!-image.jpg this truck is an 08 dodge 1 ton dually.
    Last edited by Chrishd; Oct 15, 2015 at 06:38 PM.

  7. #17
    Supporting Member
    Join Date
    Oct 2015
    Posts
    28
    Thanks
    4
    Thanked 6 Times in 4 Posts
    So after seeing the picture and explanation provided by Chrishd - I can ask this question - why would you go to so much effort when there are literally hundreds of Dodge dually rear ends at your local Pick-n-Pull? You could spend your time and money replacing all the bearings and seals on an axle that has not been as badly damaged as yours and still be out the next weekend seeing if you can do it again.

    I have a Chev with a dually 11,000 pound rear axle and every time I go there to find parts - the Dodge trucks out number the Chevys or Fords two to one. There should be plenty available in your area.

  8. #18

    Join Date
    Oct 2015
    Posts
    8
    Thanks
    0
    Thanked 0 Times in 0 Posts
    Basically because I'm cheap. Lol. And I can't afford to buy the housing. At least not right now. And so I'm on a time deadline. And this is an after work project for a friend and he is also cheap

  9. #19
    Supporting Member Frank S's Avatar
    Join Date
    Aug 2015
    Location
    Peacock TX
    Posts
    11,716
    Thanks
    2,228
    Thanked 9,207 Times in 4,399 Posts

    Frank S's Tools
    OK thanks for the pic.looking at it Nixrox has a valid point. However you still have other possibly less expensive and time consuming options available to you that is"maybe". Because from what AI am seeing you also have seal area damage this could possibly be fixed with a micro sleeve though
    One very easy thing to do would be to call around and ask for a damaged housing buy just a cut section from it as long as the cut was made on the tube far enough from where the spindle is welded on to allow you to chuck up the spindle and remove the tube keeping the 2inch long location boss of the spindle intact.
    Next it would still be better to pull the whole diff out from under the truck just to make the repair that much more accessible and easier. With a good impact a couple of good jack stands a floor jack and an hour's time the rear end can be out from under the vehicle and on a pair of pipe stands ready for mutilation so to speak.
    if you are good with a torch ad have a scarfing tip some call it a gouge or washing tip for your torch you can scarf off the weld and see the join line of the tube and spindle if you are careful you wont even damage the end of the tube. but if you do it is not the end of the world. After scarfing off the weld or removing it with a grinder if you want. you will need to remove the spindle from the tube. heat the tube all the way round enough that the spindle can be removed. a good 10 lb slide hammer is helpful here. clean up the weld area for both parts warm the tube again and tap the new spindle in place. getting it square is fairly easy with a few parallel bars and a couple of long straight edges and a vernier caliper.
    weld it up as if your were going to try and pass a pipe weld test or cheat and roll it reassemble and job done.
    another option would be same as above but build up the spindle and turn it back to size in a lathe.
    In my opinion either of the solutions above would be faster than having to spend the time and expense to make the belt grinder apparatus I drew for you. Plus you would get a better job done doing it.
    Never try to tell me it can't be done
    When I have to paint I use KBS products

  10. #20
    Supporting Member
    Join Date
    Oct 2015
    Posts
    28
    Thanks
    4
    Thanked 6 Times in 4 Posts
    The part that is really scary for me about this project - is these fellows will try to complete a complex repair on a pretty critical piece of equipment without having either the skills, training and/or experience to even understand that they might endanger someone's life - even their own. I can only hope that this is an 'OFF ROAD' vehicle. If they are going to drive it on the highway, I guess I can rest comfortably knowing they are thousands of miles away from me.

    I will keep repeating this - if you don't have the tools, training and experience please do not attempt to alter a vehicles basic undercarriage or steering components. The reason being is that if you screw up - someone is going to be killed.

Thread Information

Users Browsing this Thread

There are currently 1 users browsing this thread. (0 members and 1 guests)

Bookmarks

Posting Permissions

  • You may not post new threads
  • You may not post replies
  • You may not post attachments
  • You may not edit your posts
  •