Free 186 More Best Homemade Tools eBook:  
Get 2,500+ tool plans, full site access, and more.

User Tag List

Page 6 of 20 FirstFirst 1 2 3 4 5 6 7 8 9 10 11 12 13 14 15 16 17 18 19 20 LastLast
Results 51 to 60 of 198

Thread: Good advices for a newbie (threading tools lathe)

  1. #51
    PJs
    PJs is offline
    Supporting Member PJs's Avatar
    Join Date
    Sep 2014
    Location
    Northern CA
    Posts
    1,844
    Thanks
    8,431
    Thanked 1,129 Times in 725 Posts

    PJs's Tools
    That panel will look great when its all polished up. And boy do I get all the hand work to get it to size, shape and finish. I agree with C-Bag about investing in clamps and a vice, even though I don't own a mill yet but used them over the years. The other is to get an import adjustable boring head. A few on e-bay but new imports aren't that pricey with bits. My brothers Grizzly (2"-50mm) one does surprisingly well. Nice camera deal! Look forward to your new pics with it.

    Look forward to seeing what you come up with for your chassis...particularly the Faraday cage out of 316. Not sure if its available in your area but copper screen will work also and much easier to form. Stainless here is sometimes more than copper price wise. I've built a few over the years, my best was a separate power supply for a RX/TX pair of old Navy TCS's. I finished restoring the receiver but the transmitter had a broken shaft on one of the tuning caps and never found another...both in storage now. Also built a large HV 1.5/3kv supply and had to use heavy gauge AL to support the Xformer and in a make shift break at that. Built a small O'scope back in the day with a 3fp7 and a 4U rack panel front. Not much else other than some of the industrial stuff I did for a living.

    I hear ya C-Bag about having access to scrap bins and discontinued stuff within reason...now its the junky's/scrap guys and they are pricey anymore. Also hear you about the wood racks. My Proto for the sound table stuff was an angle faced wood contraption which now supports my lathe with a 4U drawer for all my lathe tools and cheapy wood machinist box in the bottom. When I built the clinical version I used a laminate one from Sweetwater (in the pics before) and you are right about the isolation! Luckily the 3Ghz rack computer housing had a fair amount of caging in it to start with.

    186 More Best Homemade Tools eBook
    ‘‘Always do right. This will gratify some people and astonish the rest.’’
    Mark Twain

  2. The Following 2 Users Say Thank You to PJs For This Useful Post:

    C-Bag (Feb 13, 2016), rendoman (Feb 12, 2016)

  3. #52
    Supporting Member rendoman's Avatar
    Join Date
    Nov 2015
    Location
    Italy
    Posts
    435
    Thanks
    451
    Thanked 496 Times in 241 Posts

    rendoman's Tools
    I'm seeing that both of you have built and experienced many things! that's nice!
    It seems very nice the wooden rack!
    you're right about the tools, maybe i need a import kit ( or maybe some professional used one ), now i'm blocking parts with few drilled Irons and m10 bolts, paying particular attention.
    A question, this evening i used the second tool i have for boring, it's an old home made boring from 18 to 35mm, a bit crooked the problem is that for using this i had to drill 18mm with a mill ... i'm asking, how many tools I need for making holes from 20 to 50mm? I see some "large" modern boring head, but I think i need more than one right? I found some project of this, maybe i will try building one for test ... ( yes for now i finished money for tools )
    I didn't think to copper for faraday... mmm ... for sure it's easier to ply. I have to think a good shape for the little cage don't know if round or square ...
    large HV 1.5/3kv supply is really though! i think that all parts and layout are well designed to run at this voltage!
    I got some good pics of this friday night, weather isn't so good, and no one gets out... then i decided to go to my garage
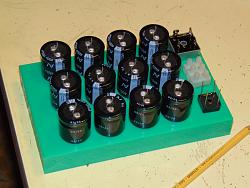
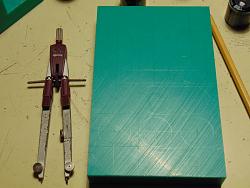
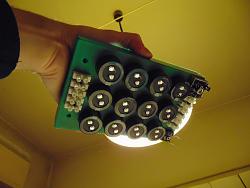
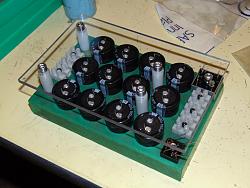
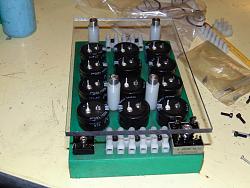
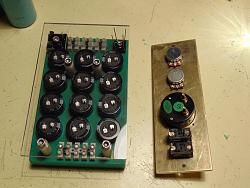
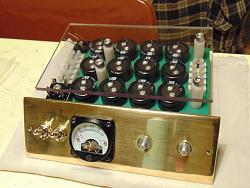
    I found some scrap of Polizene, the green panel, and plexy as top cover. It's a bit large, but i prefer keeping safe capacitors and all high voltage parts, plus the solid frame of power supply allows to anchor with m8 to the iron main frame.
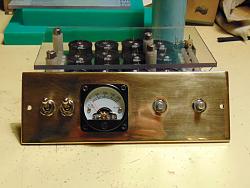
    I post a pic of semi-finished front panel, that's why i wanted brass i reject the poor "on/off" little plate of switch, too low quality. Maybe I will learn how to engrave some little plate with "HV", "Filaments" and some round decorations like those of rifles. ( yeah i love rifles )

    The new camera is pretty good! It's a bit different from old coolpix, here I can't see "macro" key, but i can do this mode approaching really close to object with few zoom. Impressive the 35x zoom and the high iso, compared to my old camera this is a shuttle

    Ps: I post a couple of diy ...tool... an italian werewolf ragu' with double salamella of friday night (don't know the name in eng, Google translator can't help, it's similar to a sausage but more flavorful, 100% pig)

    Good advices for a newbie (threading tools lathe)-dsc00022_1600x1200.jpg Good advices for a newbie (threading tools lathe)-dsc00024_1600x1200.jpg

    Good advices for a newbie (threading tools lathe)-dsc00026_1600x1200.jpg Good advices for a newbie (threading tools lathe)-dsc00027_1600x1200.jpg

    Good advices for a newbie (threading tools lathe)-dsc00028_1600x1200.jpg Good advices for a newbie (threading tools lathe)-dsc00030_1600x1200.jpg

    Good advices for a newbie (threading tools lathe)-dsc00031_1600x1200.jpg Good advices for a newbie (threading tools lathe)-dsc00037_1600x1200.jpg

    Good advices for a newbie (threading tools lathe)-dsc00040_1600x1200.jpg Good advices for a newbie (threading tools lathe)-dsc00041_1600x1200.jpg

    Good advices for a newbie (threading tools lathe)-dsc00042_1600x1200.jpg Good advices for a newbie (threading tools lathe)-dsc00044_1600x1200.jpg

    Good advices for a newbie (threading tools lathe)-dsc00045_1600x1200.jpg

    2,500+ Tool Plans
    Last edited by rendoman; Feb 12, 2016 at 09:22 PM.

  4. The Following 2 Users Say Thank You to rendoman For This Useful Post:

    C-Bag (Feb 13, 2016), PJs (Feb 13, 2016)

  5. #53
    Supporting Member C-Bag's Avatar
    Join Date
    Aug 2015
    Location
    California, central coast
    Posts
    720
    Thanks
    689
    Thanked 879 Times in 471 Posts

    C-Bag's Tools
    Too bad there isn't a emoticon for "ohhhhh looking good". Especially the dinner. I can't digest pasta and wine gives me an instant headache( I'm not joking) so Italian food I generally stay away from. But the meal in the pix looked like my kind of meal.

    My brother is the expert machinist, so between him and you tube I've learned most of what I know. So anything I say might be suspect. I traded to him for a R8 boring head for my drill/mill. Besides the range of the head, being true and fitting the head of your mill properly would be most important factors I would think. The range of the head is also determined by the size of the boring bars you buy for it. The boring bar sets have different lengths and different size cutter heads. The smaller the cutter head, the smaller the hole it will fit into.

    Another important tool the mill are 123 blocks and or jig blocks. Along with the clamp kit and milling vice they are essential for hold stuff steady and true. Wood crushes and comes loose. Nothing is worse than getting to end of a cut and having the piece start coming loose and mess up the whole thing.

    Most of my machining stuff is made in China. My lathe and drill/mill and most of the tooling. My measuring tools from when I was an automotive mechanic is all Starrett and Brown and Sharp. You might get lucky and find a clamp kit but here they are only like $40 at Harbor Freight and you almost never see them used even though every mill you see on Craigslist has a kit with it. But you seem really lucky at finding stuff. Good luck.

  6. The Following 2 Users Say Thank You to C-Bag For This Useful Post:

    PJs (Feb 13, 2016), rendoman (Feb 13, 2016)

  7. #54
    PJs
    PJs is offline
    Supporting Member PJs's Avatar
    Join Date
    Sep 2014
    Location
    Northern CA
    Posts
    1,844
    Thanks
    8,431
    Thanked 1,129 Times in 725 Posts

    PJs's Tools
    Looks pretty good Stefano. A couple of things about the green base material and components. The Caps will tend to swell a bit during use and over time and depending on the type there is a small relief valve usually on the bottom where the terminals are. A lot of times if they rupture they will "Pop" the top loose, so I probably wouldn't press fit them into the holes but leave a slight clearance...the wiring will hold them in place or maybe a dab of hot glue if it will stick to the green stuff (HDPE-polyethylene HD??)...not much sticks to it? Second I might put a "U" shaped piece of AL sheet between the bridges and green stuff to act as a heat sink, maybe with some heat sink film applied, like CPU's to heat sink. If it is Polyethylene the heat may also loosen the threads on the hold down screws if threaded directly into the HDPE. Not sure what kind of power you will be making here??

    Look forward to what you come up with on the Faraday cage. It will be interesting I think with the wires needing to enter & exit what ever shape you come up with, which may be something to consider for its effectiveness.

    If the Home made boring bar is in Pic 4 you will need "several bits" for it to reach your size. Grizzly makes a 2" (50mm) adjustable kit for ~$90US. Not sure what your spindle is but should be able to buy/find just a head and put your mills size adapter on it...although it's better to get what you need as a kit. It will save you a lot of effort and time. C-Bag is absolutely correct about the wood giving way under pressure and heat transfer. It's definitely Not Ideal but can be used in a pinch if clamped properly with light feed pressure.

    Nice pics and lovely looking home meal...love the sausage!
    ‘‘Always do right. This will gratify some people and astonish the rest.’’
    Mark Twain

  8. The Following 2 Users Say Thank You to PJs For This Useful Post:

    C-Bag (Feb 17, 2016), rendoman (Feb 13, 2016)

  9. #55
    Supporting Member rendoman's Avatar
    Join Date
    Nov 2015
    Location
    Italy
    Posts
    435
    Thanks
    451
    Thanked 496 Times in 241 Posts

    rendoman's Tools
    That a nice kit! I have to do some research in next future, i see similar "nice looking" china product, the same sold on ebay europe. I need some good tools for making large hole , and even some good drill bits
    you have eye on electronic components! that's really good! ( because if I make some mistake you can stop me in time )
    you're right with caps, mine havn't valve, only soft top disk. I drill 10mm passing hole, then 20mm flat mill and as last passage my old boring bar, the result inside is ugly finishing, but i made a bottom pocket of 20mm with central hole good as exit in case of rupture.
    right! green panel is high density polyethylene, I don't know if some adesive can attach,i know that this material is used with chains transmission. good warning that the thread can melt with temp, i read that continuos temperature should be around 80°C and 120\130 melting point. I don't know the temperature of bridges in normal operation.
    I buyed a bridge for B+ 1000v 15a alu type, and 2 1000v 1A and 400v 8A, B+ for now is 440*1.414= 622v from 50 to 90ma in normal use, maybe at red plate of oscillator can be go up to 150ma, and 380v anode voltage for modulator should be under 50ma , I think I'm in "safe zone", but precautions are never not enough
    It's a good idea placing the bridge on alu, for heat and for a better Anchorage, i will think how to modify them keeping low height, maybe a little drop with milling.

    Next thing to do is the real frame, small but capacius for all components
    see yaou next!

  10. #56
    PJs
    PJs is offline
    Supporting Member PJs's Avatar
    Join Date
    Sep 2014
    Location
    Northern CA
    Posts
    1,844
    Thanks
    8,431
    Thanked 1,129 Times in 725 Posts

    PJs's Tools
    Over all I typically double my usage amps/ma to calc the wattage....looks like you may be around 100W worst case running. Double that and take a look at the specs for the bridges. Likely what will happen with the HDPE is it will soften over time as the chains break down so the threads won't hold as well unless you use a screw with a recessed nut on the underside. A simple small piece of 14-16ga aluminum sheet folded up around 2 sides and up maybe 3/4" (19-20mm) with some saw cuts in it will suffice. However many are available already made for just a few bucks based on wattage and form from electronic stores/online. Better to be safe than sorry.

    There are adhesives that will work with HDPE (expensive 3M/Loctite)...not sure its worth it based on your design above with the through hole. Correct on the operating temp 80ºC although 110ºC is the rated continuous operating temp....best not to push it in my book, not knowing exactly what you have material wise. Personally I over build/engineer everything...to a fault sometimes.

    Look forward to what you come up for the case/frame. ~PJ
    ‘‘Always do right. This will gratify some people and astonish the rest.’’
    Mark Twain

  11. The Following User Says Thank You to PJs For This Useful Post:

    C-Bag (Feb 17, 2016)

  12. #57
    Supporting Member rendoman's Avatar
    Join Date
    Nov 2015
    Location
    Italy
    Posts
    435
    Thanks
    451
    Thanked 496 Times in 241 Posts

    rendoman's Tools
    Hi!
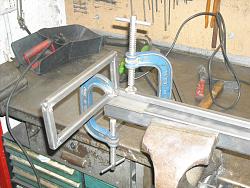
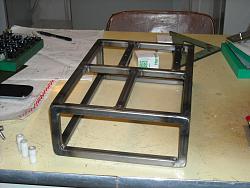
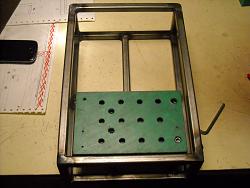
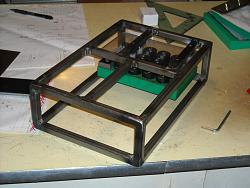
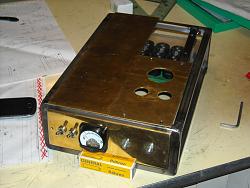
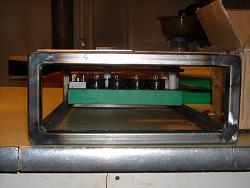
    few pic of update, it's a mess! i don't know how to do with frame, maybe i should drill many hole on frame for future needs, maybe not. The bad thing is that as prototype i will use 3 transformer, but i don't know the layout of the final transformer. Problems are not related to frame but to brass panel. If I mount tube socket and I weld components, the finishing should be final, I will not able to polishing at ending...
    It's hard to make a proto (and we are at beginning)

    I suspended powersupply with 4 m6, not a good work, i made the mistake of not disassembly parts, and drill bits pulled the green polietilene up, my mistake! i had to thread m12 and make a delrin grain, really a bad work, but for now is sufficient, i don't want for now to rebuilt the green panel

    I had to change original size because the space inside was really little. The new size will change something in aesthetics, maybe some wooden polished with true oil, I don't know
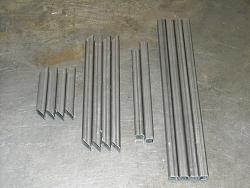
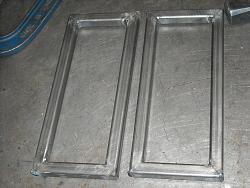
    a big BIG mistake is that I've used 15x15 1,5mm iron tube, with my old transformer welder (it don't go under 40A). Tube is too thin, holes everywhere with no current, i tried 1,6- 2- 2.5 mm electrode but in coupling position is too easy to make craters. And all because the shop in my area are so bad that keep only few size and they didn't have the 2mm thick tube.
    The result is not so professional, nor so excellent, but fortunately it's solid!

    very bad episode at ending of evening, I was cooking the ragu' for Tomorrow... i opened the tomatoes tin with too many brute force that the tin ran away from hand ... I splashed half kitchen!!! 2,5 on the wall rest of tomatoes... a disaster!
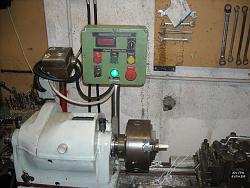
    a good news is that i put a led light for 230v on lathe

    Good advices for a newbie (threading tools lathe)-dscn0117_1600x1200.jpg Good advices for a newbie (threading tools lathe)-dscn0118_1600x1200.jpg
    Good advices for a newbie (threading tools lathe)-dscn0119_1600x1200.jpg Good advices for a newbie (threading tools lathe)-dscn0122_1600x1200.jpg
    Good advices for a newbie (threading tools lathe)-dscn0125_1600x1200.jpg Good advices for a newbie (threading tools lathe)-dscn0126_1600x1200.jpg
    Good advices for a newbie (threading tools lathe)-dscn0127_1600x1200.jpg Good advices for a newbie (threading tools lathe)-dscn0131_1600x1200.jpg
    Good advices for a newbie (threading tools lathe)-dscn0132_1600x1200.jpg Good advices for a newbie (threading tools lathe)-dscn0136_1600x1200.jpg
    Last edited by rendoman; Feb 16, 2016 at 09:10 PM.

  13. The Following 2 Users Say Thank You to rendoman For This Useful Post:

    C-Bag (Feb 17, 2016), PJs (Feb 17, 2016)

  14. #58
    Supporting Member C-Bag's Avatar
    Join Date
    Aug 2015
    Location
    California, central coast
    Posts
    720
    Thanks
    689
    Thanked 879 Times in 471 Posts

    C-Bag's Tools
    Wow! When you say heavy duty you mean it! If there was a nuclear strike in Italy that box would survive!

    Before mig welders got so cheap here there was a device called the "metal stitcher" that you replaced the work lead of your arc welder with. I never used one, but the idea was it automatically moved the rod in and out making it so you could weld thin sheet metal. They used to carry it as Eastwood but it looks like it went away. My little Lincoln 175T mig welds thin stuff really well. But if it gets really thin I oxy-acetylene weld it.

    I think I would have gone the sheet metal route for that case. Even though I don't have a metal brake. I do have a small plasma cutter and I've come up with a trick for making boxes with it. I draw it all out on the sheet and instead of cutting the whole crease I leave breaks in the cuts 1" long and space them along the crease lines. Then I can bend the box by hand. There are of course the gaps where the plasma cuts are, but if it's a place where I'm worried about aesthetics I put aluminum angle over the cuts. Makes for a classy looking box. With places like Harbor Freight and Eastwood selling these inexpensive mig's and plasma cutters now for around $400 and they are getting great reviews they are more affordable than ever.

  15. The Following 2 Users Say Thank You to C-Bag For This Useful Post:

    PJs (Feb 17, 2016), rendoman (Feb 17, 2016)

  16. #59
    PJs
    PJs is offline
    Supporting Member PJs's Avatar
    Join Date
    Sep 2014
    Location
    Northern CA
    Posts
    1,844
    Thanks
    8,431
    Thanked 1,129 Times in 725 Posts

    PJs's Tools
    I agree that is a beefy build and could definitely survive a drop from a plane. Most of the chassis' I've built have been from aluminum sheet. You can create a makeshift break from angle iron or even hardwood. As Peabody and the way-back machine remembers the 18x24 chassis I built for the HV power supply, I did with a wooden makeshift break from pallet oak. Took some time and finesse to work the 1/8" AL to 90º but got there, and easy to adjust size for the final bend.

    Your miters and fit up looked great Stefano, but welding is another story for me with out any mig/tig/arc. Have been eyeing a small mig but need to save and justify it for the stuff I do. I probably would have brazed it. Plenty strong enough and easy cleanup for this project.

    Nice Tip C-Bag on the Metal Stitcher! I have heard of those but thought they were large machines for HVAC or other sheetmetal work. Did find an article on it...very cool! Personally I love angle Aluminum, its really versatile, pretty straight and reasonably strong, and use it a lot.
    ‘‘Always do right. This will gratify some people and astonish the rest.’’
    Mark Twain

  17. The Following 2 Users Say Thank You to PJs For This Useful Post:

    C-Bag (Feb 17, 2016), rendoman (Feb 17, 2016)

  18. #60

    Join Date
    May 2014
    Posts
    4
    Thanks
    0
    Thanked 2 Times in 2 Posts
    Ciao Stefano ! See this eBay listing for lots of information and a video.

Thread Information

Users Browsing this Thread

There are currently 3 users browsing this thread. (0 members and 3 guests)

Bookmarks

Posting Permissions

  • You may not post new threads
  • You may not post replies
  • You may not post attachments
  • You may not edit your posts
  •