Free 186 More Best Homemade Tools eBook:  
Get tool plans

User Tag List

Page 2 of 2 FirstFirst 1 2
Results 11 to 12 of 12

Thread: Gasket alternative grooving tool

  1. #11
    Supporting Member tonyfoale's Avatar
    Join Date
    Nov 2016
    Location
    Spain
    Posts
    1,607
    Thanks
    721
    Thanked 2,706 Times in 726 Posts

    tonyfoale's Tools
    Quote Originally Posted by Rikk View Post
    Interesting that you use that phrase. That is the excuse I say to myself and a few machinist friends as to why I don't buy a DRO for my mill, but I substitute dials for Bridgeport.
    A lot of work has been done on mills without a DRO but they sure are useful and they save much time and help reduce errors. My mill came fitted with CNC and so I had DRO built in. I would say that only 5 to 10% of my work is done with CNC but 99% is done with the DRO.

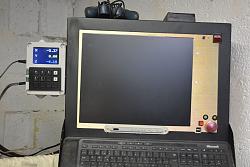
    I always felt guilty booting up a computer and CNC stuff just to read a DRO so a couple of weeks back I made an Arduino based readout which sits piggy back on the glass slides' signals. Now I only have to switch on an Arduino thingy to have a full 3 axis DRO with some calculation options which the CNC controller doesn't have. Here are some pix.
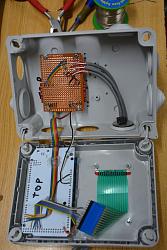
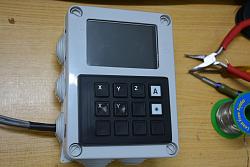
    Gasket alternative grooving tool-dro20.jpg Gasket alternative grooving tool-dro21.jpg Gasket alternative grooving tool-dro23.jpg
    Click images for full size.

    186 More Best Homemade Tools eBook

  2. The Following User Says Thank You to tonyfoale For This Useful Post:

    Rikk (Sep 20, 2019)

  3. #12
    Supporting Member Toolmaker51's Avatar
    Join Date
    Feb 2016
    Location
    Midwest USA
    Posts
    5,334
    Thanks
    7,044
    Thanked 3,011 Times in 1,900 Posts

    Toolmaker51's Tools
    Quote Originally Posted by Rikk View Post
    Interesting that you use that phrase. That is the excuse I say to myself and a few machinist friends as to why I don't buy a DRO for my mill, but I substitute dials for Bridgeport.
    Sorry no pix, my trick predates digital convenience by decades. Reinforced my admiration for absolute over incremental positioning. Best of all, it's cheap and cheerful, and great for multiple parts or re-use. Part of this will be familiar.
    By maintaining backlash, I've never found significant loss or gain in .200 per revolution dials typical of Bridgeport patterned machines. I'd run a strip of masking tape along lower edge of either axis, with a shorter piece below, at selected datum position. Mark that with a fine point inkpen, along with some indication of that coordinate; 0.000 for example. Move to next position from Zero counting .200's; (.200-.400-.600 etc) to next coordinate, ie 2.625. (will be 13 turns and .025). Mark that as you did origin. Continue across layout, and no reason this couldn't be first part. Go to lunch, come back after a weekend, it works fine to pick up where left off.
    The benefit is like a one line vernier, differentiating between say, 2.625 and 2.525, as the marked increments can only show on 'their' side of the dial, odd or even. Here in Los Angeles, it was easy to find machinists scales that were seconds. There was temptation to drill and countersink a 36", alas not easy as a strip of tape.

    2,000+ Tool Plans
    Sincerely,
    Toolmaker51
    ...we'll learn more by wandering than searching...

  4. The Following User Says Thank You to Toolmaker51 For This Useful Post:

    Rikk (Nov 8, 2021)

Thread Information

Users Browsing this Thread

There are currently 1 users browsing this thread. (0 members and 1 guests)

Bookmarks

Posting Permissions

  • You may not post new threads
  • You may not post replies
  • You may not post attachments
  • You may not edit your posts
  •