Free 186 More Best Homemade Tools eBook:  
Get tool plans

User Tag List

Page 1 of 2 1 2 LastLast
Results 1 to 10 of 15

Thread: formers and press tool to make steam lubricator body and lid

  1. #1
    Supporting Member thehomeengineer's Avatar
    Join Date
    Nov 2017
    Location
    Berkshire UK
    Posts
    737
    Thanks
    750
    Thanked 2,190 Times in 428 Posts

    thehomeengineer's Tools

    formers and press tool to make steam lubricator body and lid

    Hi All
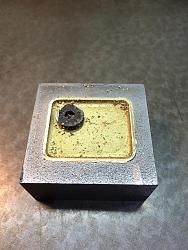
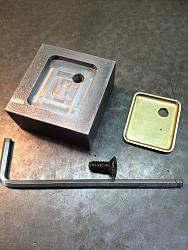
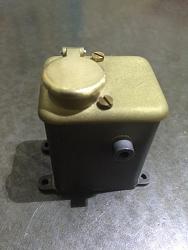
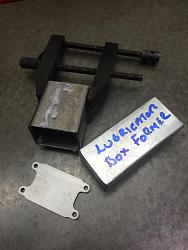
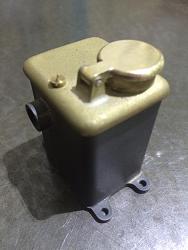
    This is a lubricator for a 3” scale Foden Steam Wagon. It is not so much about what the item is but I thought I would share the tooling made to form the material.
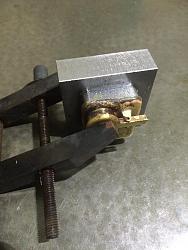
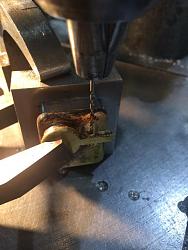
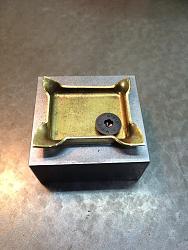
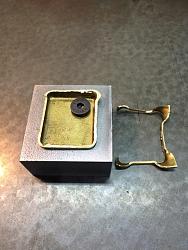
    The main box is 16 gauge steel. Simply cut to length, and rapped around the former tapped in to place for a tight fit. The lid I as a pressing. The press tool for the lid also doubles up as a milling and drilling fixture as can be seen from the photos. The box and lid have then been individually silver soldered with their relevant bits made on the mill and lathe. The original full size lubricator, constructed from two castings, so I am hoping this will look like a scaled down version, once painted. There is more info on the Foden build on my web site Practical Engineering
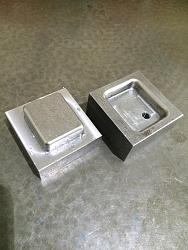
    formers and press tool to make steam lubricator body and lid-lubricator-lid-press-tool.jpg formers and press tool to make steam lubricator body and lid-brass-pressing.jpg formers and press tool to make steam lubricator body and lid-rough-edge-sawn-off.jpg formers and press tool to make steam lubricator body and lid-milled-edge.jpg formers and press tool to make steam lubricator body and lid-pressing-machined.jpg formers and press tool to make steam lubricator body and lid-silver-soldering-hindge-lid.jpg formers and press tool to make steam lubricator body and lid-drilling-hindge-pin.jpg formers and press tool to make steam lubricator body and lid-lubricator-former.jpgformers and press tool to make steam lubricator body and lid-finished-lubricator-box-lid.jpg formers and press tool to make steam lubricator body and lid-finished-lubricator-box-lid-2.jpg

    Thank you for viewing
    The Home Engineer

    186 More Best Homemade Tools eBook

  2. The Following 21 Users Say Thank You to thehomeengineer For This Useful Post:

    benkeller3 (Feb 8, 2018), billd (Apr 17, 2020), emu roo (Aug 31, 2023), Frank S (Feb 9, 2018), jjr2001 (Feb 9, 2018), johncg (Jun 21, 2023), Jon (Feb 8, 2018), KustomsbyKent (Jul 2, 2024), Mi Tasol (Feb 10, 2018), old_toolmaker (Feb 11, 2018), Paul Jones (Feb 16, 2018), rossbotics (Feb 12, 2018), Scotsman Hosie (Feb 21, 2018), Seedtick (Feb 8, 2018), sossol (Jun 15, 2018), that_other_guy (Apr 21, 2020), toma (Feb 17, 2018), Tonyg (Jun 26, 2023), Toolmaker51 (Feb 11, 2018), WinDancerKnives (Feb 16, 2018), Wmrra13 (Feb 16, 2018)

  3. #2
    Supporting Member benkeller3's Avatar
    Join Date
    Aug 2014
    Posts
    11
    Thanks
    108
    Thanked 5 Times in 4 Posts
    I am impressed!

    2,000+ Tool Plans

  4. The Following 2 Users Say Thank You to benkeller3 For This Useful Post:

    Scotsman Hosie (Feb 21, 2018), thehomeengineer (Feb 8, 2018)

  5. #3
    Content Editor
    Supporting Member
    DIYer's Avatar
    Join Date
    Aug 2013
    Posts
    3,055
    Thanks
    793
    Thanked 1,885 Times in 1,682 Posts


    Thanks thehomeengineer! We've added your Sheetmetal Former to our Metalworking category,
    as well as to your builder page: thehomeengineer's Homemade Tools. Your receipt:


  6. #4
    Supporting Member old_toolmaker's Avatar
    Join Date
    Dec 2017
    Location
    Cape Coral, FL
    Posts
    579
    Thanks
    647
    Thanked 455 Times in 184 Posts

    old_toolmaker's Tools
    Very nice work on that forming die! Nice lubricator box also! What did you use for a press?

    Dick

  7. The Following User Says Thank You to old_toolmaker For This Useful Post:

    Scotsman Hosie (Feb 21, 2018)

  8. #5
    Supporting Member thehomeengineer's Avatar
    Join Date
    Nov 2017
    Location
    Berkshire UK
    Posts
    737
    Thanks
    750
    Thanked 2,190 Times in 428 Posts

    thehomeengineer's Tools
    Hi Dick
    The brass lid I first annealed and then press with my hydraulic press. The steel was cold formed around the mandrel with a vice and hammer the steel was protected from hammer marks with a sacrificial lump of flat steel and knock in to shape. Hope this has answered your question?
    Thank you for your interest
    The Home Engineer

  9. The Following User Says Thank You to thehomeengineer For This Useful Post:

    Paul Jones (Feb 16, 2018)

  10. #6
    big o's Avatar
    Join Date
    Nov 2016
    Location
    Prescott . Arizona
    Posts
    30
    Thanks
    19
    Thanked 69 Times in 15 Posts

    big o's Tools
    Quote Originally Posted by thehomeengineer View Post
    Hi All
    This is a lubricator for a 3” scale Foden Steam Wagon. It is not so much about what the item is but I thought I would share the tooling made to form the material.
    The main box is 16 gauge steel. Simply cut to length, and rapped around the former tapped in to place for a tight fit. The lid I as a pressing. The press tool for the lid also doubles up as a milling and drilling fixture as can be seen from the photos. The box and lid have then been individually silver soldered with their relevant bits made on the mill and lathe. The original full size lubricator, constructed from two castings, so I am hoping this will look like a scaled down version, once painted. There is more info on the Foden build on my web site Practical Engineering
    Click image for larger version. 

Name:	lubricator lid press tool.jpg 
Views:	933 
Size:	80.8 KB 
ID:	22035 Click image for larger version. 

Name:	brass pressing.jpg 
Views:	946 
Size:	79.0 KB 
ID:	22030 Click image for larger version. 

Name:	rough edge sawn off.jpg 
Views:	946 
Size:	87.9 KB 
ID:	22038 Click image for larger version. 

Name:	milled edge.jpg 
Views:	942 
Size:	96.9 KB 
ID:	22036 Click image for larger version. 

Name:	pressing and machined.jpg 
Views:	884 
Size:	101.5 KB 
ID:	22037 Click image for larger version. 

Name:	silver soldering hindge lid.jpg 
Views:	940 
Size:	74.7 KB 
ID:	22039 Click image for larger version. 

Name:	drilling hindge pin.jpg 
Views:	916 
Size:	61.9 KB 
ID:	22031 Click image for larger version. 

Name:	Lubricator former.jpg 
Views:	862 
Size:	76.4 KB 
ID:	22034Click image for larger version. 

Name:	finished lubricator box and lid.jpg 
Views:	863 
Size:	60.0 KB 
ID:	22033 Click image for larger version. 

Name:	finished lubricator box and lid 2.jpg 
Views:	870 
Size:	60.6 KB 
ID:	22032

    Thank you for viewing
    The Home Engineer
    nice piece of work -big O

  11. The Following 3 Users Say Thank You to big o For This Useful Post:

    Paul Jones (Feb 16, 2018), Scotsman Hosie (Feb 21, 2018), thehomeengineer (Feb 12, 2018)

  12. #7
    Jon
    Jon is online now Jon has agreed the Seller's Terms of Service
    Administrator
    Supporting Member
    Jon's Avatar
    Join Date
    Jan 2012
    Location
    Colorado, USA
    Posts
    26,422
    Thanks
    8,097
    Thanked 40,217 Times in 11,765 Posts
    Congratulations thehomeengineer - your Press Forming Tool is the Homemade Tool of the Week!

    You actually had a few tools that were considered for this award this week, but I think this one was the fan favorite.

    Some more good picks from this week:

    Upside-Down Shelf by jjr2001
    Eccentric Shaft Cutting Method by thehomeengineer
    Internal/External Retractable Screw Cutting Tool Holder by thehomeengineer
    Drill Press Vise by Mikhandmaker
    Grinder Rest by martink
    Press Mold by thehomeengineer
    Arduino ATTiny85 Debugging by rgsparber
    Wire Clamp Tool by Cascao
    Disc/Belt Sander by Willworkfortools
    Chuck to Rotary Table Mounting Method by editor@glue-it.com
    DRO Stand by jjr2001
    Pole Holder by Captainleeward
    Demitasse Spoon Handle by Paul Jones
    Extraction Wedge by Eloy Workshop
    Brake Caliper Tool by Cascao

    thehomeengineer - we've added your tool entry to our All Homemade Tool of the Week winners post.

    You'll be receiving a $25 online gift card, in your choice of Amazon, PayPal, or bitcoin. Please PM me your current email address and gift card choice and I'll get it sent over right away.

    This is your 2nd Homemade Tool of the Week win! One more and you'll join these 3-time Homemade Tool of the Week winners: rossbotics, mr95gst, Paul Jones, Christophe Mineau, Captainleeward, immortalx, scorch, Brendon, Frank S, mklotz, Vyacheslav.Nevolya, brianhw, LMMasterMariner, jjr2001, Tuomas, olderdan, tonyfoale.

    Here are both of your winning tools:


  13. The Following User Says Thank You to Jon For This Useful Post:

    thehomeengineer (Feb 16, 2018)

  14. #8
    Supporting Member Paul Jones's Avatar
    Join Date
    May 2014
    Location
    Del Mar, California
    Posts
    1,231
    Thanks
    5,810
    Thanked 1,461 Times in 657 Posts

    Paul Jones's Tools
    thehomeengineer,

    Congratulations on your award

    Paul Jones

  15. The Following User Says Thank You to Paul Jones For This Useful Post:

    thehomeengineer (Feb 16, 2018)

  16. #9

    Join Date
    Jan 2014
    Posts
    5
    Thanks
    7
    Thanked 2 Times in 2 Posts
    Quote Originally Posted by old_toolmaker View Post
    Very nice work on that forming die! Nice lubricator box also! What did you use for a press?

    Dick
    Like Dick, I'm curious about your press. What is the tonnage of your hydraulic press, the thickness of the brass sheet that you used and can you tell us whether or not you were able to do the pressing in one pass, or did you do it in stages with an annealing in between passes. As everyone has said, this is very nice work that you have shown, and thank you for making time to share your expertise.
    Rob

  17. #10
    Supporting Member thehomeengineer's Avatar
    Join Date
    Nov 2017
    Location
    Berkshire UK
    Posts
    737
    Thanks
    750
    Thanked 2,190 Times in 428 Posts

    thehomeengineer's Tools
    Hi Rob
    The press I have is a commercial made 25ton hydraulic press I found led down in a yard at a company I use to work at. I asked if it was going to be ever used again and I couldn’t believe they said take it to get it out of the way, So the following day I borrowed my brothers small van (before they changed their mind) and loaded it. I was surprised at the weight of the press (so was my brothers van lol the power steering was lighter than ever) didn’t look that heavy led on the floor. But I somehow got it in the back of the van and got it home. Cleaned it up, new oil and a great addition to the workshop.
    The brass is 16 Gauge, I did anneal the brass and it was one pressing which if I remember took the press to about 8tons but I probably could have stopped at 5tons. The press tool also had a light smear of oil to help the material to flow in to the die. The most important thing when making dies like this is not to have sharp edges on the tooling. These radiuses help flow the material. The die in this case however did have a sharp edge around its top edge but the punch had a radius. This was because the lid pressing was not that deep and I wanted to use the die also as a holding fixture for removing the excess material on the mill. There is information on the minimum bend radius for certain gauge material the thicker the material the larger the minimum bend has to be to prevent the material from cracking etc.
    Thank you for viewing and interest and I hope I have answered your questions
    The Home Engineer

Thread Information

Users Browsing this Thread

There are currently 1 users browsing this thread. (0 members and 1 guests)

Bookmarks

Posting Permissions

  • You may not post new threads
  • You may not post replies
  • You may not post attachments
  • You may not edit your posts
  •