Free 186 More Best Homemade Tools eBook:  
Get 2,500+ tool plans, full site access, and more.

User Tag List

Page 1 of 2 1 2 LastLast
Results 1 to 10 of 16

Thread: Fly Cutter Attachment for Lathe Faceplate

  1. #1
    Supporting Member Paul Jones's Avatar
    Join Date
    May 2014
    Location
    Del Mar, California
    Posts
    1,231
    Thanks
    5,810
    Thanked 1,463 Times in 657 Posts

    Paul Jones's Tools

    Fly Cutter Attachment for Lathe Faceplate

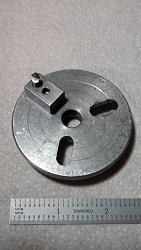
    A few years ago I first saw the design of this fly cutter attachment for faceplates in the book “The Shop Wisdom” by Rudy Kouhoupt. It looked like a great idea to try and it does machine very smooth surfaces. The cutter holder fits into one of my Unimat 2.7” dia. faceplates but the same idea could be applied to any lathe faceplate.

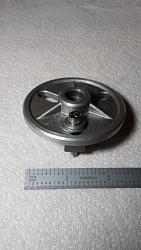
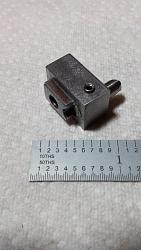
    I made the HSS cutter holding part from 0.50” x 0.625” x 0.75” cold rolled 1018 steel. There is a 0.17” deep step milled around all four sides on the backside to allow the fly cutter to fit snugly into one of the slots in the faceplate. This part is held in place with a 10-32 cap screw and two washers. The cutter was ground in a semi-circular form from an old 3/16” HSS drill shank and secured with a 6-32 set screw.

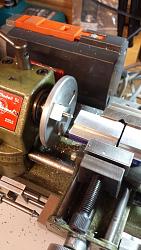
    The milled surface finishes created by the fly cutter are very smooth (almost mirror-like) and great for squaring blocks in preparation for other work. An added bonus is the faceplate can be used as an aide with a machinist square in setting up rectangular blocks at right angles to the cutter path (or set up to any other angle).

    Fly Cutter Attachment for Lathe Faceplate-unimat-faceplate-fly-cutter.jpg

    Fly Cutter Attachment for Lathe Faceplate-unimat-faceplate-fly-cutter-backside.jpg

    Fly Cutter Attachment for Lathe Faceplate-unimat-faceplate-customer-fly-cutter-fits-slot.jpg

    Fly Cutter Attachment for Lathe Faceplate-unimat-faceplate-fly-cutting-action.jpg

    Thank you for looking,

    Paul Jones

    186 More Best Homemade Tools eBook
    Last edited by Paul Jones; Dec 8, 2017 at 09:55 PM. Reason: Original photos missing and now replaced

  2. The Following 17 Users Say Thank You to Paul Jones For This Useful Post:

    baja (Jun 26, 2020), billster (Aug 14, 2018), Canobi (Apr 22, 2018), Captainleeward (Nov 26, 2017), Carnel (Jun 26, 2020), Christophe Mineau (Nov 3, 2014), Cogslayer (Aug 21, 2016), high-side (Aug 14, 2018), jjr2001 (Sep 1, 2016), kbalch (Nov 3, 2014), Moby Duck (Aug 13, 2018), olderdan (Nov 29, 2017), PJs (Aug 15, 2018), saintrain (Aug 15, 2018), Sleykin (Jun 26, 2020), Tonyg (Jun 26, 2020), Toolmaker51 (Apr 21, 2018)

  3. #2
    Content Editor
    Supporting Member
    DIYer's Avatar
    Join Date
    Aug 2013
    Posts
    3,055
    Thanks
    796
    Thanked 1,895 Times in 1,690 Posts
    Nice post, another idea to add to this group's collective knowledge.

    2,500+ Tool Plans

  4. The Following User Says Thank You to DIYer For This Useful Post:

    abditerex (Oct 7, 2024)

  5. #3
    kbalch's Avatar
    Join Date
    Jun 2012
    Location
    Clermont, FL
    Posts
    5,034
    Thanks
    2,275
    Thanked 532 Times in 384 Posts
    Thanks Paul! I've added your Lathe Faceplate Fly Cutter Attachment to our Machining category, as well as to your builder page: Paul Jones' Homemade Tools. Your receipt:


  6. The Following User Says Thank You to kbalch For This Useful Post:

    Paul Jones (Nov 3, 2014)

  7. #4
    Supporting Member Hotz's Avatar
    Join Date
    Feb 2013
    Location
    South of Brazil.
    Posts
    360
    Thanks
    157
    Thanked 76 Times in 51 Posts

    Hotz's Tools
    Very good adaptation .. Thanks for sharing.
    Sorry my mistakes in english.
    to share your tip >>> http://www.homemadetools.net/forum/tool-tips-tricks/ <<<

  8. The Following User Says Thank You to Hotz For This Useful Post:

    Paul Jones (Nov 3, 2014)

  9. #5
    Supporting Member Paul Jones's Avatar
    Join Date
    May 2014
    Location
    Del Mar, California
    Posts
    1,231
    Thanks
    5,810
    Thanked 1,463 Times in 657 Posts

    Paul Jones's Tools
    Since originally posting this article about the 3" swing Unimat fly cutter three years ago I discovered the original photos disappeared and have now been replaced.

  10. #6
    Supporting Member garage nut's Avatar
    Join Date
    Jul 2017
    Location
    Port Elizabet, SA
    Posts
    246
    Thanks
    92
    Thanked 443 Times in 109 Posts

    garage nut's Tools
    I just purchased a Lathe/Mill combination and the first thing I seem to need is a fly cutter.
    Still recovering from the cost of all the tools and measuring goodies I find this an brilliant idea, only problem is I did not receive a face plate with my machine.

    Now my question can I take a 3" disk and clamp it in the chuck and use it as the face plate or will the side forces damage my chuck?

    Is the cutter hispeed steel? How is the cutting edge ground?
    Last edited by garage nut; Nov 26, 2017 at 12:23 AM.

  11. #7
    Supporting Member mklotz's Avatar
    Join Date
    Aug 2015
    Location
    LA, CA, USA
    Posts
    3,549
    Thanks
    363
    Thanked 6,582 Times in 2,166 Posts

    mklotz's Tools
    Quote Originally Posted by garage nut View Post
    I just purchased a Lathe/Mill combination and the first thing I seem to need is a fly cutter.
    Still recovering from the cost of all the tools and measuring goodies I find this an brilliant idea, only problem is I did not receive a face plate with my machine.

    Now my question can I take a 3" disk and clamp it in the chuck and use it as the face plate or will the side forces damage my chuck?

    Is the cutter hispeed steel? How is the cutting edge ground?
    I don't think you need to worry about chuck damage.

    You really don't need a disk to convert the chuck into a monster fly cutter. A length of steel, fitted with a spigot to grip in the 3jaw or gripped directly in a 4jaw will work just fine. Drill a hole in the bar to accept the tool holder (or a slot if you want adjustable radius). The tool holder can be cobbled together from a bolt and nut as I did here...

    http://www.homemadetools.net/forum/i...y-cutter-58399

    Depending on the stiffness of the steel and desired depth of cut, you may want to fix things so the back of the tool holder seats against the face of the chuck to make things more rigid.

    Many years ago I made what I'm describing here. I'll try to find it and get a picture to make my description more understandable.
    ---
    Regards, Marv

    Failure is just success in progress
    That looks about right - Mediocrates

  12. The Following 2 Users Say Thank You to mklotz For This Useful Post:

    baja (Jun 26, 2020), Tonyg (Jun 26, 2020)

  13. #8
    Supporting Member mklotz's Avatar
    Join Date
    Aug 2015
    Location
    LA, CA, USA
    Posts
    3,549
    Thanks
    363
    Thanked 6,582 Times in 2,166 Posts

    mklotz's Tools
    Quote Originally Posted by mklotz View Post
    You really don't need a disk to convert the chuck into a monster fly cutter. A length of steel, fitted with a spigot to grip in the 3jaw or gripped directly in a 4jaw will work just fine. Drill a hole in the bar to accept the tool holder (or a slot if you want adjustable radius). The tool holder can be cobbled together from a bolt and nut as I did here...

    http://www.homemadetools.net/forum/i...y-cutter-58399

    Depending on the stiffness of the steel and desired depth of cut, you may want to fix things so the back of the tool holder seats against the face of the chuck to make things more rigid.

    Many years ago I made what I'm describing here. I'll try to find it and get a picture to make my description more understandable.
    OK, I managed to find the tool I mentioned. I wrote a description which can be found here...

    http://www.homemadetools.net/forum/f...943#post102905

    I've reproduced the two photos from that post below. They may be self-explanatory...


    ---
    Regards, Marv

    Failure is just success in progress
    That looks about right - Mediocrates

  14. The Following 3 Users Say Thank You to mklotz For This Useful Post:

    garage nut (Nov 27, 2017), Paul Jones (Nov 26, 2017), Tonyg (Jun 26, 2020)

  15. #9
    Supporting Member garage nut's Avatar
    Join Date
    Jul 2017
    Location
    Port Elizabet, SA
    Posts
    246
    Thanks
    92
    Thanked 443 Times in 109 Posts

    garage nut's Tools
    What shape should the cutter be ground to?

  16. #10
    Supporting Member mklotz's Avatar
    Join Date
    Aug 2015
    Location
    LA, CA, USA
    Posts
    3,549
    Thanks
    363
    Thanked 6,582 Times in 2,166 Posts

    mklotz's Tools
    Quote Originally Posted by garage nut View Post
    What shape should the cutter be ground to?
    I've always had good results with a generous radius on the tool. Probably the profiles suggested for lathe tools will work well as a starting point. Experiment a bit and see what works for you.

    With a tool like this you'll want to keep the depth-of-cut small and the feed slow. It's meant to clean up a surface, not take off large amounts of material, a process better done with endmills.
    ---
    Regards, Marv

    Failure is just success in progress
    That looks about right - Mediocrates

Thread Information

Users Browsing this Thread

There are currently 1 users browsing this thread. (0 members and 1 guests)

Bookmarks

Posting Permissions

  • You may not post new threads
  • You may not post replies
  • You may not post attachments
  • You may not edit your posts
  •