My first DIY Tool Build here - please be kind.
=======================
I stumbled upon the "Cyclone Dust Collector" and looked at commercial units (Priced at about $125-$325 Canadian + S&H - nothing local) but then I noticed several DIY versions out there. . I thought I'd give the DIY version a go.
The principal looked pretty simple - circular (often cone shaped) top chamber that sent the incoming debris into a 'cyclone' spin. Heavier bits fall to the bottom chamber, air and lighter dust get sucked into the shop vac. The benefit being reduced use of shop vac bags and easier recovery of small bits accidentally sucked up. And you can collect saw dust for other uses. (I hear it can be made into excellent campfire starter stick).
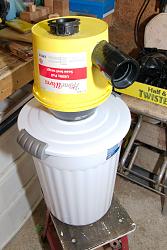
Attachment 8901 I picked up a Sterilite Multi-Purpose 24 litre trash can. The lid clamps on nice and tight - perhaps not air tight and maybe I should enhance that seal but it works as is. Maybe I'll add a ring of door style peel and stick winter weather strip to the top of the can lip?
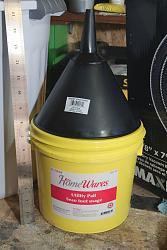
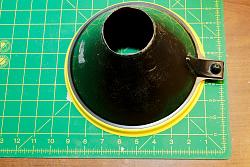
I also bought a smaller utility pail and found a funnel that exactly fit the diameter of the lid.
I cut off the end of the funnel to create a wider hole in the bottom.
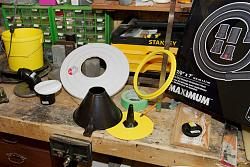
I cut out the center of the smaller utility pail lid and glued the ring to the funnel I used Lepages Super gel glue. Later I sealed any gaps with Automotive Goop (because that is what I had on hand).
I also cut out a circle in the indented centre section of the white lid from the Sterilite can. I then glued the funnel into the hole. I was thinking I may need to reinforce that joint as there could be a fair bit of torque on the join with all the action on the top end of the contraption. I've tried it out and even though I've knocked it over a couple of times (empty she is top heavy) it has held so far. If needed 'wings' could be added to bolster that connection between the funnel and the white lid. I've now dropped an old 5 pound weight lifting disk into the bottom to give it a bit more stability.
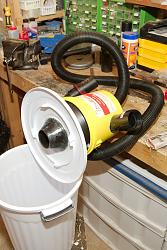
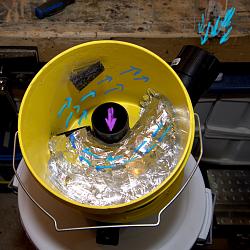
The in and out ports are simply holes cut into the yellow bucket. The out port is on top and I used one of the adapters that came with my accessory kit. Found a kit at Canadian Tire that had the adapters and was considerably less than the official "Shop Vac" accessories and hose. But is slightly smaller at 1 7/8", but adapters make it fit. Maybe I loose a little suction capacity because the hose to the shop vac is a full 2.5" and the hose in is only 1 7/8ths. It does seems to be working well.
Worst case I can upgrade the hose later - the both ports are good for 2.5" tubes. All the ports were super-gel glued in first then gaps sealed with automotive Goop. No she ain't pretty.
The in coming debris is set into a circular motion using 45° black PVC pipe corners. BTW none of my PVC pipes are glued to each other. They are too tightly jammed into the yellow bucket to move anyway. And being a frugal fellow I figured that if it turns out to be a failure I'll recover all the pipe bits.
The incoming pipe is about 12" long. (I just eye-balled it). I found by trial and error that the 2.5" shop vac hose would connect well enough to the threaded joiner on the PVC pipe. A little twist and it is snug. The fella at the shop said there was a proper connector but he did not have it in stock. This worked. And again it is just snugged on. I suppose if I need to upgrade to the right connector I can.
I used aluminum tape to create a smooth 'cyclone' starter curve. Just kinda sculpted it over the black pipe in layers. (It is that peel off the back side aluminum tape used in duct work. Note to self - before doing that again grow longer finger nails that stuff is a pain to separate from the backing or ask the Mrs. for help.
Excuse my poor illustration drawing - attempting to paint over the image with blue lines to show the direction of air flow. The purple air is the out port.
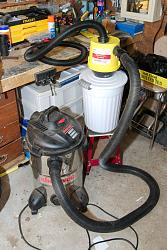
I did try it out and it does suck and it does separate and it does tip over - but not so easily now with the weight in the bottom.
I've not given it a proper trail on a real project. Just cleaned up the mess made by making this unit. I did suck up a couple of screws and such I recovered in the tub. I don't yet know how much finer sawdust would go into the tub vs go into the shop vac.
BUT anyway - I can say
"Ta Da - it worked"
PS - for the cost conscious
White can was about $10
Yellow tub $5
Funnel $3
Pipe bits - $10 total
And the second hose with connectors $25.
I had the straight pipe and glues and aluminium tape.
Parts cost about $50
Satisfaction - priceless.


 LinkBack URL
 About LinkBacks


 Reply With Quote


Bookmarks