Free 186 More Best Homemade Tools eBook:  
Get 2,500+ tool plans, full site access, and more.

User Tag List

Page 1 of 2 1 2 LastLast
Results 1 to 10 of 11

Thread: Fixed drill press vise..

  1. #1
    Supporting Member Tuomas's Avatar
    Join Date
    Jun 2016
    Location
    Jyväskylä Finland
    Posts
    832
    Thanks
    558
    Thanked 1,877 Times in 508 Posts

    Tuomas's Tools

    Fixed drill press vise..

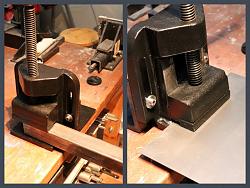
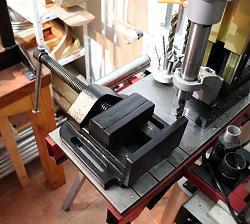
    Found a broken drill press vise.
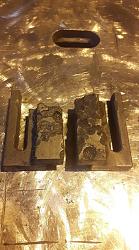
    After years of use, it finally was drilled full of dimples and it was cracked. End piece was missing, but it tought it can still be usefull.
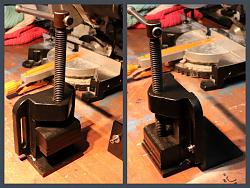

    Fixed drill press vise..-1.jpg

    Fixed it by:
    Straightening the end with angle grinder.
    Then, filled dimples with my Telwin stick welder.
    Finally made new end to it by welding 15mm plate to it.
    Weld edges are chamfered, weld size is about A5.

    Before welding i preheated it to 150 deg of celsius.
    Welds are made using Esab OK 78.16 welding rod, 4mm and 144A.

    Then i stretched the welds by hammering.
    Finally wrapped it to insulantion wool, to cool it down slowly.

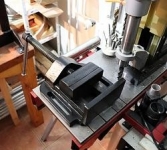
    Also made removable support to it.
    Now i can use it vertical or horizontal position.

    Great for holding objects when cutting or grinding with angle grinder, specially plates!
    But, works as a drill press vise too, or as a small press..

    Fixed drill press vise..-2.jpg

    Fixed drill press vise..-3.jpg

    Download plans for vises.


  2. The Following 13 Users Say Thank You to Tuomas For This Useful Post:

    Captn Roy (Aug 4, 2018), emu roo (Jul 29, 2024), philipUsesWood&Brass (Aug 7, 2018), PJs (Jul 22, 2018), ranald (Feb 14, 2019), rgsparber (Jul 24, 2018), rlm98253 (Jul 23, 2018), rossbotics (Jul 24, 2018), Seedtick (Jul 23, 2018), sossol (Feb 16, 2019), Stevohdee (Jul 27, 2018), Toolmaker51 (Jul 25, 2018), Tule (Feb 15, 2019)

  3. #2
    PJs
    PJs is offline
    Supporting Member PJs's Avatar
    Join Date
    Sep 2014
    Location
    Northern CA
    Posts
    1,844
    Thanks
    8,431
    Thanked 1,129 Times in 725 Posts

    PJs's Tools
    Great save Tuomas! Also like the vertical bracket idea...may use that one. Nice write up too! Although I don't know much about the welding rod the idea of preheat and cool down makes good sense and sure it will help others with this type of repairs.

    Thanks for sharing this with us.
    PJ

    Download plans for vises.

    ‘‘Always do right. This will gratify some people and astonish the rest.’’
    Mark Twain

  4. #3
    Supporting Member Tuomas's Avatar
    Join Date
    Jun 2016
    Location
    Jyväskylä Finland
    Posts
    832
    Thanks
    558
    Thanked 1,877 Times in 508 Posts

    Tuomas's Tools
    Quote Originally Posted by PJs View Post
    Great save Tuomas! Also like the vertical bracket idea...may use that one. Nice write up too! Although I don't know much about the welding rod the idea of preheat and cool down makes good sense and sure it will help others with this type of repairs.

    Thanks for sharing this with us.
    PJ
    Thanks mate.

    In this case. Preheating is necessary because mild steel cools down and also shrinks faster than cast steel. Heating, hammering and slowing cooling prevents joint to crack.

    I used tempilstik: Tempilstik® | Tempil

    To check the temperature before welding.
    Removed threaded rod and "slide", then heated the part in gas grill. Clamped the mild steel plate on its place and welded.
    I placed tack welds to the bottom, then welds to the top, removed clamps and welded sides. Finally bottom welds.

    Hammered all the welds and wrapped to insulation wool.
    When it was cooled down i cleaned the welds and removed splatters.

  5. The Following User Says Thank You to Tuomas For This Useful Post:

    PJs (Jul 23, 2018)

  6. #4
    PJs
    PJs is offline
    Supporting Member PJs's Avatar
    Join Date
    Sep 2014
    Location
    Northern CA
    Posts
    1,844
    Thanks
    8,431
    Thanked 1,129 Times in 725 Posts

    PJs's Tools
    Quote Originally Posted by Tuomas View Post
    Thanks mate.

    In this case. Preheating is necessary because mild steel cools down and also shrinks faster than cast steel. Heating, hammering and slowing cooling prevents joint to crack.

    I used tempilstik: Tempilstik® | Tempil

    To check the temperature before welding.
    Removed threaded rod and "slide", then heated the part in gas grill. Clamped the mild steel plate on its place and welded.
    I placed tack welds to the bottom, then welds to the top, removed clamps and welded sides. Finally bottom welds.

    Hammered all the welds and wrapped to insulation wool.
    When it was cooled down i cleaned the welds and removed splatters.
    Great blow by blow of the preheat and welding process, Thanks! Good way to minimize warpage. Have used temp sticks before when heat treating and tempering...nice product.

    PJ
    ‘‘Always do right. This will gratify some people and astonish the rest.’’
    Mark Twain

  7. The Following User Says Thank You to PJs For This Useful Post:

    Tuomas (Jul 24, 2018)

  8. #5
    Supporting Member Tuomas's Avatar
    Join Date
    Jun 2016
    Location
    Jyväskylä Finland
    Posts
    832
    Thanks
    558
    Thanked 1,877 Times in 508 Posts

    Tuomas's Tools
    Quote Originally Posted by PJs View Post
    Great blow by blow of the preheat and welding process, Thanks! Good way to minimize warpage. Have used temp sticks before when heat treating and tempering...nice product.

    PJ
    Yep. Those also seem to last forever. Foolproof and fast way.
    I usually use them at work. Before i weld next layer, i check that temperature of the joint haven't rised too high.

  9. The Following User Says Thank You to Tuomas For This Useful Post:

    PJs (Jul 24, 2018)

  10. #6
    Supporting Member rossbotics's Avatar
    Join Date
    Dec 2013
    Location
    Florida
    Posts
    731
    Thanks
    1,019
    Thanked 1,696 Times in 404 Posts

    rossbotics's Tools
    Quote Originally Posted by Tuomas View Post
    Found a broken drill press vise.
    After years of use, it finally was drilled full of dimples and it was cracked. End piece was missing, but it tought it can still be usefull.


    Click image for larger version. 

Name:	1.jpg 
Views:	949 
Size:	1.28 MB 
ID:	24852

    Fixed it by:
    Straightening the end with angle grinder.
    Then, filled dimples with my Telwin stick welder.
    Finally made new end to it by welding 15mm plate to it.
    Weld edges are chamfered, weld size is about A5.

    Before welding i preheated it to 150 deg of celsius.
    Welds are made using Esab OK 78.16 welding rod, 4mm and 144A.

    Then i stretched the welds by hammering.
    Finally wrapped it to insulantion wool, to cool it down slowly.

    Also made removable support to it.
    Now i can use it vertical or horizontal position.

    Great for holding objects when cutting or grinding with angle grinder, specially plates!
    But, works as a drill press vise too, or as a small press..


    Click image for larger version. 

Name:	2.jpg 
Views:	759 
Size:	1.30 MB 
ID:	24853

    Click image for larger version. 

Name:	3.jpg 
Views:	786 
Size:	1.91 MB 
ID:	24854

    Good salvage, looks good too

    Doug
    Comments are always welcome
    Doug

    Subscribe to my you tube channel

    https://www.youtube.com/channel/UCDD..._as=subscriber


    Tool Plans for Sale by rossbotics


  11. #7
    Content Editor
    Supporting Member
    DIYer's Avatar
    Join Date
    Aug 2013
    Posts
    3,055
    Thanks
    795
    Thanked 1,895 Times in 1,690 Posts


    Thanks Tuomas! We've added your Drill Press Vise Restoration to our Vises category,
    as well as to your builder page: Tuomas's Homemade Tools. Your receipt:


    New plans added on 01/03/2025: Click here for 2,682 plans for homemade tools.

  12. #8
    Supporting Member Tuomas's Avatar
    Join Date
    Jun 2016
    Location
    Jyväskylä Finland
    Posts
    832
    Thanks
    558
    Thanked 1,877 Times in 508 Posts

    Tuomas's Tools
    Quote Originally Posted by rossbotics View Post
    Good salvage, looks good too

    Doug
    Thank you Doug.

    I have idea for another kind of use for this, than just using as a vise .. tought that i could make ring roller adds to it. This kind of vise seems to fit nicely for that kind of use.

    That was the original reason to make that extra support.

  13. The Following User Says Thank You to Tuomas For This Useful Post:

    PJs (Jul 25, 2018)

  14. #9
    Supporting Member NeiljohnUK's Avatar
    Join Date
    Dec 2017
    Posts
    692
    Thanks
    61
    Thanked 251 Times in 178 Posts

    NeiljohnUK's Tools
    Nice job, I wonder if the end was originally removed for direct clamping larger objects?

  15. #10
    Supporting Member Tuomas's Avatar
    Join Date
    Jun 2016
    Location
    Jyväskylä Finland
    Posts
    832
    Thanks
    558
    Thanked 1,877 Times in 508 Posts

    Tuomas's Tools
    Quote Originally Posted by NeiljohnUK View Post
    Nice job, I wonder if the end was originally removed for direct clamping larger objects?

    It was drilled cut. Straight edge is where i shortened it by myself.
    I filled some holes with welds, but those sections we're too bad condition, that i decided to shorten it.

    Fixed drill press vise..-fb_img_1542655542371.jpg

  16. The Following User Says Thank You to Tuomas For This Useful Post:

    PJs (Nov 19, 2018)

Thread Information

Users Browsing this Thread

There are currently 1 users browsing this thread. (0 members and 1 guests)

Bookmarks

Posting Permissions

  • You may not post new threads
  • You may not post replies
  • You may not post attachments
  • You may not edit your posts
  •