Free 186 More Best Homemade Tools eBook:  
Get 2,500+ tool plans, full site access, and more.

User Tag List

Results 1 to 5 of 5

Thread: External Stock Stop for the Mini Mill

  1. #1
    Supporting Member
    Join Date
    Mar 2017
    Location
    Colorado, USA
    Posts
    43
    Thanks
    24
    Thanked 108 Times in 30 Posts

    dgbreggin's Tools

    External Stock Stop for the Mini Mill

    I wanted to make an external stock stop for my mini mill. My design was inspired by / adapted from a project in a book (details below).

    I thought it would be a good idea to make removable magnetic feet to hold the stop in place on the chuck if desired.

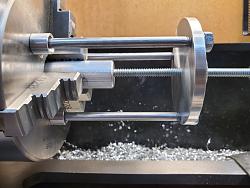
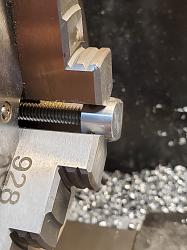
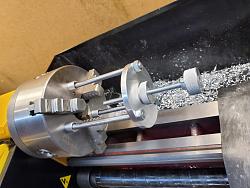
    Here are some pictures of the stop in use on my 5" lathe chuck. The knob on the end is used to adjust the stop rod, while the knob in the middle is used as a jam nut to secure the stop rod in position.

    External Stock Stop for the Mini Mill-use-1.jpg External Stock Stop for the Mini Mill-use-2.jpg External Stock Stop for the Mini Mill-use-3.jpg

    When attached to the lathe chuck using the magnets, one leg of the tool should be positioned at or near the bottom and the other two above center as shown. This is to minimize the chance of the tool pulling the magnets off of the chuck.


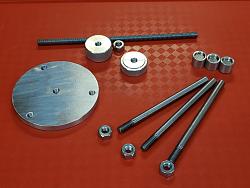
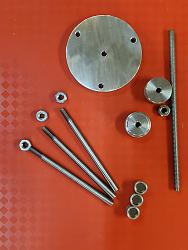
    Here are some pictures of the parts prior to assembly.
    External Stock Stop for the Mini Mill-parts-1.jpg External Stock Stop for the Mini Mill-parts-2.jpg


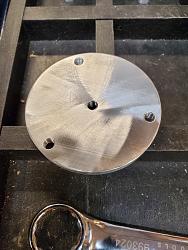
    The main body is made from aluminum flat plate. First, I drilled and tapped the 4 holes in the plate. Then I rough cut it on the band saw and rounded it on the mini mill using a rotary table and my power feed. I could have done this on the lathe instead of the rotary table, though I try to avoid interrupted cuts when I can.
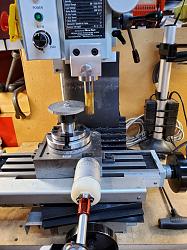
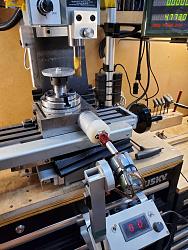
    External Stock Stop for the Mini Mill-body-1.jpg External Stock Stop for the Mini Mill-body-2.jpg External Stock Stop for the Mini Mill-body-3.jpg

    I made the body as large as I could and still have it fit the smallest lathe chuck I have (3").


    The 3 legs are made from 1/4" drill rod, threaded a short distance on one end.

    The two knobs are made from aluminum round stock and knurled on the mini lathe. The stop rod is 1/4" threaded rod, cut to length on the mini lathe and deburred. Common nuts were used to secure the drive knob to the stop rod, and to secure the legs to the body.

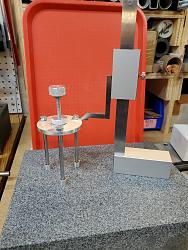
    Here is a picture of the assembly process. I used a height gauge and a granite plate to make sure the legs are the same length.

    External Stock Stop for the Mini Mill-setting-legs.jpg


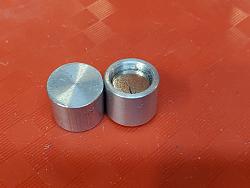
    I made 3 feet from aluminum round stock and glued a rare earth magnet inside. The feet were made in a bucket shape with a very small bit of aluminum between the magnets and the lathe chuck. The feet are held to the legs by the magnets, and the magnets hold the stop to the lathe chuck.
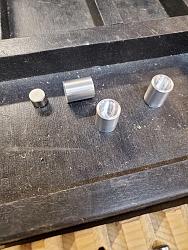
    External Stock Stop for the Mini Mill-feet-1.jpg External Stock Stop for the Mini Mill-feet-2.jpg


    It is important that the feet all be the same effective height so that they can be used interchangeably on any leg. As anyone who has glued a magnet into a hole has experienced, the magnets do not always set at a consistent height. I used my internal stock stop to position each foot in the lathe chuck and I faced off the end of each foot to make the effective height identical on all 3 feet.

    External Stock Stop for the Mini Mill-feet-3.jpg

    This is a perfect use for the internal stock stop. It allows very precise, repeatable positioning of the feet in the chuck for machining.


    It should be obvious that the lathe should not be operated with this external stop attached to the chuck.


    The book that inspired this design is:
    Useful Machine Shop Tools To Make For Home Shop Machinists by Stan Bray, edited by George Bulliss. (No affiliation.)

    External Stock Stop for the Mini Mill-book-1.jpg External Stock Stop for the Mini Mill-book-2.jpg


    The design in the book used grub screws to secure the legs and the adjustment knob. I decided to use jam nuts because grub screws will damage threads when used like this. Such damage is OK if you are certain that you will never have to take it apart or adjust it for any reason.

    186 More Best Homemade Tools eBook

  2. The Following 4 Users Say Thank You to dgbreggin For This Useful Post:

    charles scozzari (Dec 5, 2022), Christophe Mineau (Dec 6, 2022), Jon (Dec 5, 2022), nova_robotics (Dec 9, 2022)

  3. #2
    Supporting Member gatz's Avatar
    Join Date
    Feb 2016
    Posts
    180
    Thanks
    2
    Thanked 154 Times in 54 Posts

    gatz's Tools
    Thanks for a very useful apparatus for a lathe.
    I'll be making this !

    2,500+ Tool Plans

  4. The Following User Says Thank You to gatz For This Useful Post:

    dgbreggin (Dec 5, 2022)

  5. #3
    Supporting Member schuylergrace's Avatar
    Join Date
    Sep 2020
    Location
    Mesa, Arizona
    Posts
    388
    Thanks
    302
    Thanked 181 Times in 116 Posts
    Quote Originally Posted by dgbreggin View Post
    It should be obvious that the lathe should not be operated with this external stop attached to the chuck.
    Yeah...there's a reason why chuck keys come with springs these days. You should probably add a big spring to your stop, too! That way, it won't have to be obvious to the oblivious.

    Nice project, though.

    For topical application, only. Not to be taken internally or used in com-
    bination with other drugs or alcohol, except as directed by your shaman.
    Do not operate heavy equipment, unless you actually know how to.


  6. #4
    Supporting Member
    Join Date
    Mar 2017
    Location
    Colorado, USA
    Posts
    43
    Thanks
    24
    Thanked 108 Times in 30 Posts

    dgbreggin's Tools
    Quote Originally Posted by schuylergrace View Post
    Yeah...there's a reason why chuck keys come with springs these days. You should probably add a big spring to your stop, too! That way, it won't have to be obvious to the oblivious.

    Nice project, though.
    Thank you.

    Perhaps I should have put a smiley by the "warning"...

  7. The Following 2 Users Say Thank You to dgbreggin For This Useful Post:

    schuylergrace (Dec 5, 2022), Skun Knuckles (Dec 6, 2022)

  8. #5
    Content Editor
    Supporting Member
    DIYer's Avatar
    Join Date
    Aug 2013
    Posts
    3,055
    Thanks
    798
    Thanked 1,897 Times in 1,692 Posts


    Thanks dgbreggin! We've added your External Stock Stop to our Machining category,
    as well as to your builder page: dgbreggin's Homemade Tools. Your receipt:


    2,500+ Tool Plans
    New plans added on 01/17/2025: Click here for 2,706 plans for homemade tools.

Thread Information

Users Browsing this Thread

There are currently 1 users browsing this thread. (0 members and 1 guests)

Bookmarks

Posting Permissions

  • You may not post new threads
  • You may not post replies
  • You may not post attachments
  • You may not edit your posts
  •