Free 186 More Best Homemade Tools eBook:  
Get 2,500+ tool plans, full site access, and more.

User Tag List

Page 1 of 3 1 2 3 LastLast
Results 1 to 10 of 21

Thread: Everyone needs a hardness tester.

  1. #1
    Supporting Member tonyfoale's Avatar
    Join Date
    Nov 2016
    Location
    Spain
    Posts
    1,632
    Thanks
    739
    Thanked 2,745 Times in 735 Posts

    tonyfoale's Tools

    Everyone needs a hardness tester.

    I needed a hardness tester to test the hardness of cylinder heads and other engine components.
    Years ago, sales reps would give garages and reconditioning shops a simple tester based on the Shore rebound principle. I made a copy of those for myself but I was disappointed with it because it was too fast to get repeatable results by visual observation. I then made a more sophisticated version which replaced my poor old man's observational skills with electronics and an Arduino.
    Then when preparing this post I saw how the use of a camera or smart phone could turn the original version into a really useful instrument. This multi-disciplinary post describes both versions. There is mechanical, electronic, programming and simple maths content but the original version only uses the mechanical, so do not be frightened off if electrons bring you out in a rash.
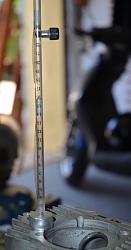
    Everyone needs a hardness tester.-hardnesstester.jpg Everyone needs a hardness tester.-tf01.jpg Click thumbnails for full size.

    These really need to be seen in action so I prepared two videos, part 1 describes the mechanical stuff and discusses hardness testing in general and part 2 looks at the electronics (very simple).

    However, video is not the best format in which to present schematics and programmes so I have also prepared a PDF with file. A PDF is not the best medium from which to lift the text of an Arduino programme so I also include that in this post directly, just copy and paste into your Arduino IDE.

    Videos:

    and


    Watch part 1 before part 2.

    Here is the PDF: https://diqn32j8nouaz.cloudfront.net...ess_tester.pdf

    ----------------------------------------------------
    Here is the programme to upload to an Arduino Nano or other compatible micro.

    #include <Wire.h> // Communications library
    #include <LiquidCrystal_I2C.h> // Library for printing to display

    LiquidCrystal_I2C lcd(0x27,20,4); // set the LCD address to 0x27 and a 20 x 4 display.

    // Change these two constants to suit your own hardware implementation.

    float s = 0.0049;
    // Vertical constant distance between sensors in m.

    float twoas = 0.1813;
    // Constant 2as is used to correct velocity using 9.25 mm final drop after mean sensing.

    void setup(){
    lcd.init();
    lcd.backlight();
    lcd.clear();
    lcd.setCursor(1,0);
    lcd.print("Leeb");
    lcd.setCursor(1,1);
    lcd.print("Rockwell C");
    lcd.setCursor(1,2);
    lcd.print("Brinell");
    lcd.setCursor(1,3);
    lcd.print("Vickers");

    pinMode(2, INPUT_PULLUP);
    pinMode(3, INPUT_PULLUP);

    myCalc();
    }

    unsigned long t[4], dt1, dt2;
    float v1, v2 ;
    uint16_t leeb, Rc, Brin, Vick;

    void myCalc() {
    // Get timings. This works better than using interrupts.
    while (! digitalRead(2)) { }
    t[0] = micros();
    while (! digitalRead(3)) { }
    t[1] = micros();
    while (digitalRead(3)) { }
    while (! digitalRead(3)) { }
    t[2] = micros();
    while (! digitalRead(2)) { }
    t[3] = micros();

    // Calculate time intervals
    dt1 = t[1] - t[0];
    dt2 = t[3] - t[2];

    // Calculate and adjust drop & rebound velocities
    v1 = (1000000*s)/dt1; v1 = sqrt(v1*v1 + twoas);
    v2 = (1000000*s)/dt2; v2 = sqrt(v2*v2 + twoas);

    // Calculate leeb hardness value and convert to other scales
    leeb = (1000 * v2)/v1; // Leeb value
    Rc = -0.000112211 * leeb*leeb + 0.2808769 * leeb - 93.83636; // HRC
    Brin = 0.00237066 * leeb*leeb -1.646908 * leeb + 455.7088;
    // Brinell
    Vick = 0.00264169 * leeb*leeb -1.900271 * leeb + 519.8346;
    // Vickers

    myDisplay();
    }

    void myDisplay() {
    if (leeb < 1000 && leeb > 0) {
    if (leeb >= 950) {
    lcd.setCursor(0,1); lcd.print("**High value** ");
    }
    else if (leeb < 400) {
    lcd.setCursor(0,1); lcd.print("** Low value ** ");
    }
    if (leeb >= 400) { //Value when Rc = 0
    lcd.setCursor(16, 1); lcd.print(Rc);
    }
    lcd.setCursor(15, 0); lcd.print(leeb);
    lcd.setCursor(15, 2); lcd.print(Brin);
    lcd.setCursor(15, 3); lcd.print(Vick);
    }
    else { // When !(leeb < 1000 && leeb > 0)
    lcd.clear();
    lcd.setCursor(0, 1); lcd.print("***** WARNING *****");
    lcd.setCursor(0, 2); lcd.print("Value out of range.");
    }
    }

    void loop() {
    }

    186 More Best Homemade Tools eBook

  2. The Following 17 Users Say Thank You to tonyfoale For This Useful Post:

    Claudio HG (Feb 13, 2021), DIYer (Feb 12, 2021), DIYSwede (Feb 9, 2021), Gar (Feb 9, 2021), Jeffie (Feb 10, 2021), johncg (Feb 10, 2021), Jon (Feb 9, 2021), ngangst (Feb 23, 2021), NortonDommi (Feb 15, 2021), olderdan (Feb 10, 2021), Paul Jones (Feb 10, 2021), sacco1 (Feb 9, 2021), Saltfever (Apr 28, 2023), Tonyg (Feb 10, 2021), Toolmaker51 (Feb 9, 2021), tooly (Feb 10, 2021), yvonf (Feb 10, 2021)

  3. #2

    Join Date
    Feb 2019
    Posts
    151
    Thanks
    62
    Thanked 99 Times in 55 Posts
    Wow, that is very nicely done!

    I spent some time working on a homebrew Vickers type tester and cobbled up a few proof on concept attempts a while back. But this is a much better approach for most of what I would want one for. Well thought out, well executed, and a great presentation of the theory.

    Thank you for sharing all of your work in such detail. This will be on my short list of projects I think. I have a knife maker friend that would love one of these, I expect I will be making two of them...

    Thanks again, your posts are always very informative.

    2,500+ Tool Plans

  4. The Following 3 Users Say Thank You to clavius For This Useful Post:

    metricworks (Feb 9, 2021), Saltfever (Apr 28, 2023), tonyfoale (Feb 10, 2021)

  5. #3

  6. The Following User Says Thank You to tonyfoale For This Useful Post:

    RonRock (Feb 10, 2021)

  7. #4

    Join Date
    Jun 2018
    Posts
    5
    Thanks
    2
    Thanked 0 Times in 0 Posts
    Wow! This is very cool. Very generous of you to share. Not sure if I will have the electrical ability or the knowledge to make an Arduino work. But I am going to give it a try. Always wanted a reason to try out an Arduino.

  8. #5
    Supporting Member Paul Jones's Avatar
    Join Date
    May 2014
    Location
    Del Mar, California
    Posts
    1,231
    Thanks
    5,810
    Thanked 1,463 Times in 657 Posts

    Paul Jones's Tools
    Excellent presentation and documentation. I like Arduino for their versatile design for digital and analog sensing. For those just starting on the Arduino journey there are several inexpensive instructive kits available for learning and experimenting. These would be a great gift for anyone.

  9. The Following 2 Users Say Thank You to Paul Jones For This Useful Post:

    olderdan (Feb 10, 2021), tonyfoale (Feb 11, 2021)

  10. #6
    Supporting Member marksbug's Avatar
    Join Date
    Apr 2016
    Posts
    1,942
    Thanks
    778
    Thanked 384 Times in 310 Posts
    way past me... but wow. now days i just use the tictoc girls for hardness testerbut in days gone by...this sure would of been nice to have. keep it comming!!!

  11. The Following User Says Thank You to marksbug For This Useful Post:

    NortonDommi (Feb 15, 2021)

  12. #7
    Supporting Member tonyfoale's Avatar
    Join Date
    Nov 2016
    Location
    Spain
    Posts
    1,632
    Thanks
    739
    Thanked 2,745 Times in 735 Posts

    tonyfoale's Tools
    Quote Originally Posted by RonRock View Post
    Wow! This is very cool. Very generous of you to share. Not sure if I will have the electrical ability or the knowledge to make an Arduino work. But I am going to give it a try. Always wanted a reason to try out an Arduino.
    Try it out. There is nothing to lose and you will learn something whatever happens. I think that you can buy the Arduino Nano for something like $15 for a pack of 5. The other electronic bits are also super cheap. If you had none to start with I doubt that you would to spend more than $5 to get everything for this project.
    These days getting started with electronic projects is so much easier than it was in pre-micro days. Now you get something like an Arduino, Pi or ESP32 and you have a device which is the equivalent of thousands of transistors arranged in a general purpose way which can be used in specific circuits just with software. Decades back you had to design and construct individual circuits for each application and the components were much more expensive. I was 8 when I first started building radios etc. and I had to save pocket money for months just to buy a single valve.
    It takes a minimum of electronics knowledge nowadays to build quite complex and useful devices.

  13. The Following User Says Thank You to tonyfoale For This Useful Post:

    Paul Jones (Mar 9, 2021)

  14. #8
    Supporting Member marksbug's Avatar
    Join Date
    Apr 2016
    Posts
    1,942
    Thanks
    778
    Thanked 384 Times in 310 Posts
    Im totaly lost on this electronic stuff.or I would of done a cnc conversion on my mill and efi for my car/toys and much more stuff. my brain is now in the off position.probably for ever. but I like reading and seeing what all your guys are doing.keep it up !!!!

  15. #9
    Supporting Member tonyfoale's Avatar
    Join Date
    Nov 2016
    Location
    Spain
    Posts
    1,632
    Thanks
    739
    Thanked 2,745 Times in 735 Posts

    tonyfoale's Tools
    Quote Originally Posted by marksbug View Post
    Im totaly lost on this electronic stuff.or I would of done a cnc conversion on my mill and efi for my car/toys and much more stuff. my brain is now in the off position.probably for ever. but I like reading and seeing what all your guys are doing.keep it up !!!!
    EFI probably needs some decent 'leccy skills but CNC now can now be as easy or hard as you can handle. Have a look at the Centroid Acorn, full CNC hardly any harder than wiring a light outlet.

  16. The Following 2 Users Say Thank You to tonyfoale For This Useful Post:

    Paul Jones (Mar 9, 2021), Saltfever (Apr 29, 2023)

  17. #10
    Supporting Member marksbug's Avatar
    Join Date
    Apr 2016
    Posts
    1,942
    Thanks
    778
    Thanked 384 Times in 310 Posts
    Ill have a look.thanks.

Thread Information

Users Browsing this Thread

There are currently 1 users browsing this thread. (0 members and 1 guests)

Tags for this Thread

Bookmarks

Posting Permissions

  • You may not post new threads
  • You may not post replies
  • You may not post attachments
  • You may not edit your posts
  •