Free 186 More Best Homemade Tools eBook:  
Get tool plans

User Tag List

Page 1 of 3 1 2 3 LastLast
Results 1 to 10 of 27

Thread: Easy forge/Foundry

  1. #1
    Supporting Member MountainMan's Avatar
    Join Date
    Jul 2018
    Location
    Conway,SC
    Posts
    63
    Thanks
    72
    Thanked 85 Times in 20 Posts

    MountainMan's Tools

    Easy forge/Foundry

    I went out to my scrap pile to find material to put together a forge for knife making but also wated to be able to use it as a foundry for melting down aluminum chips from the lathe and casting them into new parts. So I found a old brake drum and a old turkey fryer base that fit together perfectly. I ran to the hardware store and got 1.5" galvanized flange and bolted it to the brake drum. I used a 4" galvanined nipple with a T for my air intake and the bottom side of it is the ash dump. It works great as a coal forge and melts aluminum easily. Just thought I would share to help anybody else out if they where considering building one.
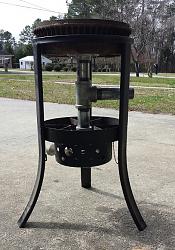
    Easy forge/Foundry-new.jpg
    Download plans for forging and casting tools.
    Dave
    "I have not failed...I've just found 10,000 ways that wont work"
    Thomas Edison

  2. The Following 25 Users Say Thank You to MountainMan For This Useful Post:

    baja (Jul 27, 2018), ben yeakey (Nov 23, 2018), billster (Jul 27, 2018), bukwessul (Jul 27, 2018), Captn Roy (Jul 29, 2018), casca92 (Jul 27, 2018), clydeman (Sep 3, 2020), cohay1 (Apr 18, 2020), DIMDIM (Aug 17, 2018), greyhoundollie (Nov 24, 2018), gunsgt1863 (Jul 28, 2018), high-side (Sep 4, 2020), HobieDave (Mar 19, 2020), JD62 (Jul 27, 2018), jdaley (Jul 28, 2018), Jon (Jul 28, 2018), JRock (Aug 7, 2018), old_toolmaker (Jul 31, 2018), PJs (Jul 28, 2018), Priemsy (Nov 23, 2018), Ralphxyz (Nov 10, 2023), redearthbonsai (Jul 27, 2018), rossbotics (Jul 31, 2018), sdiverjack (Aug 6, 2018), Seedtick (Jul 30, 2018)

  3. #2
    Supporting Member ncollar's Avatar
    Join Date
    Oct 2012
    Posts
    354
    Thanks
    23
    Thanked 181 Times in 126 Posts
    MountainMan
    Very nice, I would like to see a few more pics.
    Very nice build
    Nelson
    Download plans for forging and casting tools.

  4. #3
    Supporting Member MountainMan's Avatar
    Join Date
    Jul 2018
    Location
    Conway,SC
    Posts
    63
    Thanks
    72
    Thanked 85 Times in 20 Posts

    MountainMan's Tools
    Easy forge/Foundry-20180218_115437.jpg

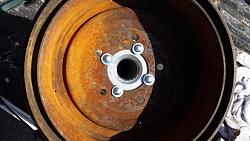
    Drilled a few holes threw the break drum to line up with the flange
    Dave
    "I have not failed...I've just found 10,000 ways that wont work"
    Thomas Edison

  5. #4
    Supporting Member MountainMan's Avatar
    Join Date
    Jul 2018
    Location
    Conway,SC
    Posts
    63
    Thanks
    72
    Thanked 85 Times in 20 Posts

    MountainMan's Tools
    Easy forge/Foundry-20180218_115553.jpg

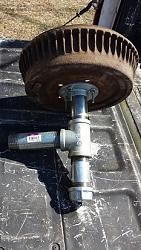
    All the pipe attached to the brake drum
    Dave
    "I have not failed...I've just found 10,000 ways that wont work"
    Thomas Edison

  6. #5
    Supporting Member MountainMan's Avatar
    Join Date
    Jul 2018
    Location
    Conway,SC
    Posts
    63
    Thanks
    72
    Thanked 85 Times in 20 Posts

    MountainMan's Tools
    Easy forge/Foundry-20180303_151003.jpg

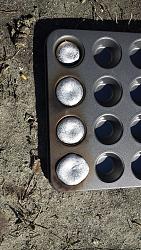
    Some aluminum from my first pour. I plan on mixing it with brass so I can mill some aluminum bronze
    Dave
    "I have not failed...I've just found 10,000 ways that wont work"
    Thomas Edison

  7. #6
    Supporting Member MountainMan's Avatar
    Join Date
    Jul 2018
    Location
    Conway,SC
    Posts
    63
    Thanks
    72
    Thanked 85 Times in 20 Posts

    MountainMan's Tools
    Easy DIY Coal Forge
    Parts list:
    Old Brake drum
    1 1/2" pipe flange
    2-1 1/2x4" nipples
    1-1 1/2x6" nipple
    1 1/2 cap
    4-3/8x 2" bolts with washers and nuts
    Dave
    "I have not failed...I've just found 10,000 ways that wont work"
    Thomas Edison

  8. #7
    PJs
    PJs is offline
    Supporting Member PJs's Avatar
    Join Date
    Sep 2014
    Location
    Northern CA
    Posts
    1,844
    Thanks
    8,427
    Thanked 1,129 Times in 725 Posts

    PJs's Tools
    Excellent build and salvage work. Nicely executed! Built one years (~40yrs) ago using an old bus 16" brake drum with a crank blower I salvaged and some exhaust pipe legs and a 1/4" plate from something. Actually melted brass in it using coke and rough cast some pieces but only got to use it for 3-4 months before life changed and had to give it up...All a hundred years ago now.

    Thanks for sharing and the memories!
    PJ
    ‘‘Always do right. This will gratify some people and astonish the rest.’’
    Mark Twain

  9. #8
    Supporting Member MountainMan's Avatar
    Join Date
    Jul 2018
    Location
    Conway,SC
    Posts
    63
    Thanks
    72
    Thanked 85 Times in 20 Posts

    MountainMan's Tools
    My original plan was to use a old hand crank forge blower but those things are no where to be found in my area (South east) so for now I have a hair dryer strapped to the intake line with a rubber boot. I believe the duty cycle on the hair dryer is about 2minutes. After the 2 minutes it turns off and wont turn back on for 5min. I either need a commercial hair dryer or to stumble across a forge blower at a fair price
    Dave
    "I have not failed...I've just found 10,000 ways that wont work"
    Thomas Edison

  10. The Following User Says Thank You to MountainMan For This Useful Post:

    PJs (Jul 30, 2018)

  11. #9
    PJs
    PJs is offline
    Supporting Member PJs's Avatar
    Join Date
    Sep 2014
    Location
    Northern CA
    Posts
    1,844
    Thanks
    8,427
    Thanked 1,129 Times in 725 Posts

    PJs's Tools
    Quote Originally Posted by MountainMan View Post
    My original plan was to use a old hand crank forge blower but those things are no where to be found in my area (South east) so for now I have a hair dryer strapped to the intake line with a rubber boot. I believe the duty cycle on the hair dryer is about 2minutes. After the 2 minutes it turns off and wont turn back on for 5min. I either need a commercial hair dryer or to stumble across a forge blower at a fair price
    MountainMan, I got mine from an old farrier I met at the Renaissance fair. It was a Champion as I remember that he had tossed in his scrap pile because the ring gear was cracked and the hand crank missing. It was pretty well worn but didn't know the vintage. Think I gave him $10 and helped him a few times and he taught me some, Real nice guy! Took it all apart and bevel ground the crack and silver brazed it, cleaned it all up and it worked fine for my use. Sold the whole thing for $60 plus half a bag of coke...only had about $25 in it, wish I still had it now.

    They are hard to find even here in No. Cal...looked a while back and used (rode hard and put away wet) are going for a couple hundred bucks 6-8 years ago. Check around with some farriers and country flea markets. Most of the farriers have gone propane but they might have a lead.

    As for the blow dryer: If it has switches to only blow air try that first. It also may be the wall wart on the cord if it has the GFI built in, which most of the newer dryers do. If not you can disconnect the heating element and the bimetal component (thermal overload)...usually a little silver cylindrical component and just blow air which is all you need. Another thought is to find a computer fan with about 80-100CFM (E-Bay ~$10-15) and run it from a wall wart but you will have to build a plenum and housing. Axial fans are not ideal because they don't have much static pressure available but might be able to overcome the back pressure with enough CFM and diameter.

    Good luck and hope to see more of your build and projects with it.

    Thanks,
    PJ
    ‘‘Always do right. This will gratify some people and astonish the rest.’’
    Mark Twain

  12. The Following User Says Thank You to PJs For This Useful Post:

    MountainMan (Jul 30, 2018)

  13. #10
    Supporting Member ncollar's Avatar
    Join Date
    Oct 2012
    Posts
    354
    Thanks
    23
    Thanked 181 Times in 126 Posts
    MountainMan
    As Pj said open up the hair dryer and snip the wires to the heating element. They have a thermo switch that stops them from combusting. It should blow as long as you want it then. Good luck, looking good.
    Nelson

  14. The Following 5 Users Say Thank You to ncollar For This Useful Post:

    Jon (Jul 31, 2018), JRock (Aug 7, 2018), MountainMan (Jul 30, 2018), PJs (Jul 30, 2018), Priemsy (Nov 23, 2018)

Thread Information

Users Browsing this Thread

There are currently 1 users browsing this thread. (0 members and 1 guests)

Bookmarks

Posting Permissions

  • You may not post new threads
  • You may not post replies
  • You may not post attachments
  • You may not edit your posts
  •