Free 186 More Best Homemade Tools eBook:  
Get tool plans

User Tag List

Results 1 to 5 of 5

Thread: Drill Lathe Mk 1 Mod 0

  1. #1
    Johnny Farnen's Avatar
    Join Date
    Feb 2016
    Location
    Bellevue, NE
    Posts
    6
    Thanks
    0
    Thanked 10 Times in 3 Posts

    Johnny Farnen's Tools

    Drill Lathe Mk 1 Mod 0

    Well, it ain't pretty yet, but it only took about 14 hours to get this far.

    Total cost at this point is $0.00.
    Everything is stuff I have had laying around the house.
    Drill Lathe Mk 1 Mod 0-img_1651.jpg

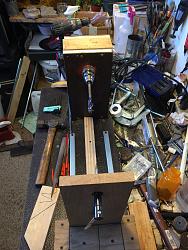
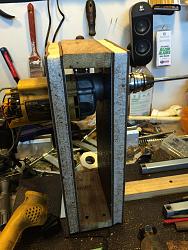
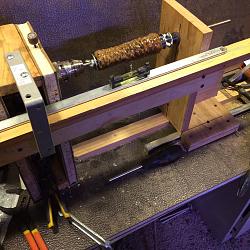
    So the main motor is an old DeWalt DW235G 7.8A 120V heavy duty corded drill. It works well, but the chuck is on its last legs. I managed to get the infamous chuck screw out. It had backed out in true DeWalt key-less chuck fashion. As soon as I figure out how to get it off the drill, it will be replaced, I assure you.
    I hacked the hand grip off, but preserved the reversible, locking trigger assembly for now. I have a 1000W, 16A, 120 volt dimmer switch that is being re-purposed as a basic speed controller.
    Drill Lathe Mk 1 Mod 0-img_1655.jpg

    The Headstock obviously needs more work, but for now it is functional. I will likely redo it in 3/4 inch oak I have laying around, but lacking a table saw and drill press...baby steps... I also have some angle braces to install, but frankly my hands are pretty torn up right now so I plan to take a break for a few days.
    Drill Lathe Mk 1 Mod 0-img_1654.jpg
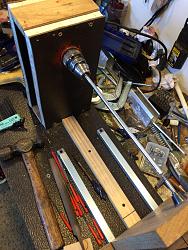
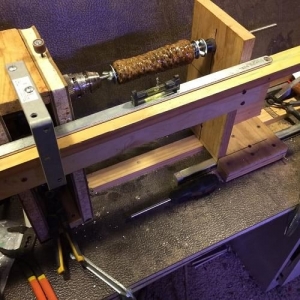
    The current tail stock is some scrap oak and a 1/2 tap handle with the point out of a spring loaded center punch, for now. The slide rails are door restrictors I got from my office, after maintenance removed them and was going to trash them! They work great.
    Drill Lathe Mk 1 Mod 0-img_1653.jpg

    It took a while to get things level and center headstock to tail stock, but finally I got it squared up. Right now it has a max of 12 inches, but I haven't built a chuck or a spur yet. I plan to make the chuck body using the lathe...

    There are prints and instructions for the build, but they are not quite right as I did some serious engineering on the fly. I'll edit those and get them up here shortly.

    I did some initial testing, but I haven't any turning tools. Since I don't own a bench grinder, that may take a bit of time to get moving

    It isn't much, but I only plan on using it to turn fly fishing rod handles, and perhaps even pen bodies. I have to put together a tool rest, which I have a skateboard truck set aside for. I also have an M12 SS threaded rod here, so once I get some nuts for it, I have a pipe clamp that is going to get modded into a crank for the tailstock and tool holder.

    I also have plans in the works to add a tool rest for my dremel, just because I can.

    More to follow soon1
    Download plans for lathes.

  2. The Following 6 Users Say Thank You to Johnny Farnen For This Useful Post:

    emu roo (Sep 26, 2024), Jon (Feb 9, 2016), kbalch (Feb 9, 2016), mudnducs (Feb 9, 2016), Paul Jones (Apr 17, 2016), PJs (Mar 15, 2016)

  3. #2
    Johnny Farnen's Avatar
    Join Date
    Feb 2016
    Location
    Bellevue, NE
    Posts
    6
    Thanks
    0
    Thanked 10 Times in 3 Posts

    Johnny Farnen's Tools
    Hello All.

    Took a little more time off on this project than I had intended. I also had to "cheat" and buy 20 bucks worth of hardware. I haven't finished the electrical yet and am currently using a velcro strip as my controller!

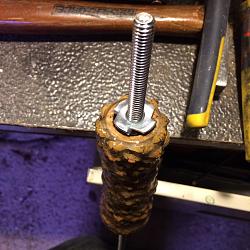
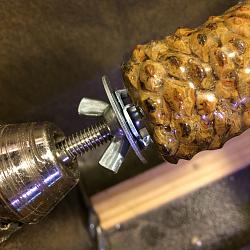
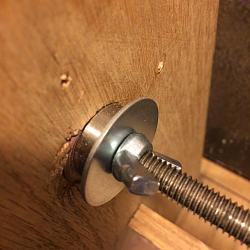
    Since my primary mission with this drill lathe is to turn blanks for custom fly rod handles, I haven't bothered to build the real tool rest or chucks. The hardware I purchased was for the fly rod grim mandrel:

    Drill Lathe Mk 1 Mod 0-img_1703.jpgDrill Lathe Mk 1 Mod 0-img_1705.jpgDrill Lathe Mk 1 Mod 0-img_1706.jpgDrill Lathe Mk 1 Mod 0-img_1707.jpg

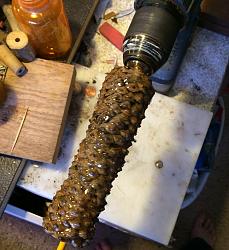
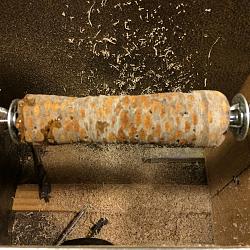
    Here it is in action turning a custom pine cone scale and resin grip:


    Notice my "adjustable tool rest. The metal bar is one of the arms off of the office door restrictors I used a slide rails for the tail stock. Still needs some refinement, but for now it is doing what I need it to do!

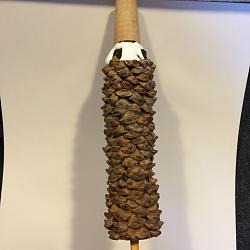
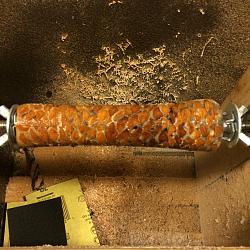
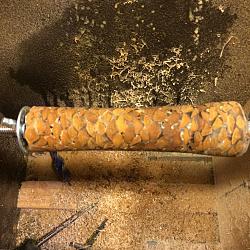
    Here are some stills of the same grip turned on this lathe:
    Drill Lathe Mk 1 Mod 0-img_1695.jpgDrill Lathe Mk 1 Mod 0-img_1700.jpgDrill Lathe Mk 1 Mod 0-img_1708.jpgDrill Lathe Mk 1 Mod 0-img_1710.jpgDrill Lathe Mk 1 Mod 0-img_1711.jpgDrill Lathe Mk 1 Mod 0-img_1712.jpg

    So far so good, a quick clear coat and that one is done. Going to spend the weekend hand gluing pine scales to a cork core and coating them with resin. Will hopefully get the power, saftey and speed controller hooked up too!
    Download plans for lathes.
    Last edited by Johnny Farnen; Feb 25, 2016 at 07:26 PM.

  4. The Following 2 Users Say Thank You to Johnny Farnen For This Useful Post:

    Paul Jones (Mar 1, 2016), PJs (Mar 15, 2016)

  5. #3
    Johnny Farnen's Avatar
    Join Date
    Feb 2016
    Location
    Bellevue, NE
    Posts
    6
    Thanks
    0
    Thanked 10 Times in 3 Posts

    Johnny Farnen's Tools
    Well I built the Mod 2 version. Reinforced the headstock and added a speed controller. Turned a few pieces of bass wood for practice. Was going along just fine when I let the smoke out. Turns out the rheostat was not actually rated at 20 amps, it was mislabeled and rated at 5 amps. Given the peak draw on the drill motor, I let the smoke out of the controller. Back to the drawing board!

  6. The Following 2 Users Say Thank You to Johnny Farnen For This Useful Post:

    PJs (Mar 15, 2016), wolfpaak (Apr 29, 2023)

  7. #4
    Content Editor
    Supporting Member
    DIYer's Avatar
    Join Date
    Aug 2013
    Posts
    3,055
    Thanks
    793
    Thanked 1,885 Times in 1,682 Posts
    Thanks Johnny! We've added your Drill Lathe to our Wood Lathes category, as well as to your builder page: Johnny Farnen's Homemade Tools. Your receipt:

    Last edited by Jon; Oct 23, 2021 at 01:57 AM.

  8. #5
    wadeamca's Avatar
    Join Date
    Mar 2012
    Location
    Belen, NM
    Posts
    5
    Thanks
    0
    Thanked 7 Times in 3 Posts

    wadeamca's Tools

    Talking

    Quote Originally Posted by Johnny Farnen View Post
    Well I built the Mod 2 version. Reinforced the headstock and added a speed controller. Turned a few pieces of bass wood for practice. Was going along just fine when I let the smoke out. Turns out the rheostat was not actually rated at 20 amps, it was mislabeled and rated at 5 amps. Given the peak draw on the drill motor, I let the smoke out of the controller. Back to the drawing board!
    Johnny, LBCs (aka, Little British Cars) have the same problem with the smoke escaping from the wiring and other components. Some LBC owners have made smoke injectors to replace the escaped smoke. Additionally, there have been reports of Liquid Smoke being readily available in many locations, primarily grocery stores in the BBC Sauce area. You might try that before replacing the smokeless rheostat. Just a thought. Wayne.


    Download plans for lathes.

  9. The Following User Says Thank You to wadeamca For This Useful Post:

    wolfpaak (Apr 29, 2023)

Thread Information

Users Browsing this Thread

There are currently 1 users browsing this thread. (0 members and 1 guests)

Tags for this Thread

Bookmarks

Posting Permissions

  • You may not post new threads
  • You may not post replies
  • You may not post attachments
  • You may not edit your posts
  •