Free 186 More Best Homemade Tools eBook:  
Get tool plans

User Tag List

Results 1 to 4 of 4

Thread: Drill Jig, this one makes strips for mounting E-Track

  1. #1
    Supporting Member Toolmaker51's Avatar
    Join Date
    Feb 2016
    Location
    Midwest USA
    Posts
    5,334
    Thanks
    7,044
    Thanked 3,011 Times in 1,900 Posts

    Toolmaker51's Tools

    Post Drill Jig, this one makes strips for mounting E-Track

    As all are aware; I treasure accurate descriptions. I excuse this habit with "I don't know any short stories...".

    Inspired by Frank S's report hauling a gang drill back indoors, and resulting exchange of 'how it works'. So this is a hack, in own new thread.
    It's at Took the first step towards building my shop starting at *363
    Now wondering at many recommendations I've made in general threads would have added to my own tally? Oh well, not here expecting compen$ation.

    • My single axle, tilt-bed 5' x 10' utility trailer fetched back many machine tools, some a bit over it's weight rating, but not grossly. One deficiency is lack of tie-down points. The angle iron frame not ideal for that, there are just four small loops. OK for ATV's, not machinery. One designed with transport in mind, other requires care in proper rigging. Otherwise, you might see a new prize become a Hyundai hood ornament.
    • I've puzzled over remedy for ages, at least 12 years. D-rings bolted to floor, swivels in the frame, welding more loops...nothing offered continuous, economical attachment points.
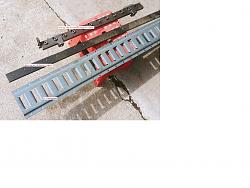
    • Finally became aware of E-Track. These are 4" wide strips, with punched rectangular slots for attaching tie-downs, spaced on 2" intervals. They are attached by welding, or screwed to insides of box trucks. Typical mount is horizontal on those walls, but nothing says deck mounting wouldn't work.
      Drill Jig, this one makes strips for mounting E-Track-e-track-bar-jig.jpg
    • In this case, preference is bolt on. The strips are 10' long, 1/4" holes spaced 2" centers in both edges, trailer didn't have any material 4" wide thick enough for good thread engagement. My solution welds two strips [four total] 3/8" x 1-1/2" hot-rolled; one to upper angle iron, other correct distance below. That 3/8" matches 1:5 diameters of 1/4-20 engagement; with 1/2" long screws through lock washer and material.
    • All well and good? Yup, once I solved drilling 240 correctly spaced #7 holes, chamfering each side, then efficient tapping of 240 locations.
    • Go ahead, say it; ALRIGHT ALREADY, or FINALLY! Your choice........
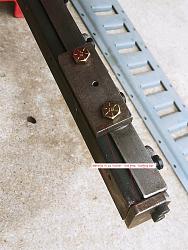
      Drill Jig, this one makes strips for mounting E-Track-e-track-bar-jig-2.jpg
    • I bored this cold rolled bar on 2" centers, same distance from edge as E-Track. Two areas were milled-drilled-tapped acute angle as clamp pads. There isn't a right vs left issue, not even a true upper vs lower. So, only one jig required, running through holes, not blind.
    • Why? Hot roll bar has convex edges, not a reliable clamp surface. Using protractor, demonstrated angle to grip beyond (under) high point at lower corner. \( Opposite those pads, at same angle are clamps themselves )/ Who knew punctuation could stand in as drawing details?
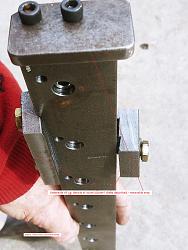
      Drill Jig, this one makes strips for mounting E-Track-e-track-bar-jig-3.jpg
    • Now, in use. One end mounts a swiveling stop, locating initial of 12 holes. Upon finishing 12th spot, loosened clamps and stop, slid jig along material and located 12th hole to 1st bushing with #7 drill shank, re-tighten clamps and proceed drilling next 11 holes until end of bar.
    • Took 40 minutes each, clearing table, setting up stock rollers, mounting drill bit, lowering head minimizing space to material, brushing cutting oil, drilling holes. Chamfer and tap ops were guided by a rail clamped on table, registering main centerline. Counter sink or point of tap did the rest.
    • I'll add couple explanatory pics from phone, a non-starter for text. Thank Jon for edit button...

    186 More Best Homemade Tools eBook
    Last edited by Toolmaker51; Apr 11, 2021 at 03:38 PM. Reason: have to figure reasonable pixel and Mb sizes...
    Sincerely,
    Toolmaker51
    ...we'll learn more by wandering than searching...

  2. The Following 4 Users Say Thank You to Toolmaker51 For This Useful Post:

    baja (Apr 13, 2021), Frank S (Apr 12, 2021), Jon (Apr 13, 2021), metric_taper (Apr 18, 2021)

  3. #2
    Content Editor
    Supporting Member
    DIYer's Avatar
    Join Date
    Aug 2013
    Posts
    3,055
    Thanks
    793
    Thanked 1,888 Times in 1,683 Posts


    Thanks Toolmaker51! We've added your Drilling Jig to our Drilling and Drill Presses category,
    as well as to your builder page: Toolmaker51's Homemade Tools. Your receipt:


    2,000+ Tool Plans

  4. #3
    Supporting Member Frank S's Avatar
    Join Date
    Aug 2015
    Location
    Peacock TX
    Posts
    11,634
    Thanks
    2,185
    Thanked 9,134 Times in 4,366 Posts

    Frank S's Tools
    Agreed there is nothing that will even come close to repeatability and speed as a well made drill jig. Not even a CNC gantry drill can absolutely repeat multiple set ups without a secure index point
    The company I was with in Kuwait was contracted to fabricate some supplemental steel beams for the Burj Khalifa in Dubai to be installed in one of the upper floors somewhere within the building. We were well known for being able to duplicate replacement beams for other companies who had miss counted their run numbers or additional small quantities of fabricated steel were required due to last minute design additions.
    Our beam line was top notch with a multi head beam drill in the line capable of drilling both flanges and the web simultaneously.
    On this particular instance the original beams had been fabricated on a beam line much the same as ours but the series of holes were off by 1mm accumulative.
    that may not sound so bad on a 20 meter long beam with only 2 or 3 sets of holes but the sets of holes on these beams were on a 500 mm spacing so by the time all of the hole sets were drilled the accumulated distance had become significant. Given the size weight and cost of the beams I decided that even though our drill was nearly new and quite capable of precisely spacing the hole sets under normal circumstances, I opted to fabricate a drill jig which would be attached to the spindle of one of the drill heads with 2 sets of holes spaced the proper distances from the set being drilled. the spindle would drill the first set of holes then the beam was advanced by the advancing clamps then a pair of machined pegs would be placed into the previously drilled holes then the spindle would drill 1 hole of the set thee pegs removed and the spindle allowed to complete the series of holes in that set and the beam advanced once again only 3 times during the entire process did our machine fail to advance exactly to the next series at which time all we had to do was release the holding clamps and fudge the beam about .5mm
    For a few moments our company was the hero of the day.
    Never try to tell me it can't be done
    When I have to paint I use KBS products

  5. #4
    Supporting Member Toolmaker51's Avatar
    Join Date
    Feb 2016
    Location
    Midwest USA
    Posts
    5,334
    Thanks
    7,044
    Thanked 3,011 Times in 1,900 Posts

    Toolmaker51's Tools
    Frank S states a very important, yet elusive factor in measuring or machine movement.
    may not sound so bad on a 20 meter long beam with only 2 or 3 sets of holes but the sets of holes on these beams were on a 500 mm spacing so by the time all of the hole sets were drilled the accumulated distance had become significant.
    Often makes all the difference in the world; the difference between incremental versus absolute dimensioning. Try this demonstration. Lay out a spacing pattern in some convenient amount, let's say 1"; moving a 6" scale along (incremental) a fair distance, then same spacing with a tape measure hooked at beginning edge (absolute). Compare them.
    I used a DRO spacing the bushing bar. In the dozen holes, displayed no error over the 24" pattern, but let's say it's .0005 overall. It took 5.45 sets of 11 holes to cover 10' length (60 holes). Accepting that supposed .0005 variance, hole #60 is only .0025 off. This does not account clearance between drilled hole receiving same size drill shank; minimal due to use of drill bushings.

    Now, if we ask Jon real nice, he might provide a way to keep # (number sign, hash, or in North American usage, pound sign) creating an empty hash link?


    2,000+ Tool Plans
    Last edited by Toolmaker51; Apr 13, 2021 at 04:55 PM.
    Sincerely,
    Toolmaker51
    ...we'll learn more by wandering than searching...

Thread Information

Users Browsing this Thread

There are currently 1 users browsing this thread. (0 members and 1 guests)

Tags for this Thread

Bookmarks

Posting Permissions

  • You may not post new threads
  • You may not post replies
  • You may not post attachments
  • You may not edit your posts
  •