Free 186 More Best Homemade Tools eBook:  
Get tool plans

User Tag List

Page 2 of 4 FirstFirst 1 2 3 4 LastLast
Results 11 to 20 of 35

Thread: DIY surface grinder

  1. #11
    Supporting Member tonyfoale's Avatar
    Join Date
    Nov 2016
    Location
    Spain
    Posts
    1,606
    Thanks
    720
    Thanked 2,703 Times in 726 Posts

    tonyfoale's Tools
    Jon,

    Many thanks. To be honest i thought that the http://www.homemadetools.net/forum/l...190#post109747 by editor was the star tool this week. Although not a tool as such but the http://www.homemadetools.net/forum/s...224#post109869 by thehomeengineer was a great tip.

    186 More Best Homemade Tools eBook

  2. The Following User Says Thank You to tonyfoale For This Useful Post:

    Paul Jones (Apr 7, 2018)

  3. #12
    Jon
    Jon is online now Jon has agreed the Seller's Terms of Service
    Administrator
    Supporting Member
    Jon's Avatar
    Join Date
    Jan 2012
    Location
    Colorado, USA
    Posts
    26,422
    Thanks
    8,097
    Thanked 40,217 Times in 11,765 Posts
    Agreed, it was a tough week. In addition to the two you mentioned, Bellevue Woodshop's 1" sander, and Frank S's truck wheel ring straightener were also excellent.

    2,000+ Tool Plans

  4. The Following User Says Thank You to Jon For This Useful Post:

    Paul Jones (Apr 9, 2018)

  5. #13
    Supporting Member tonyfoale's Avatar
    Join Date
    Nov 2016
    Location
    Spain
    Posts
    1,606
    Thanks
    720
    Thanked 2,703 Times in 726 Posts

    tonyfoale's Tools
    Quote Originally Posted by Jon View Post
    Agreed, it was a tough week. In addition to the two you mentioned, Bellevue Woodshop's 1" sander, and Frank S's truck wheel ring straightener were also excellent.
    True, I guess that I was looking at from the point of view of what would be of interest to me. You have a broader perspective.

  6. #14

    Join Date
    May 2017
    Posts
    4
    Thanks
    11
    Thanked 2 Times in 2 Posts
    Quote Originally Posted by tonyfoale View Post
    A while back I made a toolpost grinder for my lathe from a treadmill DC motor and the spindle from a small mill/drill that I found at a flea market.

    Attachment 22937 Attachment 22938 Click thumbnails for full size.

    I also used it on my T&C grinder which was featured here
    http://www.homemadetools.net/forum/h...6205#post83247

    Attachment 22939 Attachment 22940
    T&C grinder with same head.

    For some time I have needed a surface grinder and have been thinking about attaching the same grinding head to my mill. My Bridgeport was fitted from new with an early Anilam CNC system which I have ungraded to PC control. The CNC would allow for automatic X and Y traverse and Z depth of cut adjustment. I had put this job off because I thought that I had more pressing jobs and I thought that it would take more time than I wanted to spend on it.

    Attaching a grinder to a mill for this purpose is not a new idea in this forum, but others I have seen have fixed the grinder to the frame structure of the mill. I wanted to attach it to the quill for depth control.

    I realised that I would need to make a clamp around the quill but I had already made a couple to hold a high speed air spindle and later an electric spindle. Looking at those I saw that if I turned the grinding head upside down I could bolt it to the electric spindle clamp. Drill 4 mounting holes in the clamp and drill and tap 4 holes in the grinding head base plate. That didn't seem like it would take too long, a reasonable price to remove an item from my todo list.

    Attachment 22941 Attachment 22942
    High speed spindle clamp.

    Attachment 22943
    Showing the four bolts holding the grinding head to the quill clamp. 1. is countersunk to avoid fouling the quill housing, 2. is a close fit for repeatable location, 3 & 4 are in oversize holes to allow some movement to permit the clamp to close up on the quill without resistance. 3 & 4 are tightened after the clamp. The asymmetric bolt pattern was to fit in with the bracket clamping bolt and other obstacles.

    Luckily, I realised that if I mounted the base plate horizontally then the motor would be lower than the wheel surface, which would prevent the grinding of long work pieces. A solution would be to angle the base plate down at the wheel end by 3.5 deg. So I milled an angled surface on the quill clamp. The clamp is substantial enough so that the holes and milled surface have next to no effect on strength nor stiffness. It would have been easy to have overlooked this problem and it was pure luck that made me check.

    Attachment 22944 Attachment 22945
    On the left, milling the clamp for the 3.5 deg angle. On the right we can be seen how the grinder base tilts downward at the wheel end.

    A couple of hours later and I did my first test grind and was very pleased with the finish, I did it dry but will try mist in future. I used a cheap bench grinder wheel, because it is the only one that I have with a 1.25" hole in it to fit my mandrels. I can fit wheels between 5.5" and 6.5", larger will foul the clamp and less leaves the motor lower, which only matters for long work pieces. I have a CBN 6" wheel that I got for cam grinding, that is narrower and would need more passes but it will be interesting to see the finish.

    Attachment 22946 Attachment 22947 Attachment 22948
    A couple views of the grinder before it had a wheel cover and after doing the first test grind on a piece of hardened steel. I was very pleased with the results.

    After I made a Q&D wheel cover I started to think about a dust funnel to connect to a shopvac, but in the preceding day or two I had been discussing magnets with a couple of friends and that lead me to think about using one or more magnets to collect most of the swarf. Afterall if you are grinding properly with the correct wheel then almost all of the dust is steel although many people think that it is abrasive grit. Imagine how fast the wheel would wear if that were the case. So I firstly did a quick test, I hand held a magnet to the outside of the cover and did a test grind. As can be seen in the first pic below, when I removed the magnet the collected swarf fell down. The second pic shows the swarf that I wiped off magnets, which I had taped to the cover, after I had ground the top of the hardened jaws of my mill vice. Almost 100% of the swarf was captured. It was interesting to watch from work surface height. Without the magnets the sparks would be shot off horizontally at a tangent to the contact point, also some sparks would be carried around with the wheel and exit at the rear end. With the magnets in place the spark trajectory would curl around and head for the magnets, no more exited from the rear, I had a catch system to try and collect any dust that got missed and I collected nothing.

    So now I need to make a proper system for mounting the magnets. I am thinking that I should make it an eletromagnet, then when I want to clean the swarf out I'll just have to switch it off and catch the falling dust.

    Attachment 22949 Attachment 22950

    Now I have to write a simple programme to output G-code to move the table longitudinally by the required amount and then step over for the next pass. A simple bit of software that would take the need for thinking out of the equation. I also need to look for a magnetic chuck but that is not so easy to find used here in Spain, shipping would kill it from Germany or UK. I really don't want to have to make one because that WOULD take more than a couple of hours. If I have to make one then it will be an electromagnetic chuck made from surplus transformers.

    I have made videos of most of the process and will post a link as soon as I get around to editing it.
    This is absolutely "excellent" & the magnet idea "sensational" Thank you.

  7. The Following User Says Thank You to davidhoneybadger For This Useful Post:

    tonyfoale (Apr 7, 2018)

  8. #15
    Supporting Member Tuomas's Avatar
    Join Date
    Jun 2016
    Location
    Jyväskylä Finland
    Posts
    832
    Thanks
    558
    Thanked 1,865 Times in 507 Posts

    Tuomas's Tools
    Great project. Can't wait to see the videos.

    Btw.. To get more views, i think you could try to make also one shorter "preview" video too. It seems that most viewers just like to see "maker porn" 10 minutes action, sparks and that...

    So, you could try to make a detailed video series for the makers that actually want to know how to make, and one shorter video for the "entertainment" purpose.

    Just a succestion.

    Personally i have noticed that my most watched videos are ones that i tought to be boring and something obvious and seen so many times. My conclusion is that those hit that "entertainment" spot.

  9. The Following User Says Thank You to Tuomas For This Useful Post:

    PJs (Apr 10, 2018)

  10. #16
    Supporting Member
    Join Date
    Jan 2018
    Posts
    73
    Thanks
    0
    Thanked 170 Times in 40 Posts

    petertha's Tools
    Nice. You show 2 different spindles, the repurposed mill/drill & the other slender ?combo motor?. I'm looking to make a mini version for the lathe toolpost. Not a regular duty hp like a Themac, just a baby for small finicky parts. I have seen many versions of Dremels & Foredoms & other 'hand grinder' type motors adapted, but I always wonder about the bearings, both in terms of runout & heat. I do want to strive for accuracy over hogging material or just making it shiny. I have some plans using angular contact bearings that I can adapt & scale but requires detached motor & step up pulley.

    Can you comment on yours? Does the all-in-one motor/spindle run quite accurate? What kind of rpm/watts is it? How are the bearings & how long can you run? I've seen some China cnc router ones but after about 500-700 watts they seem to have water cooling & many are VFD,

    Sorry for all the questions, figured you would be a good guy to ask!

  11. The Following User Says Thank You to petertha For This Useful Post:

    tonyfoale (Apr 12, 2018)

  12. #17
    Supporting Member tonyfoale's Avatar
    Join Date
    Nov 2016
    Location
    Spain
    Posts
    1,606
    Thanks
    720
    Thanked 2,703 Times in 726 Posts

    tonyfoale's Tools
    Quote Originally Posted by petertha View Post
    Nice. You show 2 different spindles, the repurposed mill/drill & the other slender ?combo motor?. I'm looking to make a mini version for the lathe toolpost. Not a regular duty hp like a Themac, just a baby for small finicky parts. I have seen many versions of Dremels & Foredoms & other 'hand grinder' type motors adapted, but I always wonder about the bearings, both in terms of runout & heat. I do want to strive for accuracy over hogging material or just making it shiny. I have some plans using angular contact bearings that I can adapt & scale but requires detached motor & step up pulley.
    The two "spindles" have separate functions. One is the spindle for the grinding wheel. That came with taper roller bearings which have no place in such devices. Spindle heat expansion will loosen the bearings. So I have converted it to 2 back to back angular contact at the wheel end and a simple ball race at the pulley end which cam float axially. This is the best way to hold the wheel securely and allow for the differential expansion twit spindle and housing.
    The other is the motor. This is a permanent magnet DC motor off an exercise treadmill. Max. RPM of these motors is typically 5000/5500. The quoted power of mine is 2hp. Although I live in Spain with 220 v electrics, this motor is 110 v because I got in when I lived in the US for 3 years. I have a large 220/110 v transformer and I have wired my workshop for both 220 and 110 v electrics.

    Quote Originally Posted by petertha View Post
    Can you comment on yours? Does the all-in-one motor/spindle run quite accurate? What kind of rpm/watts is it? How are the bearings & how long can you run? I've seen some China cnc router ones but after about 500-700 watts they seem to have water cooling & many are VFD,
    I use these treadmill motors in various devices. They come with cooling fans and are designed for continuous running. However for what I suspect are obvious reasons, I have removed the fan from the motor on the grinder and when loaded it does warm up. So far I haven't reached the point where I considered it too hot to continue without a cool down break. Maybe that will happen when used as a surface grinder?
    I finish machine the pulleys after fitting them to the shafts to maximise accuracy.
    Today I am making some additional modifications to the motor to make it more suited to duty on a grinder and I will make a separate post when those are complete. I'll change bearings, stiffen the bearing housing, seal the motor better, change from the poly-V belt to a flat belt.

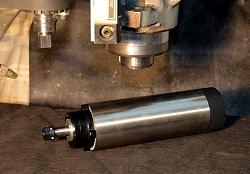
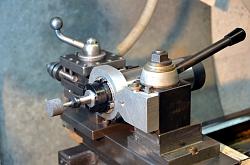
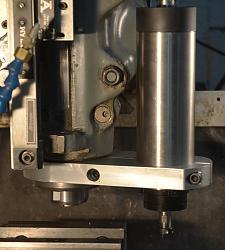
    The Chinese router spindles are high speed only. With a VFD you can physically run them at slow speed but you will soon need to buy a replacement if you do. They quote a minimum speed and you should NEVER run them below that because the fan won't shift enough air. The VFDs sold with those spindles as a kit will probably come with the VFD set for an appropriate minimum speed so the only danger is if you want to use the VFD on other slower motors and reprogram them. You can get either full air cooled versions or air/water cooling (usually referred to just as water cooled). Even the water cooled ones have a "do not run below" speed. So these high speed devices are not suitable for use with large wheels such as used for external grinding. For routing, milling with small tools and internal grinding with small mounted wheels these spindles work well and the ones in my experience have a good bearing setup. I have heard that some come with poor quality bearings but it is cheap enough to replace them with quality bearings. Mine have given no problems. here are some pix of my high speed spindle, also as fitted in a lathe and mill.

    DIY surface grinder-electric-spindle.jpg DIY surface grinder-spindle-lathe.jpg DIY surface grinder-spindle-mill.jpg


    Quote Originally Posted by petertha View Post
    Sorry for all the questions, figured you would be a good guy to ask!
    Don't be sorry, this forum is for mutual assistance and questions are an important part of that.

  13. The Following 2 Users Say Thank You to tonyfoale For This Useful Post:

    Jon (Apr 12, 2018), mwmkravchenko (Jan 24, 2024)

  14. #18
    Supporting Member
    Join Date
    Jan 2018
    Posts
    73
    Thanks
    0
    Thanked 170 Times in 40 Posts

    petertha's Tools
    Thanks so much. Your installation mode is precisely what I want to do. Is it an ER collet? If you had to replace the one like that today, do you have a preferable source? My shop is 110v or 220v single phase.

  15. #19
    Supporting Member tonyfoale's Avatar
    Join Date
    Nov 2016
    Location
    Spain
    Posts
    1,606
    Thanks
    720
    Thanked 2,703 Times in 726 Posts

    tonyfoale's Tools
    Quote Originally Posted by petertha View Post
    Thanks so much. Your installation mode is precisely what I want to do. Is it an ER collet? If you had to replace the one like that today, do you have a preferable source? My shop is 110v or 220v single phase.
    Your single phase supply is not a problem because you can get single phase VFDs which convert the output to varible speed/frequency 3 phase which is what the spindle motors need.

    Yes the collets are ER20.

    If you search eBay for VFDs then you'll get a lot of offers on VFD plus spindle combos.

  16. #20
    Supporting Member bruce.desertrat's Avatar
    Join Date
    Nov 2017
    Posts
    809
    Thanks
    589
    Thanked 687 Times in 369 Posts

    bruce.desertrat's Tools
    Kind of late to the thread, but you might want to investigate Make it Extreme's mag vise:
    that would work on the grinder once you flatten the top with the mill, then the grinder :-)

  17. The Following User Says Thank You to bruce.desertrat For This Useful Post:

    Jon (Aug 3, 2018)

Thread Information

Users Browsing this Thread

There are currently 2 users browsing this thread. (0 members and 2 guests)

Tags for this Thread

Bookmarks

Posting Permissions

  • You may not post new threads
  • You may not post replies
  • You may not post attachments
  • You may not edit your posts
  •