Free 186 More Best Homemade Tools eBook:  
Get 2,500+ tool plans, full site access, and more.

User Tag List

Results 1 to 8 of 8

Thread: DIY motorcycle wheel alignment tool

  1. #1
    hotdog0627's Avatar
    Join Date
    Jul 2016
    Posts
    65
    Thanks
    8
    Thanked 8 Times in 6 Posts

    hotdog0627's Tools

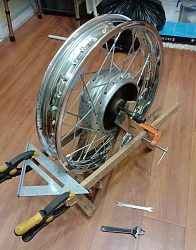
    DIY motorcycle wheel alignment tool

    I know it's cheap to just go to a shop and have your motorcycle wheels aligned... but where's the fun in that...

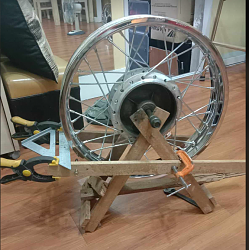
    Initially I planned to weld some scrap metal to make the tool but saw some pieces of wood, that I salvaged from old plywood/blockboard that I planned to use on something I dont know yet... tried it first as it will not consume electricity...

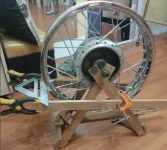
    I just used some woodscrews and clamps to keep the guide bar from falling down easily... and it seem to do the job just fine. Although, I am still learning how to perfectly tune the wheel... while watching a Netflix movie... but I'm not going that fast anyway...


    DIY motorcycle wheel alignment tool-w1.pngDIY motorcycle wheel alignment tool-w2.png

    the cheap chinese spoke tool I bought from lazada (online store like amazon) is no good when the spokes start to tighten up... I had to use the adjustable wrench instead. Do you think it will help if I quench the spoke tool (like what they do in making swords/knives)?

    186 More Best Homemade Tools eBook

  2. #2
    Content Editor
    Supporting Member
    DIYer's Avatar
    Join Date
    Aug 2013
    Posts
    3,055
    Thanks
    799
    Thanked 1,897 Times in 1,692 Posts


    Thanks hotdog0627! We've added your Wheel Alignment Tool to our Motorcycle Wheel and Tire category,
    as well as to your builder page: hotdog0627's Homemade Tools. Your receipt:


    2,500+ Tool Plans
    New plans added on 01/17/2025: Click here for 2,706 plans for homemade tools.

  3. #3
    Supporting Member eoverton's Avatar
    Join Date
    Jan 2019
    Posts
    35
    Thanks
    0
    Thanked 33 Times in 13 Posts
    Heating and quenching is very unlikely to help a cheap tool like the one in your photos. Quenching works best with high-alloy steels since they have substitutional atoms (chromium, molybdenum, nickel, etc.) in the places where BCC iron would reside. Heating above the austentizing temperature and doing a quench to form martensite (the hard form of steel) usually only works as a surface treatment. The thicker the part, the less hardened steel you're going to get towards the center. With a wrench, that's not a bad thing, since hardened (martensitic) steel is also brittle, and you want a ductile core to your part to keep it from breaking.

    That said, this part from China just looks like whatever cheap junky steel somebody's brother-in-law was selling that morning. You're not going to fix it with a BCC->FCC->BCC transition from a heat-and-quench.

  4. #4
    Supporting Member Philip Davies's Avatar
    Join Date
    Dec 2015
    Location
    Reading, Berks, UK
    Posts
    955
    Thanks
    1,293
    Thanked 1,064 Times in 360 Posts

    Philip Davies's Tools
    I am very glad to see an improvised set up like this. There are many superbly engineered tools on HMT, and my offerings are really rough in comparison. Nobody has criticised me for that, I am happy to say.

  5. #5
    Supporting Member tonyfoale's Avatar
    Join Date
    Nov 2016
    Location
    Spain
    Posts
    1,633
    Thanks
    740
    Thanked 2,745 Times in 735 Posts

    tonyfoale's Tools
    Spoke nipples have small squares with a hole up the centre, so you have a small cylinder in effect with a thin wall. This means that they can distort easily when tightening, the way to control this is to use a wide close fitting spanner. I would suggest getting a quality dedicated spoke spanner. You can get these to fit a single size spoke nipple or multiple sizes.

    From your photo it looks like your spanner is very thin, your problems with it are probably more due to that than the quality of the steel. It is best to have a spanner thickness at least 8 mm to hold the nipple over as wide an area as possible.

    If you have a mill it is very easy to make one from some 8 or 10 mm steel stock, if you do not have a mill then you can do it less easily with a hacksaw, file and patience.

  6. #6
    hotdog0627's Avatar
    Join Date
    Jul 2016
    Posts
    65
    Thanks
    8
    Thanked 8 Times in 6 Posts

    hotdog0627's Tools
    thanks @eoverton ... really appreaciate it! <br> i really learn a lot from this site!

  7. #7
    hotdog0627's Avatar
    Join Date
    Jul 2016
    Posts
    65
    Thanks
    8
    Thanked 8 Times in 6 Posts

    hotdog0627's Tools
    Quote Originally Posted by Philip Davies View Post
    I am very glad to see an improvised set up like this. There are many superbly engineered tools on HMT, and my offerings are really rough in comparison. Nobody has criticised me for that, I am happy to say.
    Thanks Philip!... critisism is always helpful

  8. #8
    hotdog0627's Avatar
    Join Date
    Jul 2016
    Posts
    65
    Thanks
    8
    Thanked 8 Times in 6 Posts

    hotdog0627's Tools
    Quote Originally Posted by tonyfoale View Post
    Spoke nipples have small squares with a hole up the centre, so you have a small cylinder in effect with a thin wall. This means that they can distort easily when tightening, the way to control this is to use a wide close fitting spanner. I would suggest getting a quality dedicated spoke spanner. You can get these to fit a single size spoke nipple or multiple sizes.

    From your photo it looks like your spanner is very thin, your problems with it are probably more due to that than the quality of the steel. It is best to have a spanner thickness at least 8 mm to hold the nipple over as wide an area as possible.

    If you have a mill it is very easy to make one from some 8 or 10 mm steel stock, if you do not have a mill then you can do it less easily with a hacksaw, file and patience.
    yeah... it is only 5mm thick. I will definitely make one when I get a chance to do this again... I do have a hacksaw, file, and more importantly lots of patience
    thanks Tony!...


    2,500+ Tool Plans

Thread Information

Users Browsing this Thread

There are currently 1 users browsing this thread. (0 members and 1 guests)

Bookmarks

Posting Permissions

  • You may not post new threads
  • You may not post replies
  • You may not post attachments
  • You may not edit your posts
  •