Free 186 More Best Homemade Tools eBook:  
Get tool plans

User Tag List

Page 2 of 2 FirstFirst 1 2
Results 11 to 19 of 19

Thread: DIY Gear Cutter: The Eureka Tool

  1. #11
    robertt4522's Avatar
    Join Date
    Jan 2019
    Posts
    10
    Thanks
    5
    Thanked 46 Times in 4 Posts

    robertt4522's Tools
    If you enjoyed watching the Eureka Tool in my first video, I thought you might enjoy a bit more in depth look at the tool. I’ve made 4 more videos to give you a much more complete look at the tool. The first 2 a simply construction videos, then in the 3rd video I make a cutter from beginning to end and the last video is a more detailed look at the button tool.


    186 More Best Homemade Tools eBook

  2. The Following 10 Users Say Thank You to robertt4522 For This Useful Post:

    DIYer (May 1, 2019), DIYSwede (May 20, 2019), high-side (May 6, 2019), Home-PC (Jul 13, 2021), Jon (Apr 27, 2019), Kevic (Apr 30, 2019), NortonDommi (May 1, 2019), Scotsman Hosie (Apr 30, 2019), Seedtick (Apr 29, 2019), will52100 (Apr 29, 2019)

  3. #12
    Supporting Member NortonDommi's Avatar
    Join Date
    Jul 2014
    Location
    North Island, New Zealand.
    Posts
    990
    Thanks
    1,800
    Thanked 530 Times in 318 Posts

    NortonDommi's Tools
    I have watched these videos on you tube and would like to thank you for such an excellent and well detailed explanation and the clear filming. Truly a monumental effort and greatly appreciated.

    2,000+ Tool Plans

  4. The Following User Says Thank You to NortonDommi For This Useful Post:

    robertt4522 (May 24, 2019)

  5. #13
    robertt4522's Avatar
    Join Date
    Jan 2019
    Posts
    10
    Thanks
    5
    Thanked 46 Times in 4 Posts

    robertt4522's Tools
    Thanks a lot...I really enjoyed making this series...I really learned a lot...bob

  6. #14
    Supporting Member DIYSwede's Avatar
    Join Date
    May 2019
    Location
    Stockholm, Sweden...
    Posts
    634
    Thanks
    416
    Thanked 804 Times in 319 Posts

    DIYSwede's Tools
    Thanks a lot for these great videos and excellent workmanship! I've finally understood the inner workings of this tool.
    Now I've just gottta get my head clear enough to try to adapt that method for relieving my upcoming 38DP 20PA 14 mm dia hob project, cut on my metric mini lathe.
    Interesting problems and hard fun ahead.
    Cheers, Johan

  7. The Following User Says Thank You to DIYSwede For This Useful Post:

    robertt4522 (May 24, 2019)

  8. #15
    robertt4522's Avatar
    Join Date
    Jan 2019
    Posts
    10
    Thanks
    5
    Thanked 46 Times in 4 Posts

    robertt4522's Tools
    Thanks Johan...I made a 48DP 20PA hob to cut the gears for my thread cutting attachment featured on another of my videos...I used an end mill to cut the back relief about .0625" back from the cutting edge...I made 18 aluminum gears with that hob and they run together great...I believe I could cut CRS gears as easily with a sharpening step included...that hob was great and the type of relief the Eureka Tool creates is nice and professional looking, but you might just want to try a simple back relief and see if you like it....I have a video out on hob making too...it was one of my early videos...but you might find it helpful...no matter what...good luck and have fun cutting your gears...bob

  9. #16
    Supporting Member DIYSwede's Avatar
    Join Date
    May 2019
    Location
    Stockholm, Sweden...
    Posts
    634
    Thanks
    416
    Thanked 804 Times in 319 Posts

    DIYSwede's Tools
    Thanks, Bob for your tips and encouragement. As you say, mill relieving the hob blank's teeth is usually "good enuff", but...
    I'm thinking along the following lines:
    Relieving the rear of the hob's tooth, you (merely) mill away the teeth TOPS,
    while at the root, the flanks will still cut/ rub the top of the gear-to-be, right?
    The Eureka tool jabs the form tool into the blank - relieving the top ONLY by deepening the bottom flanks.
    Here I might be barking up the wrong tree - as the eventual rubs would be of only marginal importance?

    Now, a Eureka for hob making (though in my small scale mini lathe) would be quite a cumbersome project for my "closet shop", SO:
    I'm thinking in perhaps trying to have my rigid tool-post grinder setup with a 40 deg rotary HSS file, AND
    making a quick-and-dirty cross slide infeed eccentric synchronized w the spindle,
    so as to make this infeed 4 times per spindle rev - thus relieving ONLY the hob's bottom flanks.
    Then it would be easy to relieve the tops by merely filing axially.
    Any thought on this would be much appreciated. Johan

  10. #17
    robertt4522's Avatar
    Join Date
    Jan 2019
    Posts
    10
    Thanks
    5
    Thanked 46 Times in 4 Posts

    robertt4522's Tools
    Johan...making a hob is quite quick and easy...the plunge cuts are the only cuts that need to be right on the mark and any plunge cut on a small lathe can be a bit trying but is doable once you get a hang on it with your lathe...how you relieve the back of the teeth can be how you want to do it...I set up my hob with a tail-stock center now and form the relief with a slitting saw...I've stopped using an end mill...it does not make a better hob it just is a better set up for me...get your plunge cuts right and how you relieve the cutting edge is what works best for you...a small patch of material behind the cutting edge will rub but I've never had any problem with this...I've made several hobs and all worked very well...also the multi-tooth cutters I use for clocks have the cutting edge relieved the same way with no problems......bob

  11. #18
    Supporting Member DIYSwede's Avatar
    Join Date
    May 2019
    Location
    Stockholm, Sweden...
    Posts
    634
    Thanks
    416
    Thanked 804 Times in 319 Posts

    DIYSwede's Tools
    Thanks Bob - I guess you were absolutely right:

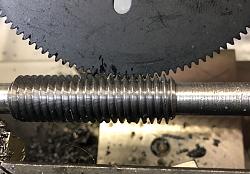
    DIY Gear Cutter: The Eureka Tool-38-dp-20-pa-14-mm-od-mild-steel-hob-test.jpg

    Proof of concept in making and checking an operational hob from a piece of BMS-
    half an hour for setup the homegrown & 3D printed 12 TPI change gears, the 20 deg compound angle and 40 deg tool,
    and another half hour in cutting, by feeding in the compound 95 thou (2,42 mm).
    Worked consistently throughout, with only minor chatter problems.
    Guess the traveling steady will help against that when all-treading the 250 mm x 14 mm drill rod, parting, relieving etc.
    Thanks for your encouragement!
    Johan

  12. The Following User Says Thank You to DIYSwede For This Useful Post:

    robertt4522 (May 26, 2019)

  13. #19
    robertt4522's Avatar
    Join Date
    Jan 2019
    Posts
    10
    Thanks
    5
    Thanked 46 Times in 4 Posts

    robertt4522's Tools
    Great stuff...very nice to see it...thanks...bob


    2,000+ Tool Plans

Thread Information

Users Browsing this Thread

There are currently 1 users browsing this thread. (0 members and 1 guests)

Bookmarks

Posting Permissions

  • You may not post new threads
  • You may not post replies
  • You may not post attachments
  • You may not edit your posts
  •