Free 186 More Best Homemade Tools eBook:  
Get tool plans

User Tag List

Page 1 of 2 1 2 LastLast
Results 1 to 10 of 20

Thread: Dirt sifter redux

  1. #1
    Supporting Member C-Bag's Avatar
    Join Date
    Aug 2015
    Location
    California, central coast
    Posts
    720
    Thanks
    689
    Thanked 879 Times in 471 Posts

    C-Bag's Tools

    Dirt sifter redux

    In looking at other parts of the forum I saw some past dirt sifters and thought I'd post my take on it.

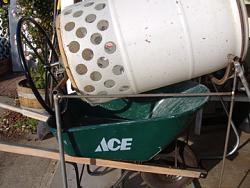
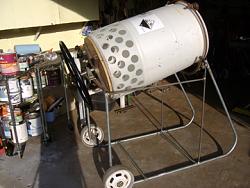
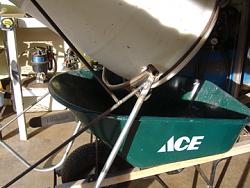
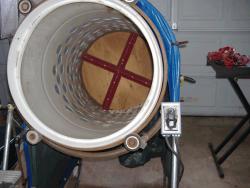
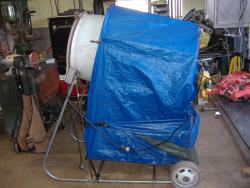
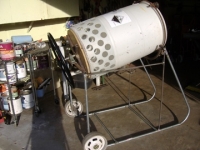
    I tried the box setup and found it too slow for the literal tons of dirt and rocks I needed to sift here. So when a friend gave me a plastic 55gal barrel the dim bulb went on. I decided to make more of a leaky cement mixer setup. I had most of the materials except the 3/4" conduit. Luckily it's pretty inexpensive. I cut two circles out of 3/4" plywood to strengthen the bottom of the barrel where the drive would be and screwed them together with deck screws. To hold the end of the barrel up I had a bunch of these sealed bearing rollers that are off a conveyor drive at the place I used to work. They had no need of them when they scrapped the conveyor so I got a bucket full of them and I use them for everything. They have some kind of heavy duty vulcanized rubber with a groove in them for the drive belt, perfect for going in the top seam of the drum to support it on the front. I also had tons of 1/2" rod that I used for the braces that hold the upper rollers and eventually to hold the improvised plastic tarp/dust shield away from the top of the drum. The holes were cut with a hole saw and then covered with 1/4" wire cloth to do the sifting.

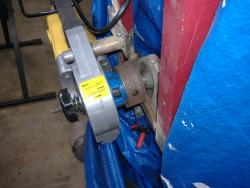
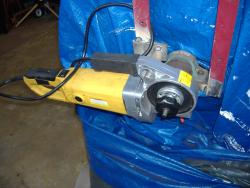
    I also had the 1" shaft and pillow block bearing along with the cull belt drum that I cut in half to make an adapter for the HFT handheld pipe threader that now powers the sifter.
    Dirt sifter redux-siftingdirt.jpgDirt sifter redux-sifter.jpgDirt sifter redux-sifterdump.jpgDirt sifter redux-downthebarrel.jpgDirt sifter redux-drive-detail.jpgDirt sifter redux-drive-detail-2.jpgDirt sifter redux-sideview.jpg

    the top three pix were the early stages to see if it would dump like I hoped. And I'd not yet tried it out so it was hand powered with the handwheel off the HFT roller I used to roll the bottom 3/4" pipe crossbrace and the ring that holds the upper support rollers. When I took off the handwheel I also had to weld on handles to move the whole thing. It actually is quite easy to move because it's pretty light and when tilted back on the handles it's balanced. That was just dumb luck.

    186 More Best Homemade Tools eBook

  2. The Following 4 Users Say Thank You to C-Bag For This Useful Post:

    Jon (Aug 12, 2015), kbalch (Aug 13, 2015), Paul Jones (Aug 12, 2015), PJs (Aug 14, 2015)

  3. #2
    Supporting Member Paul Jones's Avatar
    Join Date
    May 2014
    Location
    Del Mar, California
    Posts
    1,231
    Thanks
    5,810
    Thanked 1,461 Times in 657 Posts

    Paul Jones's Tools
    C-Bag,
    That is a really cool prototype and final design using the HFT handheld pipe threader to power it. How did you bend the 1"+ diameter pipe that holds the four roller bearings?
    Paul

    2,000+ Tool Plans

  4. #3
    Supporting Member C-Bag's Avatar
    Join Date
    Aug 2015
    Location
    California, central coast
    Posts
    720
    Thanks
    689
    Thanked 879 Times in 471 Posts

    C-Bag's Tools
    Thanks Paul.

    I have one of those HFT tubing rollers so the 3/4" pipe cross frame and the 1/2" rod were both rolled on it. If I ever get time I'm going to adapt the pipe threader to the roller too. That 40rpm that thing runs at is very handy and it's very powerful. But like most HFT's it needed some work after a while because one of the circlips in the gearbox popped off in reverse because they hadn't cut the groove for it deep enough. Luckily I heard it bog down and turned it off right away. So it didn't destroy anything and I was able to cut the retaining groove deep enough and it's been working good for a bunch of hours and yards of rock now(as he knocks on his wooden head ).

  5. The Following 2 Users Say Thank You to C-Bag For This Useful Post:

    Paul Jones (Aug 13, 2015), PJs (Aug 14, 2015)

  6. #4
    Supporting Member Paul Jones's Avatar
    Join Date
    May 2014
    Location
    Del Mar, California
    Posts
    1,231
    Thanks
    5,810
    Thanked 1,461 Times in 657 Posts

    Paul Jones's Tools
    Thanks C-Bag, and great advice about the HFT handheld pipe threader. Looks like a very handy tool.

  7. #5
    Supporting Member C-Bag's Avatar
    Join Date
    Aug 2015
    Location
    California, central coast
    Posts
    720
    Thanks
    689
    Thanked 879 Times in 471 Posts

    C-Bag's Tools
    I have not looked to see if they still carry it. It got real low ratings but I wasn't sure if it was the dies that came with it or what. After having the gearbox apart I can see if they didn't fix this problem at the factory they might all self destruct given enough time. The one I bought had been a return to a HF down south and it was in the clearance bin. Best to run it in both directions at the store to see if it has any problems because lots of times you can't return a return. It's obviously a copy of a very expensive threader for 1/10th the price. As long as you go in with low expectations and the idea you will more than likely have to work on it, it's ok. Oh and also as long as it's mechanical not electrical

  8. The Following User Says Thank You to C-Bag For This Useful Post:

    PJs (Aug 14, 2015)

  9. #6
    kbalch's Avatar
    Join Date
    Jun 2012
    Location
    Clermont, FL
    Posts
    5,034
    Thanks
    2,275
    Thanked 532 Times in 384 Posts
    Thanks C-Bag! I've added your Dirt Sifter to our Miscellaneous category, as well as to your builder page: C-Bag's Homemade Tools. Your receipt:


  10. #7
    PJs
    PJs is offline
    Supporting Member PJs's Avatar
    Join Date
    Sep 2014
    Location
    Northern CA
    Posts
    1,844
    Thanks
    8,431
    Thanked 1,129 Times in 725 Posts

    PJs's Tools
    Great build C-Bag, Thanks for sharing! Nice design with bits and scraps and of course HFT returns. Particularly liked your roller set up and the ingenious way you connected the threader...looks substantial. Curious about the Giant O-Ring on the front of the drum where the bearings are...was that part of the top seal for the drum? It's magical sometimes how things fall into place like your balance...Always worth a "Thank You" !
    ‘‘Always do right. This will gratify some people and astonish the rest.’’
    Mark Twain

  11. #8
    Supporting Member C-Bag's Avatar
    Join Date
    Aug 2015
    Location
    California, central coast
    Posts
    720
    Thanks
    689
    Thanked 879 Times in 471 Posts

    C-Bag's Tools
    Thanks PJs! I'm not sure what you mean by the big O ring. I think you are talking about the 1/2" rod ring that the upper rollers are attached to. That I rolled on the the big HFT Tubing roller. I should take some pics of it as it's also handy as a shirt pocket. It of course has been modded to do different stuff. I'm learning from you and Paul's excellent builds how to take pics. Unfortunately I never think of that until after I'm done.

    The coupler was this solid cull belt drum I cut in half. For those who have not been around fruit packing equipment it's a narrow 4" wide belt that carry's away the fruit that either too ripe or damaged to go to market and is called culls. My father in law used to make packing house equipment and had various parts laying around. So I picked up the set. 2 x 1" shafts, 2 x 3" drums and 4 x 1" pillow block bearings.

    One shaft and one pillow block are what the drive is connected to. I cut the drum in two and one end I welded 4 angle irons radiating out to be bolted into the plywood stiffener on the bottom of the plastic 55gal drum. The other half of the drum was turned into the coupler for the HFT pipe threader. If there is any interest I could pull off the tarp and try and get closer pics of the drive and the front suspension.
    Last edited by C-Bag; Aug 14, 2015 at 09:45 PM.

  12. #9
    Content Editor
    Supporting Member
    DIYer's Avatar
    Join Date
    Aug 2013
    Posts
    3,055
    Thanks
    793
    Thanked 1,892 Times in 1,687 Posts
    Cool design, and I like the use of the pipe threader as a drive source.

  13. #10
    Supporting Member C-Bag's Avatar
    Join Date
    Aug 2015
    Location
    California, central coast
    Posts
    720
    Thanks
    689
    Thanked 879 Times in 471 Posts

    C-Bag's Tools
    Thanks DIYer! I started out sifting by hand and using the big handwheel in the top pics, man did that get old quick. But it proved the concept was going to work.

    A friend said why don't you just use a variable speed drill but I knew that was going to not be heavy duty enough. I also didn't want to put some kind of motor with a belt drive, that was too complicated and bulky and it's pretty dusty. Just perusing HFT I saw that threader and saw the rpm....and the thunderclap hit. I'm itching to modify it with an easier direction switch. It's got a really cheezy recessed switch that doesn't seem very positive. But it's working and I'm not as good an electrician as I am a mechanic. I'd hate to fry it. Because it was in the return bin it was basically brand new and I got it for $100. I couldn't have come up with as nice a gear drive for that much. I also need to store it in a small shed so the motor needed to be removable, which it is because of the quick change setup. If you look close I used an old shaft, spring, washer and knob off a computer chair to hold the threader on when it's in use. Just like a magpie, I can't throw any shiny/useful stuff away. Sooner or later it finds it's new purpose

Thread Information

Users Browsing this Thread

There are currently 1 users browsing this thread. (0 members and 1 guests)

Bookmarks

Posting Permissions

  • You may not post new threads
  • You may not post replies
  • You may not post attachments
  • You may not edit your posts
  •