Free 186 More Best Homemade Tools eBook:  
Get 2,500+ tool plans, full site access, and more.

User Tag List

Page 1 of 2 1 2 LastLast
Results 1 to 10 of 17

Thread: Customizing a Unimat

  1. #1
    Supporting Member mklotz's Avatar
    Join Date
    Aug 2015
    Location
    LA, CA, USA
    Posts
    3,548
    Thanks
    363
    Thanked 6,582 Times in 2,166 Posts

    mklotz's Tools

    Customizing a Unimat

    My venerable Unimat has been converted into a decicated precision drill press/mill. I thought a review of what I did might serve to give some other folks ideas about what they can do to these clever little machines...

    Here's an overall shot of the machine...


    I mounted a fixture bar (the black bar screwed to the wooden base) so I would have a place to attach various accessories. Attached to this bar on the right is a movable aluminum block that holds a 2" DI that bears against the carriage and measures actual carriage motion (the handwheel calibrations are metric so this eliminates the need to convert).

    On the left another movable aluminum bracket arrangement holds a 1" DI bearing on an aluminum false jaw that I added to the stock Unimat vise to measure infeed. Yes, I know that extended jaw could get in the way on certain types of parts. So far it hasn't caused me grief. When it does I'll cook up some other kludge to replace it.

    The false jaw on the vise has a visible hole in it. It is located a known distance from the edge of the jaw so it can be used for locating. Because of the tiny amount of quill motion available, you can't use a conventional edge finder. In front of the black fixture bar you'll see a 1/4" bar with a precision point turned on the end and a precision 0.2" section turned on the other end. This bar can be slid into the spindle from the pulley end and out through the chuck, clamped in place, and, in conjunction with the precision hole in the vise jaw, allow all sorts of alignment trickery.

    With a short quill throw, tool changing is a problem because the Unimat is a round column device - loosening the head to raise/lower it loses all registration. To deal with this I do most of the tool changes through the pulley end of the spindle. In front of the alignment rod is another rod fitted with a magnet in a brass holder on its right end. Slide this down the spindle, loosen the chuck and the magnet grabs the tool and pulls it out through the spindle. Reverse the process to install another tool.

    Tools that won't fit through the spindle hole are dealt with differently but that situation doesn't arise very often for me. I'm mostly using tiny mills and drills.

    The quill motion is measured as follows...


    A bracket attached to the top of the Unimat column holds a DI that bears on a square aluminum tube that is secured to the aluminum pulley bracket. This latter piece is firmly screwed to the motor head so when the quill moves the spindle up and down the motion is directly communicated to this DI.

    Attaching this square tube to the bracket without making any holes in the Unimat (I had planned to sell it and wanted to keep it pristine) involved making some tiny brass clamps that were screwed to the tube.


    A further annoyance with the Unimat is the fact that when you loosen the clamp bolt that secures the power head to the round column, the head wants to slide down when all you want is to rotate it. It's also depressingly easy to let the head drop and smash a delicate mounted drill or mill into the workpiece.

    To forestall this, I built a separate clamp. When it's locked in place the head clamp can be loosened and the head rotated with out dropping. It also serves as a safety to prevent unwanted head drops.


    To lock the head in position vertically, one must tighten one of two SHCS in the head with a longish hex wrench. This is annoying and awkward. I removed one of the two screws and replaced it with an extended screw that can be operated without a wrench.


    All these improvements have made the tool a real pleasure to use. So much so, in fact, that I've given up on the notion of selling it. It doesn't take much space and has a much higher top speed than my mill.

    186 More Best Homemade Tools eBook
    Last edited by mklotz; Jul 7, 2017 at 10:09 AM.
    ---
    Regards, Marv

    Failure is just success in progress
    That looks about right - Mediocrates

  2. The Following 4 Users Say Thank You to mklotz For This Useful Post:

    kbalch (Sep 4, 2015), Lasse Sabell (Mar 23, 2016), Paul Jones (Sep 4, 2015), PJs (Sep 5, 2015)

  3. #2
    Supporting Member Paul Jones's Avatar
    Join Date
    May 2014
    Location
    Del Mar, California
    Posts
    1,231
    Thanks
    5,810
    Thanked 1,463 Times in 657 Posts

    Paul Jones's Tools
    Marv,
    Great to see another Unimat SL user and the improvements. I too have one that I purchase in 1970 and decided to make some improvements (see Homemade Lathe Modifications ). I plan to keep mine as well because there are things it does well for its size. I found replacing the factory motors with the Unimat continuous duty U-100 motors let me run this machine for hours and have no worries about burning up the motors.
    Paul Jones

    2,500+ Tool Plans

  4. #3
    Supporting Member mklotz's Avatar
    Join Date
    Aug 2015
    Location
    LA, CA, USA
    Posts
    3,548
    Thanks
    363
    Thanked 6,582 Times in 2,166 Posts

    mklotz's Tools
    Quote Originally Posted by Paul Jones View Post
    Marv,
    Great to see another Unimat SL user and the improvements. I too have one that I purchase in 1970 and decided to make some improvements (see Homemade Lathe Modifications ). I plan to keep mine as well because there are things it does well for its size. I found replacing the factory motors with the Unimat continuous duty U-100 motors let me run this machine for hours and have no worries about burning up the motors.
    Paul Jones
    Yes, Paul, it was your post that inspired me to report on my improvements. Granted, not as pretty as yours but, a few differences and the best soup is made with lots of ingredients. Hopefully, other Unimat users will expand on both your and my ideas to make the ultimate small machine.

    One of the sore points of the Unimat in lathe mode was the pivoting head stock. Great for making large angle tapers but a real b...h to realign for parallel turning. Back when I was young (early Jurassic) I bought a commercial device that clamped to the ways and used a differential screw to precisely realign the headstock. Once adjusted, it could be used without further diddling to realign whenever the headstock was moved. Are you familiar with that device? If not, I'll have to get a picture and do a write-up; it's something that wouldn't be hard to duplicate in the home shop.

    If any other Unimat users are reading what Paul and I have written, we encourage you to post and let us know about what you've done to augment the abilities of this Austrian gem of a tool.
    ---
    Regards, Marv

    Failure is just success in progress
    That looks about right - Mediocrates

  5. The Following User Says Thank You to mklotz For This Useful Post:

    PJs (Sep 5, 2015)

  6. #4
    kbalch's Avatar
    Join Date
    Jun 2012
    Location
    Clermont, FL
    Posts
    5,034
    Thanks
    2,275
    Thanked 532 Times in 384 Posts
    Thanks Marv! I've added your Unimat Customization to our Lathes category, as well as to your builder page: mklotz's Homemade Tools. Your receipt:


  7. #5
    Supporting Member Paul Jones's Avatar
    Join Date
    May 2014
    Location
    Del Mar, California
    Posts
    1,231
    Thanks
    5,810
    Thanked 1,463 Times in 657 Posts

    Paul Jones's Tools
    Yes, Marv, I am very interested in seeing a write-up about your device that clamps to the ways and uses a differential screw to precisely realign the headstock. I almost never pivot the Unimat headstock because it is such a pain to get back into alignment. Yet the pivoting feature is so cool to use so I am looking forward to seeing your solution.
    Thank you, Paul

  8. #6
    Supporting Member mklotz's Avatar
    Join Date
    Aug 2015
    Location
    LA, CA, USA
    Posts
    3,548
    Thanks
    363
    Thanked 6,582 Times in 2,166 Posts

    mklotz's Tools
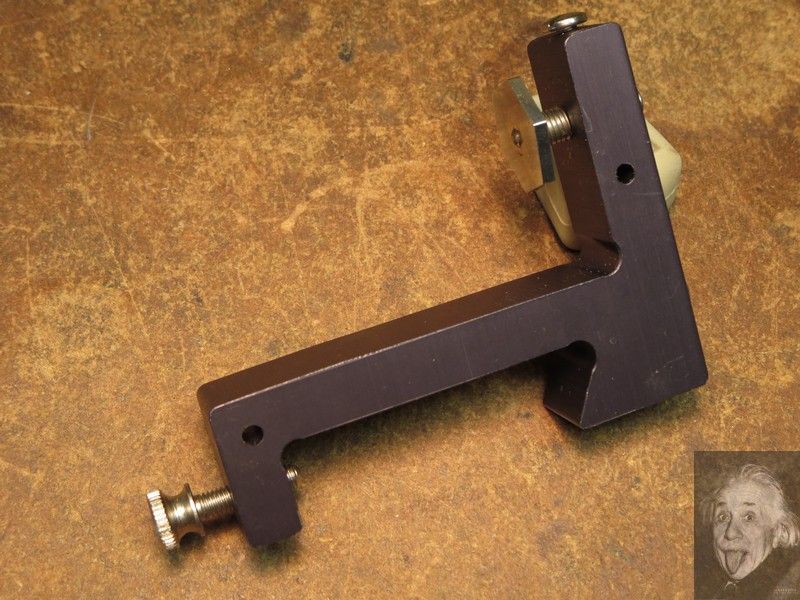
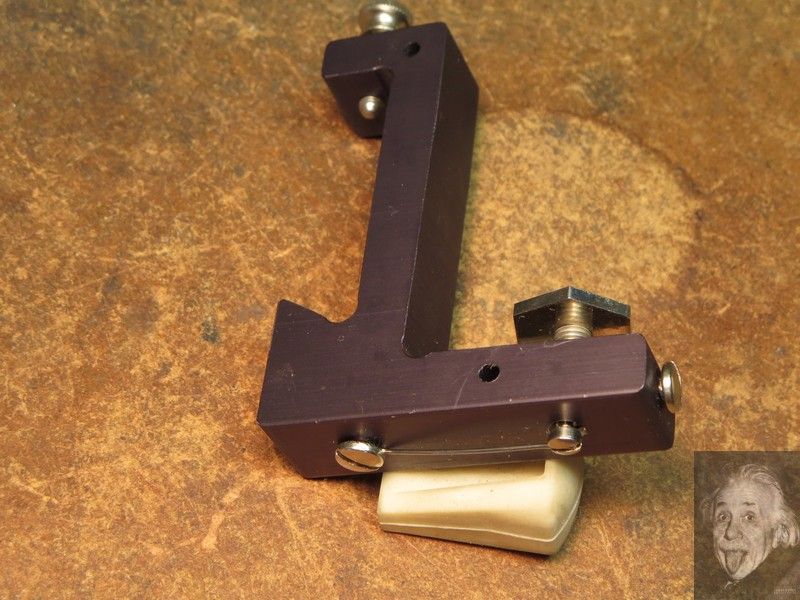
    As promised, here are some pics of the Unimat headstock alignment guide. Let me emphasize here that this tool is a commercial product made by National Camera, Englewood, CO 80110 and not something made by me. It was bought many, many years ago so I have no idea if the company still exists. That said, it's a simple enough device and any competent hobby machinist could cobble one together in a few hours.

    As is obvious from the pictures it clamps across the Unimat drill rod lathe ways and is secured in place by the small thrumb screw. The differential screw mechanism consists of a large hex-headed adjuster nut threaded 28 tpi into the frame. In the center of this adjuster, a small pusher screw is threaded 32 tpi into the adjuster and prevented from rotating by the spring lock visible on the back of the frame in the second photo.

    Thus a full rotation of the adjuster will move the pusher by:

    1/28 - 1/32 = 1/224 = 0.00446"

    so a 1/6 rotation (ie, one flat on the adjuster) will move it 0.00074"

    In use, one butts the pusher against the Unimat spindle, takes a test cut on a bit of scrap, measures the amount of taper produced and then makes a correction with the adjuster nut. This process is repeated until the taper is reduced to an acceptable level at which time the lock nut on the top of the frame is used to lock the adjuster in place. Then the next time the headstock is moved, it's a simple matter to drop the unit in place, move the spindle against the pusher, lock in place and Bob's your mother's brother.


    Last edited by mklotz; Jul 11, 2017 at 10:25 AM.
    ---
    Regards, Marv

    Failure is just success in progress
    That looks about right - Mediocrates

  9. The Following User Says Thank You to mklotz For This Useful Post:

    Paul Jones (Sep 5, 2015)

  10. #7
    Supporting Member Paul Jones's Avatar
    Join Date
    May 2014
    Location
    Del Mar, California
    Posts
    1,231
    Thanks
    5,810
    Thanked 1,463 Times in 657 Posts

    Paul Jones's Tools
    Marv, looks like a great project for Unimat lathe owners and will put on my "to do" list for future tool projects. Now, I am interested other tool designs using a differential screw mechanism. Thanks for sharing the details and photos, Paul

  11. #8
    Supporting Member mklotz's Avatar
    Join Date
    Aug 2015
    Location
    LA, CA, USA
    Posts
    3,548
    Thanks
    363
    Thanked 6,582 Times in 2,166 Posts

    mklotz's Tools
    Quote Originally Posted by Paul Jones View Post
    Marv, looks like a great project for Unimat lathe owners and will put on my "to do" list for future tool projects. Now, I am interested other tool designs using a differential screw mechanism. Thanks for sharing the details and photos, Paul
    Not that differential threads are rocket science, but if you need some guidance, try the DIFFTHRD archive on my website. It will find the pair of threads (inch and mm) that will come closest to providing an input desired pitch. It will also help you to calculate how much thread length you need to achieve a desired range of motion.
    ---
    Regards, Marv

    Failure is just success in progress
    That looks about right - Mediocrates

  12. The Following User Says Thank You to mklotz For This Useful Post:

    Paul Jones (Sep 5, 2015)

  13. #9
    Supporting Member Hemi's Avatar
    Join Date
    Mar 2017
    Posts
    79
    Thanks
    56
    Thanked 27 Times in 17 Posts

    Hemi's Tools
    -This all right here is more my speed! I got 2 of these little gems, and love them both dearly....... Used often (nearly everyday) and enjoy all the old ways of them! I just got a good ER-16 6 pcs collet set with collet chuck for mine that came with a Dividing head and fixture plate from ebay.... I also just got a complete new to me machine thats just the cats meow in a model shop, setting! (Which is what I have), so having 2 one is set up as a metal lathe, and the other a Milling machine/drill press.... I got 2 Dividing heads (both with 48 placement gearins in them) I'd like/love to get the other 2 that goes with the machine. I got a Dremel hanging between the 2 machines with a flex-Shaft attachment to use on either machine as needed powered/controlled by a sewing machine foot pedal....

    I do a lot of little model things on model cars & trucks and these mini machine centers are priceless that way! Makes so much of what I make and model possible I can't even begin to explain!

    There are a few attachments I'd LOVE to have yet for the machines, a 3 inch rotary table, and a Dremel pin-vice like holder to hold the Dremel collets as well as Dremel's 3 jaw chuck for using in the 2 machines, YES I go down THAT small on some things!

    Then to top it all off, I have a much larger Metal Lathe then the Unimats thats out of order. a Grizzly ? 7 x 14, thing came with plastic drive gears, and turning a worn socket front edge flat again to "grab" a bolt of the size it was made for, chunked off 3/4th of the teeth on I think 2 of the plastic drive gears. I wanna get new metal ones for it out of the Micro-Mark catalog when funds allow.... But because its now sat for over 3 years, its gonna need some TLC as rust has set in and I wanna get on that ASAP as I don't want to hurt the machine! (It was after all new but over 6 months old when the gearing issue happened so I couldn't return it) so...... it sets till I have the $$$$$ to go and buy the gear set in metal!

    BUT My true love of metal work falls onto the Unimats, LOVE that they can interchange so easily.... Only hitch so far I have found is that the mill table is T-Slotted with 2 different "T-Nuts" on the clampings to clamp down things to the mill table, I have to say tho, I have A LOT of attachments for these 2 machines tho. an a few things, I have 2 of because I have 2 machines! BUT, thats OK, I'm working on a rather large medicine cabinet to "house" all of it, wall mounted behind that 2 machines!

  14. #10
    Supporting Member Hemi's Avatar
    Join Date
    Mar 2017
    Posts
    79
    Thanks
    56
    Thanked 27 Times in 17 Posts

    Hemi's Tools
    Quote Originally Posted by mklotz View Post
    As promised, here are some pics of the Unimat headstock alignment guide. Let me emphasize here that this tool is a commercial product made by National Camera, Englewood, CO 80110 and not something made by me. It was bought many, many years ago so I have no idea if the company still exists. That said, it's a simple enough device and any competent hobby machinist could cobble one together in a few hours.

    As is obvious from the pictures it clamps across the Unimat drill rod lathe ways and is secured in place by the small thrumb screw. The differential screw mechanism consists of a large hex-headed adjuster nut threaded 28 tpi into the frame. In the center of this adjuster, a small pusher screw is threaded 32 tpi into the adjuster and prevented from rotating by the spring lock visible on the back of the frame in the second photo.

    Thus a full rotation of the adjuster will move the pusher by:

    1/28 - 1/32 = 1/224 = 0.00446"

    so a 1/6 rotation (ie, one flat on the adjuster) will move it 0.00074"

    In use, one butts the pusher against the Unimat spindle, takes a test cut on a bit of scrap, measures the amount of taper produced and then makes a correction with the adjuster nut. This process is repeated until the taper is reduced to an acceptable level at which time the lock nut on the top of the frame is used to lock the adjuster in place. Then the next time the headstock is moved, it's a simple matter to drop the unit in place, move the spindle against the pusher, lock in place and Bob's your mother's brother.


    This attachment setter something for the Unimat 3? As I can't see where this would work on the SL1000 or the DB200..... ????

Thread Information

Users Browsing this Thread

There are currently 1 users browsing this thread. (0 members and 1 guests)

Bookmarks

Posting Permissions

  • You may not post new threads
  • You may not post replies
  • You may not post attachments
  • You may not edit your posts
  •