Free 186 More Best Homemade Tools eBook:  
Get tool plans

User Tag List

Results 1 to 8 of 8

Thread: bench saw stand

  1. #1
    Supporting Member Floradawg's Avatar
    Join Date
    Jul 2018
    Location
    Flora, MS
    Posts
    905
    Thanks
    732
    Thanked 195 Times in 151 Posts

    Floradawg's Tools

    bench saw stand

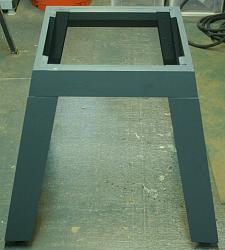
    I'm fixing to sell my old Craftsman table saw as it is loud and doesn't run very smoothly. My wife had a new Craftsman bench saw that was purchased years ago and has been in a box all this time. I really like it so I made a stand for it out of 1x4 whitewood boards. I bought 3 10' boards and that was enough. I like the way it came out and it is very sturdy and not too heavy. If anyone is interested I can post photos and details of its construction.
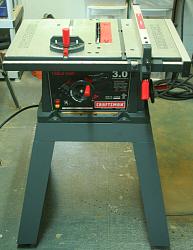
    bench saw stand-stand.jpgbench saw stand-stand2.jpg

    186 More Best Homemade Tools eBook
    Stupid is forever, ignorance can be fixed.

  2. The Following 3 Users Say Thank You to Floradawg For This Useful Post:

    bruce.desertrat (Jul 26, 2018), PJs (Jul 26, 2018), rlm98253 (Jul 25, 2018)

  3. #2
    Content Editor
    Supporting Member
    DIYer's Avatar
    Join Date
    Aug 2013
    Posts
    3,055
    Thanks
    791
    Thanked 1,880 Times in 1,677 Posts


    Thanks Floradawg! We've added your Bench Saw Stand to our Dollies and Stands category,
    as well as to your builder page: Floradawg's Homemade Tools. Your receipt:


    2,000+ Tool Plans

  4. #3
    Supporting Member bruce.desertrat's Avatar
    Join Date
    Nov 2017
    Posts
    808
    Thanks
    589
    Thanked 685 Times in 368 Posts

    bruce.desertrat's Tools
    Very nice. Is it on casters or just leveling feet? (The legs appear in the photo to be floating a bit above the floor, so I'm guessing feet of some sort)

  5. #4
    Supporting Member Floradawg's Avatar
    Join Date
    Jul 2018
    Location
    Flora, MS
    Posts
    905
    Thanks
    732
    Thanked 195 Times in 151 Posts

    Floradawg's Tools
    Thanks.

    Yes it has leveling feet. I turned them on the lathe and glued some black rubber gasket material on them. I tapped the center and put some pieces of 1/4-20 stainless allthread in them. There are pieces of steel plate on the bottom of the legs screwed in place with drywall screws that I tapped and put a hexnut on each side to lock the feet in place. 1/4-20 may sound a little small but it seems to be okay.
    Stupid is forever, ignorance can be fixed.

  6. #5
    Supporting Member bruce.desertrat's Avatar
    Join Date
    Nov 2017
    Posts
    808
    Thanks
    589
    Thanked 685 Times in 368 Posts

    bruce.desertrat's Tools
    Nice!

  7. #6
    Supporting Member Karl_H's Avatar
    Join Date
    Sep 2013
    Posts
    896
    Thanks
    660
    Thanked 475 Times in 262 Posts

    Karl_H's Tools
    "If anyone is interested I can post photos and details of its construction."

    Yes, I am interested!
    Thanks

  8. #7
    Supporting Member Floradawg's Avatar
    Join Date
    Jul 2018
    Location
    Flora, MS
    Posts
    905
    Thanks
    732
    Thanked 195 Times in 151 Posts

    Floradawg's Tools
    Okay, I cut the leg boards 21" long. It depends on the height of the finished stand and saw. Draw a simple diagram based on your saw. I wanted mine 36" because that was how tall my old saw is. I ripped half of the pieces to 3/4" narrower than the other half, or approximately 3" wide. I then glued them together with a butt joint. (see photos) I clamped them without any fasteners. When dry I sanded them on my disc sander to clean up the joints. Then I set the saw blade to about 9 degrees and cut the angle on each end. Be aware of the proper positioning of the leg before cutting the opposite angle. I left the saw blade at that angle for the remainder of the cutting. Next determine the dimensions of the boards for the saw base. Cut the angles on the end of the boards and then rip the angles on them. Rip one edge and then flip the board and rip the other edge so that the angles form a parallelogram rather than a trapezoid. These pieces are glued together as shown in the photos. Since two pieces are glued on the end grain, I drove a couple of drywall screws into them for extra strength. Drill clearance holes and pilot holes to keep from splitting the wood. I sanded the ends of the legs with the angle duplicated on my disc sander. If you do this just sand them lightly to clean up the saw cuts. I cut some pieces as shown in the photos to join the legs to the saw base. The dimensions are not important. I didn't want them to be visible but large enough to offer good support. Glue and screw with drywall screws. I added a couple of wood strips to the inside top of the long base pieces in case the screws that hold the saw in place would be close to the inner edge of the outer base pieces. I could have done without them. I cut and sanded some small wood blocks and glued them to the bottom ends of the legs to help hold the steel plates on the bottoms and also add strength to the legs at that end. I cut some angle iron down to obtain flat pieces for the plates at the ends of the legs. I drilled clearance holes for three drywall screws in each and also drilled and tapped a 1/4-20 hole for the adjusters. I didn't have any round stock big enough for the pads so I used some flat stock about 3/16" thick and cut some pieces and drilled and tapped 1/4-20 holes in the center of each. I slightly countersunk one side and screwed in a length of 1/4-20 stainless allthread and left it slightly protruding. I put on a hexnut and tightened it against the top side of the pad. The bottom side had the threaded rod sticking out about 1/16". I put it loosely in a vise around the hexnut and peened the rod into the countersink. I had cut them in an octagon shape and then chucked it in the lathe around the hexnut and anther one loosely on the other end and carefully turned them round. If you used round stock it would be much easier. I ground the peened end flat and glued on some black rubber gasket material and trimmed it around the perimeter. These ended up being installed in the bottom plates with a hexnut tightened on each side after adjusting for level. If you think 1/4-20 is a little small go up to 5/16.

    Attachment 24957Attachment 24958Attachment 24959Attachment 24960

    Attachment 24961Attachment 24962Attachment 24963Attachment 24964

    Attachment 24965Attachment 24966Attachment 24967Attachment 24968
    Stupid is forever, ignorance can be fixed.

  9. The Following User Says Thank You to Floradawg For This Useful Post:

    Karl_H (Sep 5, 2019)

  10. #8
    Supporting Member Floradawg's Avatar
    Join Date
    Jul 2018
    Location
    Flora, MS
    Posts
    905
    Thanks
    732
    Thanked 195 Times in 151 Posts

    Floradawg's Tools
    The pictures didn't show up??? Doubleclick on the attachments to see them. I don't know why that happened.


    2,000+ Tool Plans
    Stupid is forever, ignorance can be fixed.

Thread Information

Users Browsing this Thread

There are currently 1 users browsing this thread. (0 members and 1 guests)

Bookmarks

Posting Permissions

  • You may not post new threads
  • You may not post replies
  • You may not post attachments
  • You may not edit your posts
  •