Free 186 More Best Homemade Tools eBook:  
Get tool plans

User Tag List

Page 1 of 2 1 2 LastLast
Results 1 to 10 of 13

Thread: Axle bearing install tool

  1. #1
    Supporting Member Frank S's Avatar
    Join Date
    Aug 2015
    Location
    Peacock TX
    Posts
    11,628
    Thanks
    2,181
    Thanked 9,134 Times in 4,366 Posts

    Frank S's Tools

    Axle bearing install tool

    Many roller bearing axle bearings are actually a little on the delicate side when it comes to the cage holding the rollers in place after all to be fair the cages are designed to keep the roller from touching each other not to hold them in place.
    I've seen countless mechanics make the mistake of just using a cylinder of some kind that had the proper OD to drive an axle bearing into the housing. Only to find that they had knocked the rollers out of the cage. Or they will use an install tool which is part of a set of disks with a mild locating step, while thinking that because they used a tool from a multi hundred dollar set it must be the proper way to do the job.
    Not so says I,
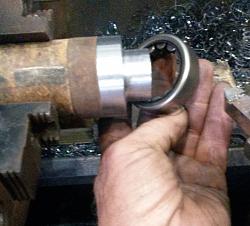
    The proper tool to install one of these bearings must have a pilot long enough to reach complexly through the bearing this prevents the rollers from possibly falling out of the delicate cage often made of plastic
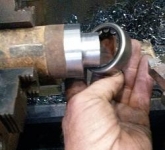
    Here is what I did first i located a scrap piece of cylinder then turned it down for the pilot
    Axle bearing install tool-20180714_204434.jpgc.jpg
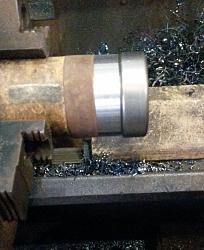
    there was no reason to turn it any further. Later I might part it off and drill the center to fit my driver handle just because it would take up less space in a box.
    Axle bearing install tool-20180714_204439.jpgc.jpg
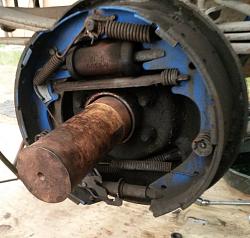
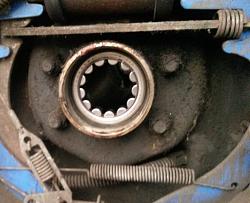
    Bearing driven home
    Axle bearing install tool-20180714_204741.jpgc.jpg
    Axle bearing install tool-20180714_204749.jpgc.jpg
    The plus side is if I polish the surface and radius the end I can use the same tool to install the seal

    186 More Best Homemade Tools eBook
    Never try to tell me it can't be done
    When I have to paint I use KBS products

  2. The Following 2 Users Say Thank You to Frank S For This Useful Post:

    PJs (Jul 17, 2018), Seedtick (Jul 16, 2018)

  3. #2
    Supporting Member rossbotics's Avatar
    Join Date
    Dec 2013
    Location
    Florida
    Posts
    731
    Thanks
    1,019
    Thanked 1,684 Times in 404 Posts

    rossbotics's Tools
    Quote Originally Posted by Frank S View Post
    Many roller bearing axle bearings are actually a little on the delicate side when it comes to the cage holding the rollers in place after all to be fair the cages are designed to keep the roller from touching each other not to hold them in place.
    I've seen countless mechanics make the mistake of just using a cylinder of some kind that had the proper OD to drive an axle bearing into the housing. Only to find that they had knocked the rollers out of the cage. Or they will use an install tool which is part of a set of disks with a mild locating step, while thinking that because they used a tool from a multi hundred dollar set it must be the proper way to do the job.
    Not so says I,
    The proper tool to install one of these bearings must have a pilot long enough to reach complexly through the bearing this prevents the rollers from possibly falling out of the delicate cage often made of plastic
    Here is what I did first i located a scrap piece of cylinder then turned it down for the pilot
    Click image for larger version. 

Name:	20180714_204434.jpgc.jpg 
Views:	266 
Size:	186.7 KB 
ID:	24757
    there was no reason to turn it any further. Later I might part it off and drill the center to fit my driver handle just because it would take up less space in a box.
    Click image for larger version. 

Name:	20180714_204439.jpgc.jpg 
Views:	253 
Size:	263.4 KB 
ID:	24758
    Bearing driven home
    Click image for larger version. 

Name:	20180714_204741.jpgc.jpg 
Views:	249 
Size:	212.4 KB 
ID:	24759
    Click image for larger version. 

Name:	20180714_204749.jpgc.jpg 
Views:	262 
Size:	177.1 KB 
ID:	24760
    The plus side is if I polish the surface and radius the end I can use the same tool to install the seal
    Good Job
    I have made a few of those things over my years

    Doug

    2,000+ Tool Plans
    Comments are always welcome
    Doug

    Subscribe to my you tube channel

    https://www.youtube.com/channel/UCDD..._as=subscriber


    Tool Plans for Sale by rossbotics


  4. #3
    Content Editor
    Supporting Member
    DIYer's Avatar
    Join Date
    Aug 2013
    Posts
    3,055
    Thanks
    793
    Thanked 1,885 Times in 1,682 Posts


    Thanks Frank S! We've added your Axle Bearing Install Tool to our Axle category,
    as well as to your builder page: Frank S's Homemade Tools. Your receipt:


  5. #4
    Supporting Member metric_taper's Avatar
    Join Date
    Mar 2017
    Location
    Marion, Iowa
    Posts
    607
    Thanks
    237
    Thanked 265 Times in 160 Posts

    metric_taper's Tools
    The beauty of having machine tools to manufacture your own assembly tools.
    I do keep running into the tools I've made, that will only be used once.
    Thanks for posting yours, as I don't see this documented.

  6. #5
    Supporting Member Frank S's Avatar
    Join Date
    Aug 2015
    Location
    Peacock TX
    Posts
    11,628
    Thanks
    2,181
    Thanked 9,134 Times in 4,366 Posts

    Frank S's Tools
    metric_taper, use them once or use them a 1000 times. the time and materials to make them pays off in saved aggravation or damaged parts is the way I look at it.
    Never try to tell me it can't be done
    When I have to paint I use KBS products

  7. #6
    Supporting Member metric_taper's Avatar
    Join Date
    Mar 2017
    Location
    Marion, Iowa
    Posts
    607
    Thanks
    237
    Thanked 265 Times in 160 Posts

    metric_taper's Tools
    Quote Originally Posted by Frank S View Post
    metric_taper, use them once or use them a 1000 times. the time and materials to make them pays off in saved aggravation or damaged parts is the way I look at it.
    Not damaging the bearing is critical to doing the repair. What I hate more is seeing the "pecker tracks" of a previous repair done with punches and hammers. It is well worth the small time to make an installation tool, even if the only time they will be used. There is a reward for doing proper repair. One being trusting to operate the machine till your end without it failing again.
    I do not do the quantity of repair that I see you post.

  8. #7
    Supporting Member Frank S's Avatar
    Join Date
    Aug 2015
    Location
    Peacock TX
    Posts
    11,628
    Thanks
    2,181
    Thanked 9,134 Times in 4,366 Posts

    Frank S's Tools
    A good friend of mine who used to work for me once said you could talk me into making or repairing most anything once just don't expect me to ever do it again. Most of that comes from learning that it is counter productive to plow the same ground twice unless approaching from another direction.
    Never try to tell me it can't be done
    When I have to paint I use KBS products

  9. #8
    Supporting Member metric_taper's Avatar
    Join Date
    Mar 2017
    Location
    Marion, Iowa
    Posts
    607
    Thanks
    237
    Thanked 265 Times in 160 Posts

    metric_taper's Tools
    I enjoy seeing the "inerds" and repairing machines as well, even correct design deficiencies. But I would not want to do repetitive work, where nothing new is learned.
    I'm good at reverse engineering most mechanical, electrical, and software machines. It does make you the 'go too' for nagging problem products. I spent my career working on avionics. Most of my peers wanted nothing to do with old designs, for me it was a challenge.

    I have one repair that didn't go well, an Onan 2 cylinder engine, 25HP.
    Any idea what tool steel makes a good exhaust valve hardened seat. The original failed in the press fit. I made a new one with Water hardening drill rod. Used a slide hammer to press it in. But it to has come loose. I'm thinking the thermal expansion is the issue, and don't know what the design should use for a press fit (tolerance) or material that will stay put for at least 1000 hours. I had the block up on the mill to make the recess round again for the seat.
    Back when I did the fix, 10+ years ago, I asked this question on the Recreational.crafts.newsgroup, with zero replies of what steel type to use for the repair. My gut tells me it should be somewhere around Rockwell C scale hardness of 60. The engine is die cast aluminum with cast iron cylinders sleeves cast in place. So the seat is in an aluminum block. It's also a flat head.
    This is one of those intellectual property issues that if you knew, you won't tell me.

  10. #9
    Supporting Member Frank S's Avatar
    Join Date
    Aug 2015
    Location
    Peacock TX
    Posts
    11,628
    Thanks
    2,181
    Thanked 9,134 Times in 4,366 Posts

    Frank S's Tools
    Well lets see for motorcycle racing engines I believe a seat made of Beryllium and copper used to be the popular seat material especially it titanium valves were used.
    98% copper for the intake and 99% for the exhaust.
    An RC of 30 to 40 would be considered a hardened seat.
    when I was doing heads for aluminum I cut for an interference fit of .004" per inch diameter of the seat OD. and froze the seat in dry ice for a few hours before installation for cast iron it was '003"
    I mostly always bought replacement seats from a vendor making them is a PITA and time consuming for the price they can be bought for. Back in the late 70's early 80's a lot of older engines needed rebuilt due to the unleaded gas debacle everyone wanted sodium filled valve stems and hardened seats plus bronze guides. the hardened seats at the time were of a high nickle content. Nickle Stainless seats are still available
    there are suppliers of oversized seats for just about every application don't worry about it being for this or that engine What they will want to know is aluminum or cast iron. and the dimensions of the valve the seat height and a rough OD you will have to have the block in your case bored to the recommended depth and size
    One note pressed powdered metal seats can explode if installed wrong Don't ask how I know. Powdered metal seats are real popular in many rebuild shops as they are readily machined their cutter lasts longer and the seal surface will be almost a mirror finish with good wear resistance
    Now I probably didn't help you one little bit but that has reached about ad deep into my memory fog as I can go
    Never try to tell me it can't be done
    When I have to paint I use KBS products

  11. #10
    Supporting Member metric_taper's Avatar
    Join Date
    Mar 2017
    Location
    Marion, Iowa
    Posts
    607
    Thanks
    237
    Thanked 265 Times in 160 Posts

    metric_taper's Tools
    You know, if you have a lathe, you can make stuff. Like all your specialty bearing and seal installation tools. It's interesting to see just how many you make to do the rebuilt correctly.
    If I went to an engine shop, they wanted to do the work and I'm a cheap bastard.
    I tried looking for COTs seats back in the day, and had zero luck. To early for the internet.

    This engine is power for a Hydro-mac skid steer of 1972 vintage. Cummins bought Onan, and quit making parts. This engine has been rebuilt at least twice before, as the pistons I bored out to 0.030, the crank bearings are 0.020 under.
    The crank grind was cheap if I recall <$80. But I bored the block on my Wells-Index vert. mill.
    It (the engine) really was a misapplication by the designer back in the day. This engine does not have ball bearings on the main, and it is needed on the PTO out, as it drives a triple V-belt to the Sunstrand hydro pump-motors. The babbit main bearing is taking the belt forces, which it was never designed for.
    It was a basket case when I purchased it, and the pig farmer that owned it before never fixed anything until it didn't move. You can see the damaged components that document this operating mode. I got it from a machinery dealer that did a Texas overhaul (paint over everything including pig manure). But I bought it, because everything was bolted on and repairable.
    I'm not trying to make a high performance racing machine, I still want to know what tool steel would make acceptable seats. However, it's making them stay in the block that is my problem. I think I could do better now with 25 more years of experience. My temporary fix was J-B weld epoxy, as it failed when I was digging out a basement for an addition I started in 2007, ran it pretty hard. Between then and now, I retired, and so would like to fix it correctly. The J-B has held up for more then 60hours. Which surprised me on an exhaust valve, and air cooled engine. Paul Harvey was right (if you ever heard his radio advert for the product). The machine now is for snow removal. I just want it to start reliably.

Thread Information

Users Browsing this Thread

There are currently 1 users browsing this thread. (0 members and 1 guests)

Bookmarks

Posting Permissions

  • You may not post new threads
  • You may not post replies
  • You may not post attachments
  • You may not edit your posts
  •