Free 186 More Best Homemade Tools eBook:  
Get tool plans

User Tag List

Page 1 of 3 1 2 3 LastLast
Results 1 to 10 of 23

Thread: Adding a morse taper to drill press.

  1. #1
    Supporting Member tonyfoale's Avatar
    Join Date
    Nov 2016
    Location
    Spain
    Posts
    1,607
    Thanks
    721
    Thanked 2,706 Times in 726 Posts

    tonyfoale's Tools

    Adding a morse taper to drill press.

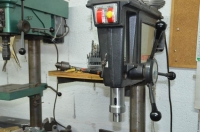
    My drill presses all had chucks on them, but all my drill bits above 13mm have morse taper 2 mountings, as do both tapping heads that I have. I could use these in the mill but that is not always as convenient as a drill press for quick jobs and for some time I thought that I should convert one of the drills to MT2 by making a new spindle. Of my drills I decided that the floor standing Craftsman drill was likely to be the best candidate for modification. I dismantled the spindle and quill with a view to just measuring up to order some material for the spindle.
    However, when it was apart I saw that it would be relatively easy to modify an R8 to MT2 sleeve to fit on the end of the existing spindle. However, the original spindle is only 5/8" diam. and the sleeve would have a lot of overhang from a small bearing on a thin shaft. Not good. I then had the idea of extending the quill (much more rigid than the spindle) to hold some larger bearings to support the MT sleeve. Then the only overhang is in the quill and new larger bearings would support the MT sleeve, leaving the spindle to only do the driving and not the supporting.
    I had two spare R8 to MT2 sleeves, one was properly hardened but the other was softer and could be machined. So I machined that to take much larger bearings, and the shortened spindle. All in all the job only took a few hours and I was able to use stuff that I had here. I am very pleased with the finished item, particularly the overall rigidity.
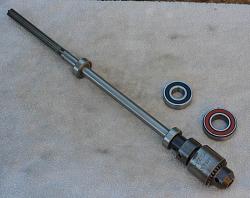
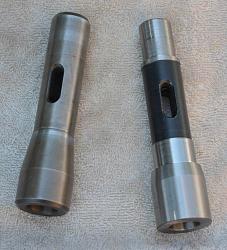
    Adding a morse taper to drill press.-drill_original_spindle_chuck.jpg Adding a morse taper to drill press.-drill_r8_to_mt2.jpg Adding a morse taper to drill press.-drill_spindle-mt2_sleeve.jpg
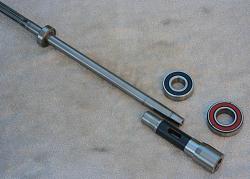
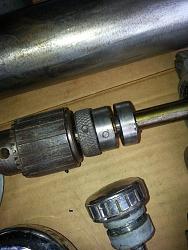
    Here is the original spindle and chuck, note the small bearings on the shaft and the new larger ones. Next the modified R8-MT2 sleeve is shown alongside an unmodified one. Finally the original shaft is shown without the chuck ready to accept the extension sleeve, note that the lower original bearing is no longer needed.
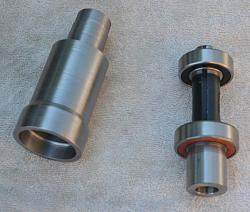
    Adding a morse taper to drill press.-drill_new_parts.jpg Adding a morse taper to drill press.-drill_quill-extension.jpg
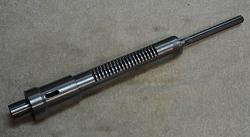
    Here we have the new quill extension with the MT2 sleeve fitted with bearings. Secondly, the original quill ready for the add-on.
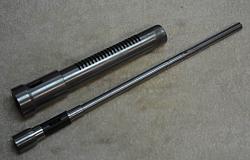
    Adding a morse taper to drill press.-drill_new_quill_spindle.jpg Adding a morse taper to drill press.-drill_new_quill_assembly.jpg
    Quill and spindle with extensions fitted, then assembled.
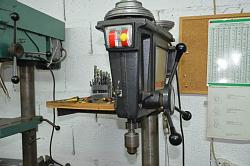
    Adding a morse taper to drill press.-drill_original.jpg Adding a morse taper to drill press.-drill_now_with_mt.jpg
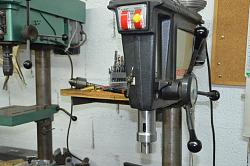
    Original chuck only drill press compared to the morse taper version.

    Now I can use it for my large drill bits as well as a chuck for smaller bits, but the reality is that most of the time it is fitted with a reversing tapping head. In practice large holes are usually make on the milling machine, smaller holes often done with another drill press and tapping with the modified one. A near perfect arrangement.
    Download plans for drilling and drill presses.
    Last edited by tonyfoale; Jan 7, 2019 at 11:34 AM. Reason: Not all pix. showed.

  2. The Following 21 Users Say Thank You to tonyfoale For This Useful Post:

    baja (Mar 6, 2020), bvd1940 (Jan 26, 2018), C-Bag (Dec 14, 2016), Captainleeward (Dec 19, 2016), Home-PC (Jan 13, 2021), jjr2001 (Dec 20, 2016), Jon (Dec 15, 2016), kboy0076 (Feb 25, 2024), mattthemuppet (Dec 20, 2016), Moby Duck (Jan 14, 2017), mr mikey (Feb 22, 2024), mwmkravchenko (May 27, 2018), Paul Jones (Dec 15, 2016), PJs (Dec 14, 2016), rendoman (Dec 20, 2016), Ropetangler (Jan 23, 2017), Seedtick (Dec 19, 2016), Stirmind (Jan 14, 2017), Tonyg (Mar 6, 2020), Toolmaker51 (Dec 17, 2016), Woodgeezr (Dec 14, 2016)

  3. #2
    PJs
    PJs is offline
    Supporting Member PJs's Avatar
    Join Date
    Sep 2014
    Location
    Northern CA
    Posts
    1,844
    Thanks
    8,427
    Thanked 1,129 Times in 725 Posts

    PJs's Tools
    Wow Tony you are gonna fit right in here! This post particularly hits home to me as I picked up a 49'-50' King Seeley/Craftsman bench press about a month ago and have been restoring it...all the while wondering how this might be accomplished. Your press looks to be 70's vintage but the 5/8" spindle and rack are almost identical.

    Unfortunately my spindle has a stop at the taper end that appears to be blind pinned. This pic is not long after I got it apart with only minor clean up.

    Adding a morse taper to drill press.-spindle-pin.jpg

    The pin doesn't show on the opposite side and I might assume it's either tapered or maybe a splined pin??

    The impressive thing about your R8 version is it doesn't add too much to the original length with the chuck which would be important for a bench model. I rarely get anything over a 1/2 bit and have used Silver Demmings once or twice in my current press but not much room for work after that. Mine has the original Jacobs 6A "0"-1/2" chuck but someone along the way spun a few bits in it so it's only good down to 1/32-3/64 now. I may see if new "0" jaws aren't prohibitively expensive. Ultimately I think the runout would be better with a good R8 but somehow really appreciate the beefy vintage of it.

    I am curious what kind of clearances you left between the rack throat and your quill extension and does it just butt up to the bottom of the old bearing recess?

    Thanks for sharing this great mod that a lot of us have thought about!! ~PJ
    Download plans for drilling and drill presses.
    ‘‘Always do right. This will gratify some people and astonish the rest.’’
    Mark Twain

  4. The Following 4 Users Say Thank You to PJs For This Useful Post:

    C-Bag (Dec 14, 2016), Paul Jones (Dec 15, 2016), tonyfoale (Dec 17, 2016), Woodgeezr (Dec 14, 2016)

  5. #3
    Supporting Member tonyfoale's Avatar
    Join Date
    Nov 2016
    Location
    Spain
    Posts
    1,607
    Thanks
    721
    Thanked 2,706 Times in 726 Posts

    tonyfoale's Tools
    Quote Originally Posted by PJs View Post
    I am curious what kind of clearances you left between the rack throat and your quill extension and does it just butt up to the bottom of the old bearing recess?
    Pressed together with an interference fit using the press in my previous post. I probably also used high strength Loctite on the surfaces but I don't remember for sure. I don't usually make any notes about such things but I do take lots of photos normally, so for these posts I have to write the text from memory.

  6. The Following User Says Thank You to tonyfoale For This Useful Post:

    PJs (Dec 15, 2016)

  7. #4
    Supporting Member Paul Jones's Avatar
    Join Date
    May 2014
    Location
    Del Mar, California
    Posts
    1,231
    Thanks
    5,810
    Thanked 1,461 Times in 657 Posts

    Paul Jones's Tools
    Tony,

    Thank you for excellent and labelled photos, and the systematic approach and explanation. Your HMT presentation is one of the best I have seen this year and a very useful project, as PJs said, for the viewers.

    Regards,

    Paul

  8. The Following 3 Users Say Thank You to Paul Jones For This Useful Post:

    PJs (Dec 15, 2016), Ropetangler (Jan 23, 2017), tonyfoale (Dec 17, 2016)

  9. #5
    PJs
    PJs is offline
    Supporting Member PJs's Avatar
    Join Date
    Sep 2014
    Location
    Northern CA
    Posts
    1,844
    Thanks
    8,427
    Thanked 1,129 Times in 725 Posts

    PJs's Tools
    Pressed together with an interference fit using the press in my previous post. I probably also used high strength Loctite on the surfaces but I don't remember for sure. I don't usually make any notes about such things but I do take lots of photos normally, so for these posts I have to write the text from memory.
    Thanks Tony, Good memory! In thinking about this last night I was thinking that adding a shoulder to fit the old 6202x5/8" bearing housing on the rack and using a bearing locker during assembly. It will however require removal of the blind pin and short of drilling it out I'm not sure how to do that yet. Then there is the quill stop set up which will require mods also. I sure like this idea and build you did...more pondering I think. Thanks again for posting this great idea.

    Your HMT presentation is one of the best I have seen this year and a very useful project
    Agreed Paul and that is High Praise considering the quality of your presentation!

    Thanks, ~PJ
    ‘‘Always do right. This will gratify some people and astonish the rest.’’
    Mark Twain

  10. #6
    Supporting Member tonyfoale's Avatar
    Join Date
    Nov 2016
    Location
    Spain
    Posts
    1,607
    Thanks
    721
    Thanked 2,706 Times in 726 Posts

    tonyfoale's Tools
    Quote Originally Posted by Paul Jones View Post
    Tony,

    Thank you for excellent and labelled photos, and the systematic approach and explanation. Your HMT presentation is one of the best I have seen this year and a very useful project, as PJs said, for the viewers.
    Thanks Paul. What is HMT?

  11. #7
    Supporting Member tonyfoale's Avatar
    Join Date
    Nov 2016
    Location
    Spain
    Posts
    1,607
    Thanks
    721
    Thanked 2,706 Times in 726 Posts

    tonyfoale's Tools
    Quote Originally Posted by tonyfoale View Post
    What is HMT?
    Forget that, I have realised what it means, dummy.

  12. The Following User Says Thank You to tonyfoale For This Useful Post:

    Paul Jones (Dec 17, 2016)

  13. #8
    Content Editor
    Supporting Member
    DIYer's Avatar
    Join Date
    Aug 2013
    Posts
    3,055
    Thanks
    793
    Thanked 1,888 Times in 1,683 Posts


    Thanks tonyfoale! We've added your Morse Taper for Drill Press to our Drilling and Drill Presses category,
    as well as to your builder page: tonyfoale's Homemade Tools. Your receipt:


  14. The Following User Says Thank You to DIYer For This Useful Post:

    tonyfoale (Dec 17, 2016)

  15. #9
    Supporting Member tonyfoale's Avatar
    Join Date
    Nov 2016
    Location
    Spain
    Posts
    1,607
    Thanks
    721
    Thanked 2,706 Times in 726 Posts

    tonyfoale's Tools
    What exactly does changing the category mean? Is it no longer part of Homemade tools? Did I post in the wrong place first?

  16. #10
    Supporting Member Frank S's Avatar
    Join Date
    Aug 2015
    Location
    Peacock TX
    Posts
    11,634
    Thanks
    2,185
    Thanked 9,134 Times in 4,366 Posts

    Frank S's Tools
    No that is a way of locating it in the future.
    Never try to tell me it can't be done
    When I have to paint I use KBS products

  17. The Following User Says Thank You to Frank S For This Useful Post:

    Paul Jones (Dec 17, 2016)

Thread Information

Users Browsing this Thread

There are currently 1 users browsing this thread. (0 members and 1 guests)

Tags for this Thread

Bookmarks

Posting Permissions

  • You may not post new threads
  • You may not post replies
  • You may not post attachments
  • You may not edit your posts
  •