Hi All
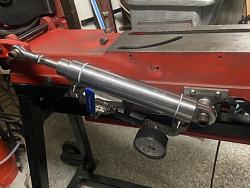
I have finally replaced the spring feed tensioner with a hydraulic system on my 6x4 bandsaw.
it took a while to purchase all the bits as I didn’t want to spend to much on the project and wasn’t in a rush to finish it. The overall cost was £65 for all the bits. The only fitting I made was a thread nipple to ensure I could keep all the fittings between the inlet and outlet ports on the cylinder.
The ram is a pneumatic cylinder as hydraulic rams are really expensive in the UK. The working pressure of this system is well within the working rated pressure of the pneumatic cylinder.
I didn’t intend on fitting a pressure gauge. But after thinking about it, I thought it would be good opportunity to see what pressure is on the blade and find out what pressure works best on different materials. Once happy with cut, a cutting pressure table can made for feed pressure for different materials. This should also indicated when the blade need’s replacing due to an increase in pressure when the blade is worn. (not sure if this will be the case but will be interested to see).
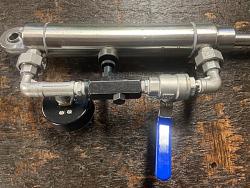
The needle valve is fitted with a check valve, so the saw frame can be lifted with the needle remaining set at the required pressure feed rate. The 1/4 turn ball valve can then be used to close the oil flow. This allows the frame to be lifted and not travel down at the set needle valve rate. This is important for setting the stock material in the correct position in the vice for cutting.
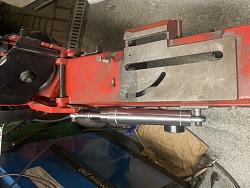
The cylinder is set so the main body of the ram/ cylinder is below the stock material to try and prevent swarf landing on the ram and damaging the seals.
The idea of this project is to maintain a constant feed rate and not allow gravity to take over and put more pressure on the blade. This system also allows the frame to be held without dropping while setting up the stock to be cut.
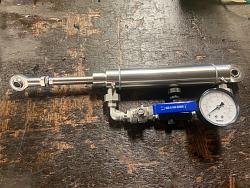
The blue handle is the 1/4 turn ball valve next there is a needle valve/check valve and then the pressure gauge.
photo shows the complete assembly which I tried to keep as compact as possible.
The photos below show the assembly fitted to the saw.

I am currently working on several other improvements to the saw and will post on HMT once completed and will make a YouTube video of all the changes made to the saw.
Hope this of interest
The Home Engineer


 LinkBack URL
 About LinkBacks


 Reply With Quote


Bookmarks