Free 186 More Best Homemade Tools eBook:  
Get tool plans

User Tag List

Page 3 of 4 FirstFirst 1 2 3 4 LastLast
Results 21 to 30 of 39

Thread: 4ft hydraulic plate roll

  1. #21
    Supporting Member metric_taper's Avatar
    Join Date
    Mar 2017
    Location
    Marion, Iowa
    Posts
    612
    Thanks
    238
    Thanked 266 Times in 161 Posts

    metric_taper's Tools
    Quote Originally Posted by Frank S View Post
    No need to neutralize the reason for keeping the surface/s being treated wet for a time is to aid the process in devouring the rust,
    Here's one good way first if you have heavy rusted surface that has large built up amounts of layered rust If at all possible chip or brush off any chucks of rust that you can wire brush the area to remove more loose rust. I have a pneumatic needle scaler that does a great job just like removing flux from welds. Also have cup brushes for angle grinders that I sometimes will don a respirator goggles and a full face mask to lightly go over the entire area. But not always sometimes I will simply wash large sheet metal areas with water to remove as much loose dust and any rust that will readily wash away. then blow dry to evaporate the excess water I don't worry about getting the parts completely dry.
    I am almost positive a small 1qt hand sprayer was included in your order I know it did if it was sent by Eddy from his warehouse stock but there have been times when products have been drop shipped from the factory that these sprayers have been left out. If you did not receive one you can locate his phone number on his site or PM me with your info such as phone number and email and within 24 hrs I will see that he gets your information he will call you within an hour after I call him usually while I'm still on the phone with him.
    Ok, fill the sprayer adjust the nozzle to a fine mist spray the surface until it looks wet ( when I am spraying say a floor pan by the time I get it covered I will start at the beginning again and do this until the whole surface remains glistening with moisture then what I do to save time and product is I cover the area when ever possible with plastic film the stuff you use to wrap sandwiches in or the 18 to 24 inch wide shrink wrap film you don't have to stretch it tight just lay the film over the areas then check back in an hour or so if it still looks wet forget about it for a while Depending on how badly the area is corroded will depend on how many applications you want to use once it gets to bare metal there will be no further reactions. Disclaimer if doing this on aluminum surfaces certain alloys of aluminum will continue to etch even after all corrosion is gone if you keep renewing the process but if allowed to dry any further eching stops.
    I have sprayed badly corroded lamp sockets like the old 1157 stop/ taillights that were so bad it was impossible to remove the bulbs and if the bulbs were good after a couple sometimes a few hours of treatment the light would begin working when power was applied to them sometimes without ever removing the bulb.
    I have tossed nuts and bolts in a plastic or glass container of the stuff left them over night the next day the color will have all been faded to a dirty clear simply pour out the bolts spread them on a cloth then re use them.
    For rusted on stuck nuts and bolts I have tried little experiments like holding a plastic tube over them filling it with the product then taped the tube in place of have pre glued them in place left the product over night to do its work then the next day unscrewed the bolts sometimes helping them along with a little lubricant.
    Hope this gives you some useful info.
    Yes, I got the spray bottle with the order.
    I did start out yesterday with a large cup wire wheel on my 7" Milwaukee grinder. And full dust mask and eye shield. I removed all the surface flaky rust. It is pitted pretty bad from salt that got under the original weathered rubber floor mat. This mat was falling apart when I removed it last week. And per your earlier description, I washed the loose dust off first. Then I sprayed on the product and covered with Glad brand plastic wrap (had a box in the kitchen). I kept rewetting this through most of the day every hour or so. I just got up in the middle of the night here, and washed the black iron phosphate off the surface, then reapplied the rust blast product again. I'm not seeing any bare metal yet.

    I like the suggestion of dripping the product onto a corroded bolt. I had just such a bolt on the left front steering linkage that attaches to the spindle. I was using PB Blaster (un impressed) as well mix of ATF and acetone (also didn't work) after two days. I did make a soft metal punch as the bolt sticking out was 1/2", so I counter bored a 1" piece of aluminum round bar. And ran a boring bar to relieve the inside edge so it would only push near the center of the bolt. I did mushroom the aluminum, it finally broke free, and I saved the bolt. I did have to run a die on the NF threads, and put a new clean chamfer on the edge (used a brass hammer initially, didn't like seeing the bolt distressed), as well redrill the cotter key hole. I'm going to sand blast the bolts and nuts.

    I'll keep reapplying product through the day. I probably should have bought their detergent degreaser, as they really have a system for improving the outcome.

    We shall how much bare metal I can recover. The ultra pitted stuff needs to be cut out and replaced. Should be a fun location to TIG weld.

    186 More Best Homemade Tools eBook

  2. #22
    Supporting Member Frank S's Avatar
    Join Date
    Aug 2015
    Location
    Peacock TX
    Posts
    11,635
    Thanks
    2,186
    Thanked 9,134 Times in 4,366 Posts

    Frank S's Tools
    If you decide later to try their aquaclean I found it works best when diluted with 'HOT' water,
    Waiting an hour between initial applications of the rust blast was not frequent enough in my opinion. I like starting out with re aplications every few minutes up to 15 or 20 minutes apart doing it 3 or 4 times then covering and forgetting

    2,000+ Tool Plans
    Never try to tell me it can't be done
    When I have to paint I use KBS products

  3. #23
    Supporting Member metric_taper's Avatar
    Join Date
    Mar 2017
    Location
    Marion, Iowa
    Posts
    612
    Thanks
    238
    Thanked 266 Times in 161 Posts

    metric_taper's Tools
    Frank, It's true, I've not been proactive on applying the rust blast. There's just too many things to do around here. And loosing sunlight puts me in overdrive.
    I know I'm doing this restoration wrong. It should be a total tear down, the term I've heard around here is a "Texas overhaul" where paint is slapped on to make it look newish. But that's probably derogatory to some.
    I just finished taking the clutch pedal and linkage out, as it was preventing working further under the cab on the frame. That and the holes in the floor were dripping rustblast onto the clutch mechanisms.

    What I've been finding working better is taking a scrub brush and hitting the area being worked then applying more rustblast. I have a few areas now of gray sheet metal.
    I need to go and apply some more now. This probably is a many day task to get to where it needs to be. It is a very thin coating of chemicals versus the very thick rust.
    I need to get a needle scaler, as a cup wire wheel does not do well with the very rough surface.

  4. #24
    Supporting Member metric_taper's Avatar
    Join Date
    Mar 2017
    Location
    Marion, Iowa
    Posts
    612
    Thanks
    238
    Thanked 266 Times in 161 Posts

    metric_taper's Tools
    Frank; As I've seen your posts on your pickup body repair, you've gone down this path of restoration, that I've never been.
    What is the tools and tricks to separate seams between sheet metal body panels. In my case it is seams between the floor panel and side panels. I need to remove the rocker panel on both sides. This panel is also a step up into the cab on the 55-57 truck cabs. I don't see simple spot weld dimples to drill out. I would like to keep the metal joints lapped over each other as original build. The youtube videos I see use a plasma cutter and then they MIG the new parts in making a butt weld. I want to use pop rivets to temporarily fixture the parts in place, then I can TIG weld them. If I have to, I will buy a MIG machine, shouldn't be too expensive as I'll only use it on sheet metal, a low current model.
    There must be some thin profile chisels used to separate panels at their seams. I'm just not familiar with doing this.

  5. #25
    Supporting Member Frank S's Avatar
    Join Date
    Aug 2015
    Location
    Peacock TX
    Posts
    11,635
    Thanks
    2,186
    Thanked 9,134 Times in 4,366 Posts

    Frank S's Tools
    There are several ways to go about this one way if you cannot locate the spot-welds would be to slice away the panel you are replacing leaving the lap joint intact you would then have just a 1/2 to 3/4Inch strip of the old panel left. At this point you have a few options One is what a professor showed me while he and I were teaching a couple of concurrent college courses to military personnel over in Germany. He was teaching body shop while I was instructing a course in Automotive chassis and suspensions I was supposed to be taking the course I was instructing but what I would often do was to challenge the final exam on a course then depending on how high I scored I would simply get the credit hours instead of having to sit through months of boring meaningless (to me) lectures. I would then Assist DR. Tulla in one or more of the courses this way he could cram in 2 or sometimes 3 additional courses on the docket per semester. I got my credit hr's and earned enough money to pay for my challenges + put some spare change in my SGT E5 pocket at the same time.
    Anyway about the little trick he showed me on older vehicles back when body and seam fits were never perfect he said you could get away with a 1/16" deviation in layer height. when the panel was not a crucial side skin having to match perfectly with an adjacent panel so at those times when doing crash repairs he might actually leave the thin offending strip in place.
    His repairs would turn out looking factory and only someone like me or him or a persnickety inspector would ever know the difference.
    Note I don't do this because to me the additional layer of metal left in place is a potential new place to cause problems.
    When I cannot use my rivet drills to drill out the spot welds I slice off the bad panel as close to the lip of the adjoining panel then use an air chisel to separate them Usually once I start chiseling between the edges the spot dimple will show up then drilling it out saves a lot of time trying to cut it away with the chisel or damaging the lip of the panel I want to re attach a new patch panel to. I then grind away any burs or parts of the strip or welds and reform the offset in the edge.
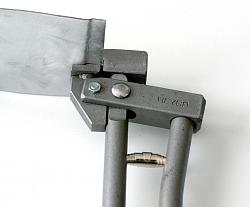
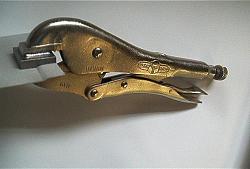
    Sometimes when sectioning in a patch like on the skin of a roof where I am doing away with a moon roof or other patch sections where I am only using a part of a replacement panel what I do is to form an offset in the edge to the panel that the new piece will be attached to by using a sheetmetal edge offset tool like one of these
    I like one similar to this one best as it is faster and offers more leverage. You can make one fairly easy from taking a close look at the picture
    Click on pics to expand
    4ft hydraulic plate roll-absetzzange-blech.jpg
    4ft hydraulic plate roll-001-edge-offset-tool.jpg
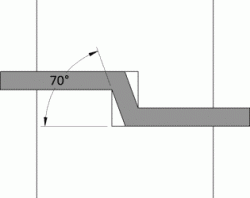
    This is the desired profile which is the thickness of the sheet you are adding and about 5/8" wide.
    4ft hydraulic plate roll-maximum-offset-angle.gif
    You will also want to practice straightening the edge lip to be as near flat and straight or curved which ever the case may be to match the profile of the patch. and the profile of how the original should look. I use shaped anvil dolly and a planishing hammer I don't swing and beat on it just grip the handle between thumb and fore finger then rapidly rock the hammer I can almost imitate the sound of a pneumatic hammer sans the escaping air and the noise of the piston rattling back and forth.
    good luck and any help needed or advice requested if I know the answer I'm happy to share.
    (IF I DON"T KNOW THE ANSWER I am real good at making things up LOL
    Last edited by Frank S; Aug 15, 2019 at 09:50 PM.
    Never try to tell me it can't be done
    When I have to paint I use KBS products

  6. #26
    Supporting Member Frank S's Avatar
    Join Date
    Aug 2015
    Location
    Peacock TX
    Posts
    11,635
    Thanks
    2,186
    Thanked 9,134 Times in 4,366 Posts

    Frank S's Tools
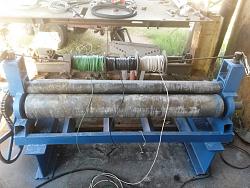
    Since I'm waiting on my sheet steel to arrive to make the air tanks out of on my plate roll I discovered another use for it
    I'm pulling some circuits in my 53 ft shipping container to run some of the equipment in there
    the Plate roll was just sitting there so I grabbed a length of 3/8" rebar slid it through the holes for the top roll adjusting screws and hung 3 rolls of 10 ga wire on it

    4ft hydraulic plate roll-20190902_091552er.jpg
    Never try to tell me it can't be done
    When I have to paint I use KBS products

  7. #27
    Supporting Member metric_taper's Avatar
    Join Date
    Mar 2017
    Location
    Marion, Iowa
    Posts
    612
    Thanks
    238
    Thanked 266 Times in 161 Posts

    metric_taper's Tools
    Quote Originally Posted by Frank S View Post
    Since I'm waiting on my sheet steel to arrive to make the air tanks out of on my plate roll I discovered another use for it
    I'm pulling some circuits in my 53 ft shipping container to run some of the equipment in there
    the Plate roll was just sitting there so I grabbed a length of 3/8" rebar slid it through the holes for the top roll adjusting screws and hung 3 rolls of 10 ga wire on it
    10AWG, that's a tough pull, now I see why you ran 1" conduit.
    I made the mistake of running 3/4" EMT on my garage build 30 years ago, I pulled up to 12 (the max) 12AWG TW insulated wires, that was too much work, and I did it solo. I swore if I ever run conduit again I would only use 1".

  8. #28
    Supporting Member Frank S's Avatar
    Join Date
    Aug 2015
    Location
    Peacock TX
    Posts
    11,635
    Thanks
    2,186
    Thanked 9,134 Times in 4,366 Posts

    Frank S's Tools
    Quote Originally Posted by metric_taper View Post
    10AWG, that's a tough pull, now I see why you ran 1" conduit.
    I made the mistake of running 3/4" EMT on my garage build 30 years ago, I pulled up to 12 (the max) 12AWG TW insulated wires, that was too much work, and I did it solo. I swore if I ever run conduit again I would only use 1".
    I ran parallel conduits 1"into 6x6x4 J boxes and 3/4 into 4x4x2 boxes the 3/4 has my 120v lines such as for future duplex drops and lighting. another reason for running parallel is because I may 1 day go 3 ph. Since My panel is already a 200 amp 3ph panel I'm just not using the center lug at this time. if I do go with 3 ph which is most likely as most of my machines are 3 ph I'll set a secondary panel then pull all of my single ph stuff over to it move a few wires around and add colored tape to the ones that need it then I can have what ever voltage the electric company will provide which will probably be 240 according to what the line men told me when they dropped a quad 000 service line to the pole. then hung 00 service drop to my meter. while they were setting the pole I relocated my meter and pulled 000 coper from the base into my 200 amp service panel in the house. and 00 to the outside 125 amp disconnect that currently feeds my shop they drove a 20 ft ground rod near the meter for me and connected a #4 bare copper earth wire, as the house had never had one where the meter had previously been located.
    Never try to tell me it can't be done
    When I have to paint I use KBS products

  9. #29
    Content Editor
    Supporting Member
    DIYer's Avatar
    Join Date
    Aug 2013
    Posts
    3,055
    Thanks
    793
    Thanked 1,888 Times in 1,683 Posts


    Thanks Frank S! We've added your Hydraulic Plate Roller to our Metalworking category,
    as well as to your builder page: Frank S's Homemade Tools. Your receipt:


  10. #30
    Supporting Member Frank S's Avatar
    Join Date
    Aug 2015
    Location
    Peacock TX
    Posts
    11,635
    Thanks
    2,186
    Thanked 9,134 Times in 4,366 Posts

    Frank S's Tools
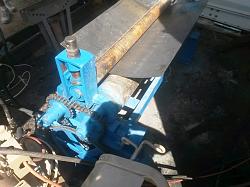
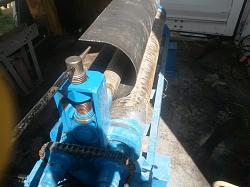
    I finally got around to hooking up my power unit to the plate roll.
    As I suspected even with the almost 10 to 1 reduction I still need to reduce it further but it works fine
    4ft hydraulic plate roll-20190917_121957cx.jpg

    4ft hydraulic plate roll-20190917_122644cx.jpg
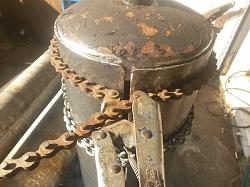
    The ID is 8" so that should have been 25.132" length required to roll but knowing there is some shrinkage I cut the sheet at 25.250" forgetting that I should have allowed at least double the thickness of the sheet instead of allowing only a single thickness. for the next one I will cut the sheet at 25. 400 hopefully this will leave me with a gap of 0.060to 0.090" to weld up instead of the 0.250" I have now which is no problem it will just tale as little longer to weld is all

    4ft hydraulic plate roll-20190917_173515cx.jpg
    This video shows the speed as you can see it is a little fast for doing tight small rolls by yourself
    Never try to tell me it can't be done
    When I have to paint I use KBS products

Thread Information

Users Browsing this Thread

There are currently 2 users browsing this thread. (0 members and 2 guests)

Bookmarks

Posting Permissions

  • You may not post new threads
  • You may not post replies
  • You may not post attachments
  • You may not edit your posts
  •