Free 186 More Best Homemade Tools eBook:  
Get tool plans

User Tag List

Results 1 to 5 of 5

Thread: 3D-Printable thumbscrews for 7x10/14/16 Minilathe change gear cover

  1. #1
    Supporting Member
    Join Date
    Nov 2017
    Posts
    401
    Thanks
    38
    Thanked 209 Times in 116 Posts

    Elizabeth Greene's Tools

    3D-Printable thumbscrews for 7x10/14/16 Minilathe change gear cover

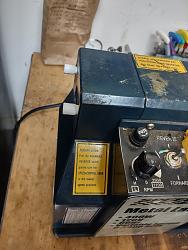
    These are knobs for thumbscrews to make it easier to install and remove the change gear cover on my Homier 7x16 Minilathe.

    (This stretches the definition of a homemade "tool", but I'm going to have a whole series on mini-lathe stuff so it made sense to put it here too.)
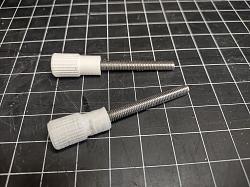
    3D-Printable thumbscrews for 7x10/14/16 Minilathe change gear cover-gear-cover-thumbscrews-assembled.jpg 3D-Printable thumbscrews for 7x10/14/16 Minilathe change gear cover-gear-cover-thumbscrews-installed.jpg

    To make these, I printed them in PLA with the threaded hole facing up. This hole has modeled threads, but depending on your printer's tolerances and tuning you may have to drill and tap the holes for M5-0.8. (I did).

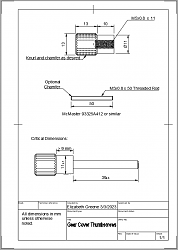
    Each thumbscrew requires a piece of M5-0.8 threaded rod 50 mm long. McMaster-Carr 93805A636 would work, but I was able to source threaded rod locally at a significantly lower cost (Ace Hardware - Midwest Fastener Brand, 100mm $1.95). The threaded rod is permanently affixed to the handle with Loctite Blue 242. Other adhesives would also work, e.g. epoxy, The 242 is what I had at hand.

    Small parts printed with FDM may deform if your printer is too fast to allow sufficient cooling between layers. This is visible in the picture above as a wavy deformation in the print. Reducing the print speed addresses this issue.

    A .pdf drawing and the Fusion 360 .f3d files are on my GitHub at https://github.com/ElizabethGreene/M...%20Thumbscrews if you'd like to reproduce this in another material. (Turned brass would be pretty.) If you make one that way, only the last ~10mm of the rod needs to be threaded.

    3D-Printable thumbscrews for 7x10/14/16 Minilathe change gear cover-gear-cover-thumbscrews-bpo.png

    Discussion:
    I tried making one of these as one piece in steel (including the threads) and it didn't go well. Holding the round bit below the handle in the chuck I was able to turn down the threaded portion to fit a die, but (as I'm sure you guessed) there was a significant amount of deflection in that loooong skinny bit sticking out so far from the chuck. That diameter (~4.5 mm) is too small to hold a live/dead center though. How would I support that? I have a follow rest, but it's still packed in 20-year-old cosmoline.

    Thinking about it now, I guess I could hold the stock with ~10 mm sticking out, turn that down to the diameter to be threaded, then pull out another ~10mm, turn that, pull out more, repeating, but I only have a 3-Jaw and I'd struggle to maintain concentricity. I guess strict concentricity isn't absolutely required, it would just be cosmetic.

    Offer:
    If you don't have a 3D printer and want a couple, PM me and I'll print you some.

    186 More Best Homemade Tools eBook

  2. The Following 6 Users Say Thank You to Elizabeth Greene For This Useful Post:

    Inner (Mar 7, 2023), Jon (Mar 7, 2023), metric_taper (Mar 12, 2023), rlm98253 (Mar 6, 2023), saguaro (Mar 7, 2023), Scotty1 (Mar 6, 2023)

  3. #2
    Content Editor
    Supporting Member
    DIYer's Avatar
    Join Date
    Aug 2013
    Posts
    3,055
    Thanks
    793
    Thanked 1,885 Times in 1,682 Posts


    Thanks Elizabeth Greene! We've added your Thumbscrews to our Fastening category,
    as well as to your builder page: Elizabeth Greene's Homemade Tools. Your receipt:


    2,000+ Tool Plans

  4. #3
    Supporting Member Toolmaker51's Avatar
    Join Date
    Feb 2016
    Location
    Midwest USA
    Posts
    5,334
    Thanks
    7,044
    Thanked 3,011 Times in 1,900 Posts

    Toolmaker51's Tools
    Quote Originally Posted by Elizabeth Greene View Post
    <<<snipped>>>turn down the threaded portion to fit a die, but (as I'm sure you guessed) there was a significant amount of deflection in that loooong skinny bit sticking out so far from the chuck. That diameter (~4.5 mm) is too small to hold a live/dead center though. How would I support that?
    Available to buy them? Now put to use as intended?
    Sounds homemade to me. All thread isn't cheating, it's expedient.

    To turn such parts, a follow rest is a solution but cumbersome; I'd suggest it's little brother "box tool". Commercial versions aren't turret lathe only, you could make one, toolholder mounted.
    Sincerely,
    Toolmaker51
    ...we'll learn more by wandering than searching...

  5. #4
    Supporting Member Saltfever's Avatar
    Join Date
    Apr 2012
    Location
    NorCal
    Posts
    401
    Thanks
    402
    Thanked 140 Times in 100 Posts

    Saltfever's Tools
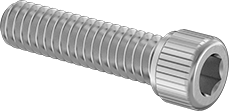
    Since you are 3D printing them I assume only moderate torque is being applied in use. Just buy socket head screws the correct size. Turn some knobs from aluminum and drill a hole with an interference fit to the socket head. Squeeze them together in a vise.

    If you search enough you will find some with serrations around the head. That will greatly enhance the "bite" (i.e., press fit).

    Name:  socket head.png
Views: 708
Size:  13.5 KB
    Last edited by Saltfever; Mar 6, 2023 at 06:57 PM. Reason: added pic

  6. The Following User Says Thank You to Saltfever For This Useful Post:

    uv8452 (Mar 7, 2023)

  7. #5
    Supporting Member
    Join Date
    Oct 2019
    Location
    Germany
    Posts
    130
    Thanks
    484
    Thanked 100 Times in 36 Posts

    uv8452's Tools
    Yes! And make the bore large enough so that an Allen key still passes.


    2,000+ Tool Plans

Thread Information

Users Browsing this Thread

There are currently 1 users browsing this thread. (0 members and 1 guests)

Bookmarks

Posting Permissions

  • You may not post new threads
  • You may not post replies
  • You may not post attachments
  • You may not edit your posts
  •